
FIVE NOT-SO-EASY PIECES
These sturdy shop fixtures are built to last.
SHOP OWNER: Ray Haggerty
LOCATION: Bethlehem, PA
Here are some pictures that may help and inspire some fellow woodworkers with the design of their shop tools. I confess that I get as much pleasure out of designing shop tools and making my shop more fun and functional as I do making custom furniture and restoring/repairing antique furniture for friends and family. Fortunately for me, the wood is often provided for these projects.
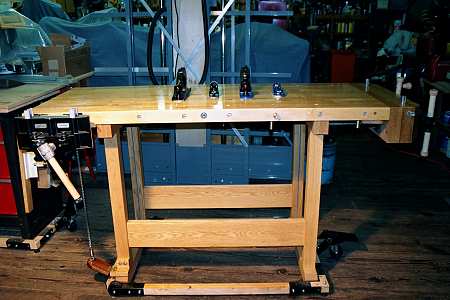
Butcher Block Bench
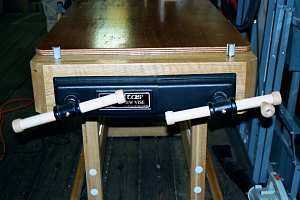
The first two pictures (above and right) are of the workbench I built from the 2 1/4 inch laminated maple slabs obtained from the Lehigh Valley Woodworking Guild source last spring. The base is built with truss-rod construction using white oak. White oak is also used for the cheeks of the Veritas Twin-Screw End Vise. I added a Veritas Tucker Patternmaker's Vise to the front end.
Dog holes are in two rows on the top of the bench and vise and also on the sides of the bench and vise to provide plenty of clamping versatility. An overlay top provided a hole-free, protective work surface for certain projects.
Finally, I decided to make this bench mobile so I can put it where I need it for a given project. I assure you it does not move when the rolling mechanism is released! As a final touch, I added Frank Klausz "oil cup" and handsaw cut-off flip-stops for both western and Japanese saws made from black walnut.
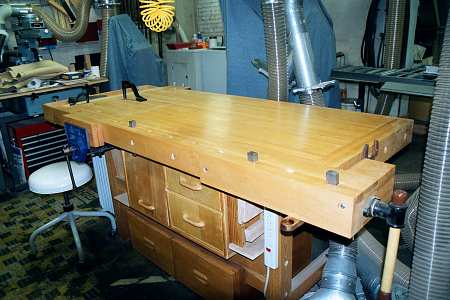
Monster Bench
The next picture shows my original workbench that I built and laminated entirely myself. It took me about two years to finally get it right.
The top is made from maple and is a solid 4 in. thick all the way across the 36-in. width by 72-in. length. It has a removable tool tray on one end that I fasten with modified, recessed bed-rail fasteners.
There is a large Record vise on the front of the bench and a smaller Record vise on the opposite side. Round dog holes in line with the smaller vise provide for cross clamping and allow for the hold-downs. I also purchased the German Tail Vise and enjoyed the challenge of customizing it to my bench. I use full-size Ulmia square bench dogs with this vise.
The base of the bench is made from white oak and the legs are laminated to 3 inches square. The top sits on bridle tenons and is so heavy that it does not require fastening to the base. It has never moved yet when I work on it, which is not surprising since it took four people to lift the top onto the base.
I later added the black walnut saw flip-stops and Frank Klausz "oil-cup." Finally I added drawers, breadbox doors and electrical strips to both ends. Overhead compressed air and electrical supply complete the set-up.
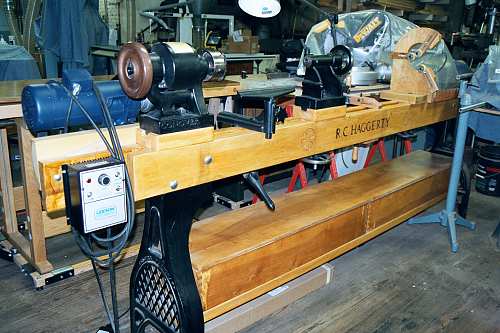
Conover Lathe
The next picture shows my Conover Wood Lathe. It has a 10-ft.-long bed made from 8-in.-wide poplar into which I carved my name and some rosettes. Tool storage is provided below. I pillow-blocked the head stock and tail stock to increase the swing over the bed to 20 inches. You can quickly move the motor and headstock to the other end of the lathe for outboard turning. I built the wooden steady rest shown using in-line roller blade wheels for non-marring support. The heart of the lathe is the Leeson 1 1/2-HP DC reversible, variable-speed motor and the Oneway Stronghold Chuck. For outboard turning, I welded the steady rests shown in the photograph. Again, it doesn't move!
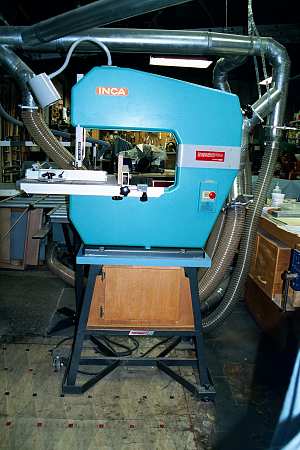
Inca Bandsaw Stand
I really like the way my Inca 20-inch bandsaw adapted to the HTC mobile base beneath. It puts the saw at an ideal height for me when I added the Formica laminated blue top. Later, I decided that I wanted tool and blade storage beneath so I added the enclosed plywood panels and spring-closing doors. I also added the 2-in. riser block to give me 10 in. of vertical height for the saw. This may be a 3-wheel bandsaw but I have no trouble with it tracking very accurately. It is driven with a 1 1/2 HP motor.

Modified Rousseau Router Table
Finally, here are two pictures of my Rousseau--American Woodworker--Norm Abrams--Fred Matlack router table (I think I got all the credits here and apologize if I missed anyone). Very simply, I purchased a Rousseau router table and top and metal base cabinet but then realized that much more was possible. Rather than start over, I began cutting out sheet metal and adding wood as appropriate and necessary.
One unique feature that I incorporated was the integral adjustable roller supports that extend about 40 in. beyond the sides of the table top. They are very handy when routing long stock.
I purchased a metal track to recess into the top for a miter guide, but a conversation with Fred Matlack and Bob Tinsman at our guild meeting convinced me that this would weaken the top structurally, possibly compromising its support, collect dirt and dust, and not provide any benefit that a simple sled jig couldn't provide. Hence, I left it off; I'll use it on something else.
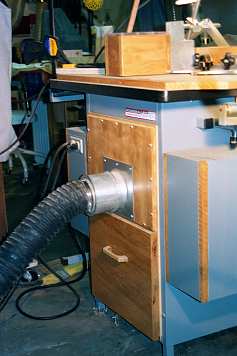
These table routers really make a lot of dust so I decided there would be no vacuum cleaner for me; instead I installed a 6-in. dust port in the rear. All these improvements paid off; this is really a quiet, clean machine.
There was room for Norm Abram's full-size drawer in the rear with vertical wooden dividers for manuals and books. Note that I couldn't bring myself to "cut the cord" on my 3+ HP Porter-Cable Router. Those allen-wrench-tightened quick bit changers work great!
Comments (0)
No comments yet. Be the first!
Leave a Comment