Eccentric Turning Between Centers
by Charlie Belden
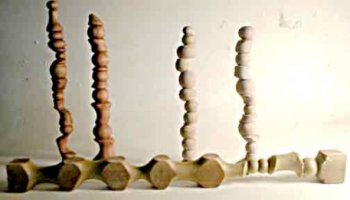
At some point in your turning journey, normal spindle turning will get boring. You may have seen some of Francoise Escoulen’s eccentric turnings and think “I have got to try that.” Then you check the price of the Escoulen chucks and look for another approach…that's free. You'll find that turning some parts of a spindle multi-centered isn't all that hard.
There seem to be two ways to turn this type of eccentric piece
- for each pair of centers, cut a cove at the point of least eccentricity (null point) and then turn a bead between each pair of coves
- for each pair of centers, cut a bead at the point of least eccentricity and then turn coves to connect them
|
|
|
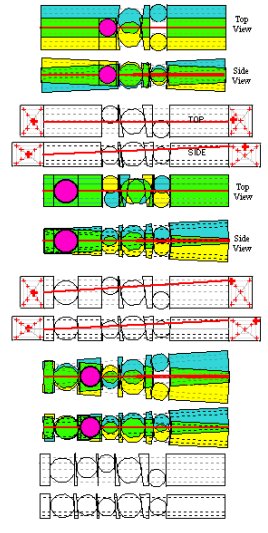
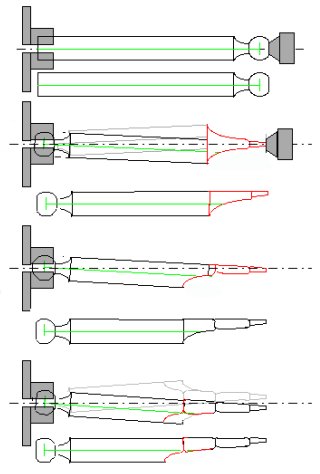
| 1. Blank with selected centers and red centerline between a given pair of centers for the top and side view | |
| 2. Rotate the top and side views of the chosen center pair such that the chosen center line is horizontal as it would be between centers on the lathe. Color the results in yellow. Duplicate the results, flip it horizontally and color it blue. Align its centerline with that of the yellow version. The resulting green area is the common area. The remaining yellow and blue areas are the shadow areas. | |
| 3. Begin with the results of the previous operation. Select another pair of centers and draw the red center line in both the top and sice view. Repeat the duplicate, flip, and center line alignment process described above. Identify the largest bead that can be turned in the green common areas, in this case it's the top view that defines the maximimum bead size. | |
| And so on… |

|
|
| And so on… |
| And so on… |
But blending the shapes together gets a bit trickier and figuring out a way to develop a plan of what you want to turn is even trickier. In an attempt to fill in this gap I've come up with a graphical method of planning an eccentric piece. The following procedure is for beads first. A coves first example will be forthcoming when it's done.
Turning the example at the top of the page—with hard planes immediately adjacent to the beads is tricky. The bead is easy. Getting the straight planes ain't.
|
|
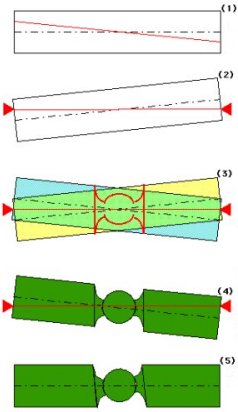
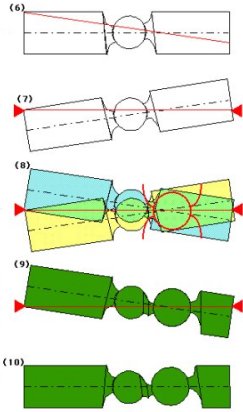
Select a pair of centers |
|
| Place the selected centers between | ||
| Turn the lathe on and note where the shadows and solid areas are | ||
| Turn a bead and a half cove on either side of it. The half coves will be used for the transition between adjacent rurned beads | ||
| And here's what you will have turned |
Ball and Chuck Off Center Turning—The Free Way
|
|
|
| Turn a ball on the end of a chucked up blank | |
| Place the ball in the chuck, move the tails stock end off center then tighten the chuck Turn the tail stock end of the blank | |
| Here's what you have at this point | |
| Loosen the chuck, move the tail end of the blank and then tighten the chuck again. Note that the tail stock no longer can support that end of the blank Turn some more on the tail stock end of the blank | |
| Here's what you have at this point | |
| Repeat step 5 | |
| Here's what you have at this point | |
But you'll find that turning a half cove on either side of each bead is easier to do—and provides a smoother transition between adjacent beads.
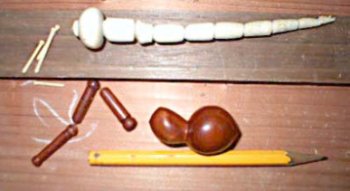
Here are two examples using the Ball and Chuck method—a curved dragon fly body (and a set of regular turned legs) as well as the body (and one regular turned leg) of a tarantula.
Stu's Dungeon (that's Stu Ablett, AKA Stu in Tokyo) has a great page “Turning Demonstration by Jean Francious Escoulen” of a three centers multi axis turning.
Comments (0)
No comments yet. Be the first!
Leave a Comment