Panel Glue Ups
by unknown
The question of how to make the joints flat in a panel glue-up comes up from time to time. There are three (at least) theoretical approaches to achieving them:
- A furniture factory, or anyone owning a large planer, would skip dress the parts (that is hit and miss planing or face jointing to get a flat but not finished surface), glue the skip dressed pieces, and then run the assembly through a planer. This approach is guaranteed to yield a flat panel, but most of us don't have planers of sufficient width for this to be a solution.
- Next best is to glue up what will fit through your planer and then glue these finish planed sub assemblies into the finished panel size. I do this approach regularly.
- Finally if you don't own a planer at all, then you are stuck getting every joint as flat as possible.
So, in cases two and three (limited planer, or none at all), what is the best way to get a joint flat with no edges sticking up, or down? My goal is to get the joint edges flat to better than 1⁄64" so that a few swipes with the hand plane or belt sander leaves the joint smooth. So, here are points important to the process I follow:
- First, I don't use cauls or biscuits. They are unnecessary and somewhere between a distraction and hinderance to the process. I don't think cauls will ensure a joint as flat as I can routinely achieve without them.
- I do use stiff bar clamps, however. Clamps which aren't stiff can flex which results in bowed panels. If the bars are stiff, though, it is unnecessary to alternate clamps top and bottom (there is an exception to this generalization if the stock is very thin—then it can flex under the pressure).
- It is helpful, although not essential, to begin with flat lumber. Face jointed stock is one less problem to worry about when making the joint. However, we sold thousands of feet of less than perfect yet finished planed lumber to cabinet shops which then successfully glued cabinet panels from them. So, it certainly is possible to make panels from stock which isn't perfect.
- Work in subassemblies. The more joints you try to glue at one time the more difficulty you will have keeping all of them as flat as possible. For critical work I glue one joint at a time, but most times I will do two or three if necessary to get the finished size.
Here's how I do it: I have the boards laying on the clamps as shown in the picture with ample glue on one edge (I use what many furniture factories use—yellow glue). I then rub the joint together to transfer glue to the second surface—this saves time over smearing glue on both surfaces. I start at one end of the joint, carefully aligning it and then lightly snugging the clamp. How much pressure to apply here is what will take the most practice. It must be enough to hold the joint but not so much as it tightens up the joint at the next clamp.
Then move to the next clamp, 10-12" away, and by lifting the low board (or pushing the high board) align the edge as perfect as you can and snug this clamp. I feel the joint to verify from the glue squeeze out if sufficient glue was applied. Repeat this process until the last clamp is snugged. Then go back and tighten all the clamps a bit more. Look to verify that the panel is flat on the clamps which are flat on the bench. If an edge sticks up, bang it flat to the clamp with a mallet. It will easily skid against the metal clamp face. Finally, securely tighten all the clamps.
Note: yellow glue is terrifically shock resistant in the partially cured state. Banging on a recalcitrant joint will rarely move it. However, partially cured glue will easily yield to shear. Therefore, pressure will coax a joint into alignment. In an extreme case I have fixed a jack between a clamped panel and the upper floor joists and pushed a badly bowed board into alignment. In other cases I have pulled down a bowed board end by C-clamping the bowed board in the assembly at the edge of the bench.
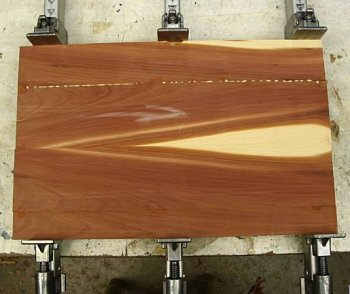
The picture shows gluing the last board in this panel assembly. This panel is too thin and frail to run through the power planer, thus I wanted the joints to be glued flat so hand planing would be quick and easy. For this reason I have done the joints one at a time. You can see the squeeze out on the last joint. You can't see any high edges because edges are aligned perfectly.
Comments (0)
No comments yet. Be the first!
Leave a Comment