Foolproof Dovetail Marking
by Bill Tindall
I only have occasion to make dovetails few times a year. As a result, reliability of technique is of greatest importance and speed is hardly a factor. Saving a few minutes when I only make so few is of no benefit, and I am not too proud to use any crutch I can find if it helps to ensure success. Many amateur woodworkers could find themselves in this situation with any number of techniques they only use occasionally.
I found that the tail to pin transfer marking operation introduced the largest source of error in my dovetails. I experienced two problems. First, when using the techniques I have seen demonstrated, things often moved while marking the pins. Second, my drawers didn't always come out planar, as a result of not perfectly aligning the front to the side of the drawer during marking. Apparently I am not the only one experiencing this issue or the crutch of rabbeting the tail board would not have been demonstrated in the Cossman video.
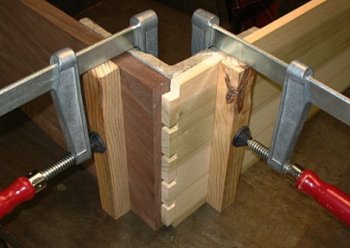
Solution : The crutch shown in the picture is quick to do and absolutely fool proof. The angle block can be a previously made dovetail right angle, or a piece of angle iron as shown in the picture. It does not have to be exactly at right angles, but its legs must be in a plane (when I cut this piece of plastic angle stock one leg was off a few thousandths and I simply shimmed it with tape). If its legs are planar and it sits on a level surface (table saw for example) the drawer front and side will be in a plane.
Gentle tapping aligns the ends as perfect as one chooses. The clamps secure the piece for marking. I brace the piece between my knees and mark with a marking knife. The arrangement is so accurate that once I forgot to mark one pin and when I reassembled the pieces the previously marked pin lines aligned perfectly with the tails.
It is both quick and foolproof, attributes I look for when I don't do something often enough to maintain profession proficiency in an otherwise crutch-free technique.
Comments (0)
No comments yet. Be the first!
Leave a Comment