Remote Control for a DVR Lathe
by “lastole”
I put in a similar modification as that described by Walt Ahlgrim in his More Woodturning (August 2004) article and illustrated in his pictures on the forum. I'm a bit nervous with sharing how one does the cable breakout in the headstock panel because I don't want to be liable for anything except my own stupid mistakes. I have, however, found a great source for remote control boxes that I thought I would share.
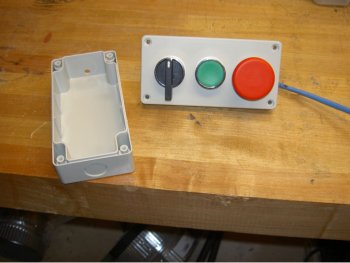
I wanted remote Stop, Start, and RPM controls, so I needed an enclosure with three control openings. In my case, I settled on a large, red mushroom-style stop button; a green start button with a safety (flush) enclosure to prevent false starts, and a lever/knob that controls up and down adjustments to the RPMs.
This last part was particularly important to me. I really dislike leaning over and fumbling with the membrane buttons to adjust the RPM. I wanted a lever that if I turned it to the left it would be as if I held down the down membrane button, while if I turned it to the right it would be equivalent to holding down the up membrane button. Also, when I release the lever it was important to me that the lever would return to the middle off position. For me, this setup would eliminate my fumbling around to change the RPM or hitting the stop button.
I chose to build an industrial-quality control box using the 22mm modular metal controls sold by www.automationdirect.com. With this modular system, you buy the enclosure that you want (in my case a three hole box) and the buttons that you want. This is a pricey way to go, but very easy to put together, quite rugged, and Automationdirect had exactly the kind of lever that I wanted for the RPM control. You need to get normally-open (N.O.), momentarily closed contacts that fit behind the buttons. Here are the precise parts that I used from automation direct:
- SA107-40SL 3-hole, 22mm grey top enclosure $9.75
- GCX1135 22mm metal pushbutton red 40mm mushroom $10.00
- GCX1102-SC 22mm metal pushbutton flush green button $4.50
- ECX1040-2 22mm metal contact N.O. blocks, package of 2 $6.00
- GCX1380-22 22mm 3-position ss lever rtc $19.50
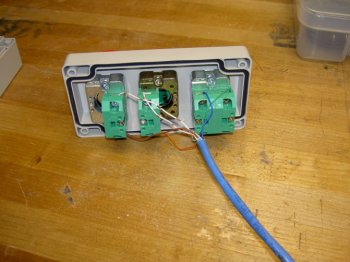
I've attached a front (above) and rear view of the final control box. The blue cable I am using is 4 pair (8-conductor) CAT-5 cable that I salvaged from an old internet cable whose plug stopped working. The 4 pair wire is perfect in my case because I have four switches to wire. In reality, you only need 3 pair (6-condutor) wire under my setup because one of the wires is shared by three of the switches.
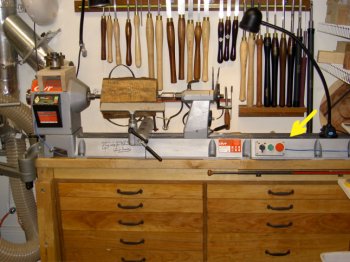
I put some magnets on the back of the enclosure so that I could place it an the lathe wherever it was convenient. This photo (yellow arrow) shows the final product on my lathe.
How I connected my remote control to my headstock and voided my warranty
First, some acknowledgments and disclaimers. I couldn't/wouldn't have been able to do this without Walter Ahlgrim's notes and his short article in More Woodturning (August 2004). His circuit diagram is for the Nova DVR 3000 (I think), but from what I can tell it accurately depicts the wiring for the DVR XP (at least for Up, Down, Start and Stop). Thanks, Walt, for being the pioneer! Now for the disclaimers and downsides of performing this modification. I'll begin by quoting the warning and disclaimers from the More Woodturning article:
Comments (0)
No comments yet. Be the first!
Leave a Comment