Cabinet Saw "Clatter" and Bearing Replacement
by Jim Rahbe
My four-year-old Jet Cabinet saw recently developed a clatter when shutting down. Definitely a metal on metal sound, but nothing I could duplicate when moving things by hand.
I remembered reading onWoodCentral that this type of noise could be caused by loose set screws on the arbor pulley. Sure enough, that is what it was. Since I was not sure if the arbor shaft was damaged, I decided to take it apart and replace the bearings while I was in there. I documented my adventure in case anyone else was interested in doing the same thing.
STEP 1
After turning off the power to the saw, you need to remove the cast iron top. In my case, I had to remove the fence rails and the out-feed table first, but with a shorter fence this might not be necessary. I left the two wings attached. The top is held on by four Allen head bolts. Above each bolt, between the top and the cabinet, you may find a spacer washer. These spacers may be different thickness and need to go back in the same location that they were originally in.

The Allen bolts.

Top removed.

Keep track of the spacers and their location.
STEP 2
Belt removal. to remove the belts, loosen the two belt tension bolts and raise the motor up as far as possible. The pic shows one of two bolts the other is on the opposite side of the mounting bracket.

Loosen motor bolts.

Get those belts off!
STEP 3
Remove or loosen the pulley set screws.

Remove set screws
STEP 4
Remove the arbor nut.

The arbor nut (half off in this pic).
STEP 5
Drive the arbor shaft out of the fixed bearing and through the arbor pulley (already removed in pic).

Drive arbor shaft out of fixed bearing

Keep track of what goes where…
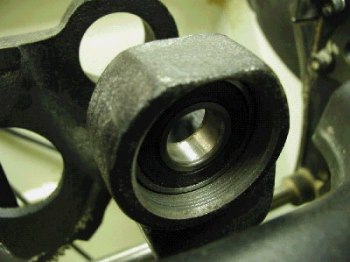
STEP 6
Remove the spanner nut holding in the fixed bearing and then remove the bearing.

Spanner nut with bearing behind.
Fixed bearing slides right out.
STEP 7
Ask your spouse to drop by the local bearing place and pick up new bearings. In my case, they removed and replaced the one pressed on the arbor shaft for $5.00 (plus the bearing).
STEP 8
Assemble in reverse order.
Comments (0)
No comments yet. Be the first!
Leave a Comment