Making Chairmaker's Devils
by Skip Ohdeen
Before I made my own I'd never seen (in real life) or touched a chair devil much less used one. Nor have I ever made a chair—although I have plans to do so at some future time. However, it seemed like chair devils would be useful tools to have around for other purposes.
I had recently taken some old spokeshave blades and built new bodies for them. I had also made a spokeshave using the kit from Lee Valley. It seemed to me that the skills I learned doing that would easily transfer to making chair devils. In practice I found this to be true, in fact, in my opinion, making the chair devils was as easy as making a spokeshave.
Mark I chair devils
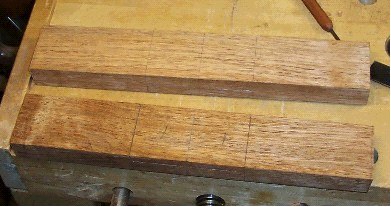
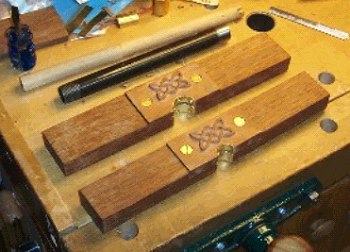
For the first two chair devils I started out with two pieces of jatoba (Brazilian cherry) for the bodies. The dimensions were 11" x 1 7⁄8" x 7⁄8". For the clamping block I used some apple that was 3¼" x 1 7⁄8" x ½" (I later cut one of these down to 1½" from 1 7⁄8"). I decided to use ¼–20 threaded brass inserts to hold the clamping block to the body—the length of these inserts determined the width of the body under the clamping block.
I started by sawing the 11" long bodies out of a piece of 2" x 2" x 24" piece of jatoba then planing the bodies smooth. The critical locations to be flat and square are the (eventual) back and top so that any drilling done will result in holes 90° to the back. I suggest not spending a lot of time squaring or flattening the other surfaces as most of them will be cut away and shaped later. Once the bodies were cut and squared appropriately I located and marked the center all the way around the blank. I used a fine pencil for this and the mark needs to be maintained until after the wear plate is fitted and attached. The next step was to mark out the location of the clamping block, again using a fine pencil, centered on the center line mark on the body.
With my marking gauge slightly longer than the length of the threaded inserts and with the fence on the back of the devil's body, I marked between the pencil marks defining the length of the clamping block. A marking knife delineated the area of the body to be removed to make space for the clamping block.
With the marking complete, I sawed multiple cuts across this space and chiseled out the waste. I did a final flattening of this opening with a chisel followed by a rasp, and squared the two sides with a chisel followed by a shoulder plane.
I cut and smoothed a piece of apple to fit the opening. Again, in my opinion, the critical area that has to be flat and square is the back and top of the clamping block.
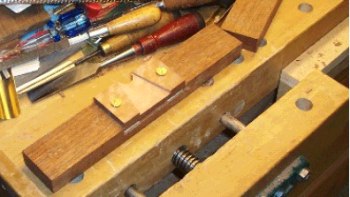
With the clamping block fitted I located the centers for the screw holes far enough in from the sides of the clamping block to avoid the possibility of blowing out the sides when the screws are tightened. I then put the clamping block into the opening of the body and set them squarely against the fence of my drill press.
Threaded inserts require a hole larger than ¼"; the inserts I used required a 21⁄64" hole. Using a drill press, I set the ¼" brad point drill bit so the tip would go all the way through the clamping block and just penetrate the body of the chair devil. I then drilled both holes in the clamping block keeping the body and clamping block squarely against the fence. With the clamping block removed, and the drill bit changed to match the threaded insert, I used the marks on the body to drill both holes for the insert in the body. After putting a little wax on the outside of the inserts I screwed them into the body so they were just below the surface. I did this using a ¼" hex head bolt with two nuts tightened together then screwed into the insert. I suggest using at least a 2" long bolt with enough excess screwed through the insert to reach the back of the body when the insert is set against the hole. This allows you to visually judge if the insert is centering itself in the hole as you screw it in.
Threaded inserts installed
I countersunk the holes in the front of the clamping block enough to set the heads of the machine screws flush with the top of the clamping block. I bought brass machine screws that would be longer than the final depth. I screwed the two pieces together and marked the screws so I could cut them flush to the back of the devil.
I cut the screws to length and then smoothed the ends with a file followed by a little sandpaper and screwed the two pieces together. Using a fine pencil, I transferred the center marks from the body of the devil to the three exposed sides of the clamping block. I removed the clamping block, marked the centerline on the back of the clamping block and screwed them back together. From this point on I kept the two pieces screwed together as much as possible.
Brass wear plates
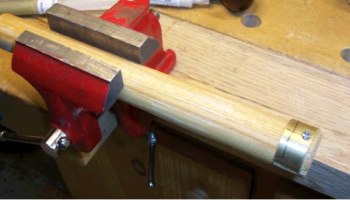
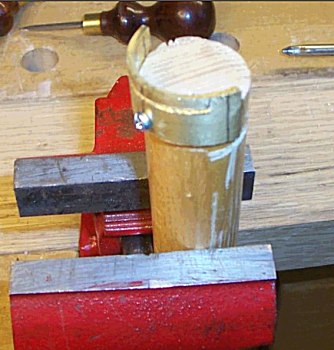
I bought some sheet brass stock in a hobby store. The piece I used for the wear plates on the Mark I were 2" x 12" x 0.03" and the piece I used for the Mark II was 2" x 12" x 0.09". You should be able to get several wear plates out of this length of brass sheet stock, at least three maybe as many as five. I used an appropriately sized piece of round metal—metal pipe would work, and bent the sheet stock around it. It would be possible to use brass pipe for wear plate stock although you should keep in mind that brass pipe comes in a limited number of diameters, nominally ½", ¾", 1" and 1½" inner diameters are the most common and they can be purchased in virtually any hardware or plumbing stores.
After bending the stock, I determined the approximate inside and outside diameters using a circle template and, using the same template marked three points on the outside of the plate. Two of those points defined the each end of the arc, in the case of the Mark I the arc was a semicircle, in the case of the Mark II, slightly less than a semicircle. The third point was at the center of the arc. Using a square I extended these marks down the length of the (soon to be) wear plate and using a pair of tin snips on the thin stock and a hack saw for the thicker stock, cut the semicircular pieces loose. The wear plate should be cut so that it will extend slightly below the bottom of the chair devil so that it can be cut and/or filed back even with the bottom of the chair devil.
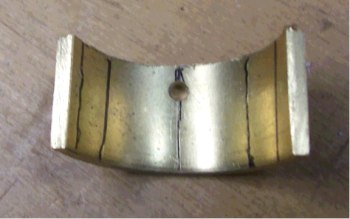
Piece of scrap left over with the marking highlighted.
After bending, the flat stock deforms a bit and the outside will not be even. The edges of the semicircular piece will likely be higher than the center. This is especially evident in the thicker brass stock. At this point I used sandpaper on a flat surface to smooth and square the outer surface. Then I reestablished the lines on the outside of the piece.
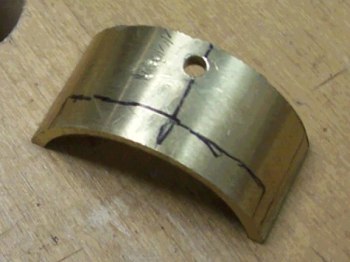
With the clamping block and body screwed together I used the marks on the brass to center the wear plate on the clamping plate and traced the outline of the plate onto the clamping block. I next used a square to extend the lines across the bottom to the back and marked the semicircle on the back using the marks on the wear plate as a guide. I used a hand drill to remove much of the waste and removed the rest of the waste using a circular microplane followed by a rasp. The final fitting of the wear plate to the devil was achieved by test fitting and removing waste with a rasp using the center marks on the devil and wear plate to keep the plate centered.
When the fit was acceptable I removed the clamping block and laid out the throat in the clamping block. Using a marking knife, I struck two lines on the back of the clamping block that angled from near the bottom of the clamping block at the opening for the wear plate to the top of the clamping block. I set the depth of the throat at 3⁄16" at the wear plate and widened it to ¼" at the top of the clamping block. I cleaned the waste out using a sharp chisel.
Throat for Mark I completed.
Using the width between the front of the clamping block and the throat, I marked a line that on the wear plate that would be in the center of the remaining width of the clamping block. I then clamped the wear plate into the opening aligning the inner center line on the wear plate with the center line on the clamping block and drilled a hole for the for the first of three screws used to attach the plate to the clamping block.
The bit used for this should be slightly larger than the diameter of the screw so the screw goes through the hole without having to be forced. I countersunk the hole in the brass, switched to a smaller bit and drilled the pilot hole for the screw. The wear plate attaches to the clamping block with a screw. After locating the positions of the other two screws, a scratch awl extended lines across the inside of the wear plate so that I wouldn't have to perform the same operation when fitting the wear plate to the body. I repeated the drilling, countersinking, drilling the pilot hole and inserting the screws at the other two points on the wear plate. Leaving the plate attached to the clamping plate I removed the clamping block from the body and, using a scratch awl, marked the back of the wear plate to the profile of the back of the clamping block.
I removed the wear plate and used a hack saw cut the front wear plate loose from the rest of the plate. I removed the wear plate and removed the excess material with a hack saw and file. For this operation I found it helpful to screw the wear plate to a piece of round stock that was slightly smaller than the inner diameter than the wear plate. This allowed me to saw and file on the small piece of brass without it changing its shape. For the final fit I reattached the wear plate and filed it even with the back of the clamping block.
Wear plate for the clamping block with the throat opening marked out
Wear plate for the clamping box ready to have the opening for the throat completed.
After squaring the remaining part of the wear plate stock with a file, I repeated the same operation on the body of the devil again evening the wear plate with the body while the wear plate is in place. The screws on the wear plate should be pretty much below the surface of the wear plate. If the heads project slightly above the surface it's not a problem as the next step will take care of that problem.
With both wear plates in place and the clamping block and body screwed together, I leveled and squared the wear plates by using a sanding drum of a smaller diameter in a drill press. I sanded the plates until I had an even wear pattern on the entire surface and any protruding parts of the screw heads were even with the surface. I used some 220 grit sandpaper to refine the surface of the wear plates. You could also do this by hand using a piece of pipe or wooden dowel with some sandpaper applied. I then filed the parts of the wear plates extending below the body even with the bottom of the devil. On the heavier brass wear plates I filed the inner edge round so it wouldn't mar any stock it is used on.
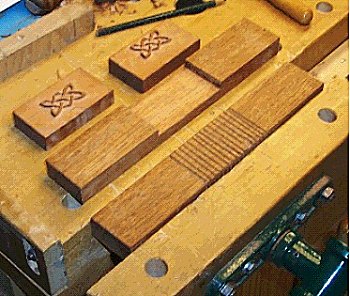
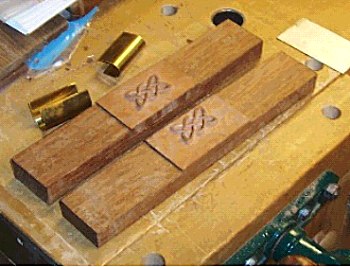
Mark Is ready to have the bodies shaped.
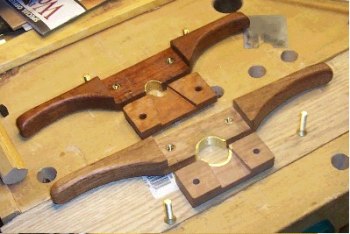
At this point I made a template to shape the body of the chair devil. I chose a slightly gull wing shape. I drew the shape I wanted on a piece of stiff cardboard, just one side and using the centerline mark on the chair devil I drew the outline on both sides. I cut the bulk of the waste out with a coping saw then finished the shaping with a spokeshave followed by a rasp. I finished it off by sanding down to 220 grit with sandpaper and applied 2 coats of boiled linseed oil.
Mark II chair devils
I found that the Mark I devils were too high so I lowered the height of the Mark II to 13⁄8". I think that a bit lower still would be better, and would recommend no higher than 1¼". Since I made the Mark II for larger diameter stock I used the heavier brass for the wear plate. I suspect that bending the heavier brass to small diameters would be pretty difficult so the thinner brass stock would, in my opinion, be better for smaller diameters.
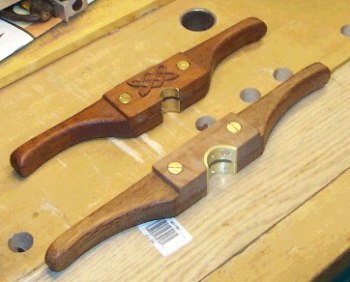
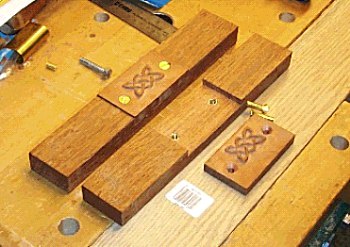
Completed Mark I (top) and Mark II (bottom).
Blades
The blade was made from a piece of old back saw blade. I positioned the blank in the body so that it was centered in relation to the opening with the bottom of the blank slightly retracted in relation to the bottom of the chair devil. I then used a scratch awl to mark the opening on the blade. In the Mark I models I used a complete semicircle and found that the two bottom corners tended to mar stock that was slightly larger than the opening. This was one reason I used somewhat less than a semicircle on the Mark II. To bury the bottom corners of the blade in the body (avoiding the marring problem) I straightened the lines close to the bottom of the blade. I then beveled the blade at about a 25° angle. It can be used like this or with a hook.
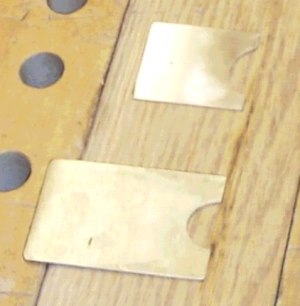
Blades for Mark I (bottom) and Mark II (top)
Tools used
Cross cut saw and chisel for cutting the space in the body for the clamping block. A drill press used for drilling the holes for the screws and threaded inserts and for squaring up the completed brass wear plates. A hand drill was used to drill the holes for the screws attaching the wear plates to the clamping block and body and for removing some of the waste in the opening for the wear plate. Tin snips or a hack saw used for cutting the brass wear plates and a scratch awl for marking the brass. A coping saw, spokeshave and rasp for shaping the body and a file for work on the blade. Also appropriately sized round metal objects (steel pipe would work) for shaping the wear plates. A square, marking gauge and marking knife used to mark the opening for the clamping block. A small round microplane used for removing waste in the opening for the wear plate.
Material list
- Jatoba stock 2" x 2" x 24" (about $8.00)
- apple 2" x 1" x 12" (free scrap)
- two threaded brass inserts ($3.99 for 10)
- two ¼-20 brass machine screws (less than $2.00 a pair
- flat head brass wood screws—¼" long #2 for the thin brass wear plates and ½" long #4 for the heavier wear plates ($1.00 for a bag of six or eight)
- brass sheet stock (don't remember—but less than $3.00 each)
- blade material from either an old saw blade or scraper (basically free)
I got four bodies out of the jatoba; the brass stock supplied at least three wear plates each making the total cost for each chair devil easily under $10.00 each.
Comments (0)
No comments yet. Be the first!
Leave a Comment