Carving a Flame Finial
by William Duffield, on the Cohansey
My mother is visiting. It's her first time on the Cohansey since she came here for my wedding in 1974, and her first time in my shop, so I figured I would demonstrate some reproduction, turning, and carving techniques for her. Tuesday, I picked something simple, a flame finial right off of a 1790 tall case clock that happened to be close at hand. Quite a bit later, I turned and carved a pretty close copy.

The original, top left, is in West Indies mahogany. The copy, my first flame finial, still unfinished, is in walnut. The ball's too small, the flame's too big, and there are some minor problems with the cove and bead details, too, but it's pretty close.
You might ask what I'll do with the new finial, since the clock still has all three of its originals. I'll glue a dowel and a cork on the bottom end, and it will be a wine finial, for the end of the wine. I have turned several finial shaped stoppers, as gifts for friends who appreciate period furniture and good wine, and several more finials for beds, clocks, etc., and have carved turned bedposts, but this is my first finial with carving on the turning.
More process info, repeated from the Woodcarving Forum:
First, I turned a jalapeña-shaped flame…
- Then, with the lathe still turning, I marked the major diameter with a pencil.
- With a pair of dividers, still on the lathe, but with the lathe stopped, I stepped off the equator, adjusting the dividers until I had five about equal steps.
- Using the original finial as a guide for the angle, I drew a diagonal line through each of the five points.
- At the tip, I drew a short vertical line that would have intersected the points, if I had extended it far enough.
- At the bottom, I drew five semicircles, centered on the points. I guess I could have drawn another line around the turning down there and then drawn the semicircles with a compass, but it's not really necessary, since the gouge controls the curvature of the bottom of the flute.
- I then connected all the pertinent points, freehand. All this was done on the lathe, with my hand resting on the toolrest.
- Then, I took it to the bench, and using a gouge (I think I used a Pfeil half inch, #11 Swiss pattern, but that would vary, depending on the size of the finial), I made a spiral cut in between each pair of lines. This took several cuts, working towards both ends, of course.
- After that, I kept deepening and widening each channel, with quite a few cuts, until I got all the way to the lines I had drawn.
I'm still smoothing the flutes, with scrapers and sand paper.
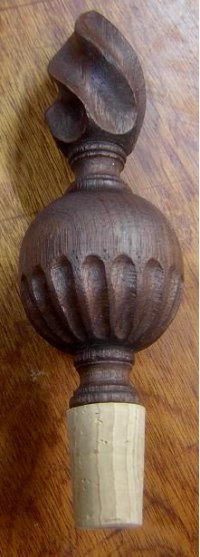
Here's a photo of the finial, with some finishing touches, including a cork stopper, finished with walnut oil and clear, dewaxed shellac. It's a French polish, sort of, except I use walnut oil instead of linseed oil. Linseed oil is probably a better choice if all you are interested in is the quality of the finish, but using walnut oil instead seems to help sell items to people who are paranoid about food safe finishes.
Comments (0)
No comments yet. Be the first!
Leave a Comment