General 26020VD Wood Lathe Set-up and Review
by Garrett Lambert
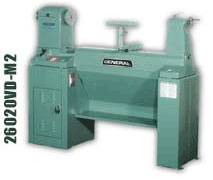 I completed re-equipping my shop when the General 26020VD lathe was dropped off just inside my garage. This is a wonderful time to be a turner with so many excellent lathes on the market, and I purchased the General only after a lot of research into the many options. The moment of decision came at a woodworking show. I was watching a Sorby demonstrator from England promoting their turning tools on a General 26020VD. During a lull, we had some time without anyone else around, so I asked him about the lathe. He was extremely enthusiastic despite acknowledging that Sorby is the UK rep for the Nova lathes, in particular the DVR 3000, and took me through the differences, ending up by saying he much prefers the General.
Since it weighs about 550 pounds, I called a moving crew to get it into the basement. However, the earliest anyone could come was the following afternoon, and I kept thinking that there must be a way to do this job myself. The head and tail stocks were already off, so the cast iron bed and the sheet metal base with the big 2 HP motor and electronics together weigh perhaps 450 pounds. I figured if they could be separated, each would be manageable.
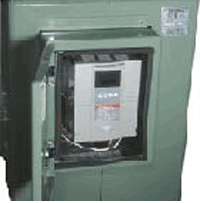 However, there is a small problem. The speed and rotation controllers are mounted on the front of the bed, and connected by a cable to the electronics that are in a large box on the back of the base. I called the local dealer – and a couple of others besides – and each told me that separation required cutting and re-soldering more than 40 tiny wires and advised absolutely against it. One of them said he'd actually done it once and "Never again!" Well, I'm kind of stubborn, especially when told something can't be done, so I opened up the control panel on the front of the lathe bed – just a couple of screws – and found a total of 7 wires in the box, not 40. (These are in the big electronics box on the back of the base.) Since one of the 7 wires is a jumper only 6 would have to be disconnected in order to enable me to lift the bed off the base. 3 were screw connections and 3 were soldered. After making a diagram, I unscrewed and unsoldered the 6 and drew the cable back into the base.
Removing 6 hex bolts enabled me to lift the cast iron bed off the base and lower it onto an old quilt on the garage floor. (That hoist just about maxed me out.) However, with the quilt underneath it was relatively easy to drag across the floor and up the 3 entry steps into the foyer where I stood it on end to pirouette it into position to go down the 10 basement steps. With another quilt under it, I lowered it onto the steps and guided it slowly to the bottom. Another pirouette to change direction, a bit more dragging, and it was in the shop. The same procedure got the bulkier base unit into its intended position, and I set the bed back on it. A bit of jockeying to line up the holes, and the 6 hex bolts were in and tight.
The next step was to install the headstock. It's a neat design. Two cast iron tabs fit into the gap between the ways to position it roughly. With the live centre in the tailstock with its point almost touching the point of the drive spur in the headstock, adjusting 4 gib screws in the two cast iron tabs enables perfect alignment of the points. Once that's achieved, 4 more hex bolts fasten the headstock to the bed. The drive belt drops through into the base unit and a lever lifts the motor so that it can be fitted onto the pulley. (The dealer gave me a tip: if ever that belt must be replaced, install a link-belt rather than pulling the headstock shaft.) The last task was to thread the cable from the base back to its position in the bed, re-attach the 6 wires, and screw the panel back in place.
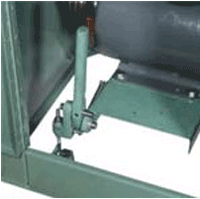 Now for the moment of truth. I plugged the cord into the 220v receptacle and hit the magnetic switch. Nothing happened! A quick glance at the control unit showed that the forward-reverse control has an "off" position as does the speed controller. Once those were moved the lathe switched on, but I turned it off immediately when I heard a whining sound from the electronics at the rear. Even more worrisome, the whine continued for 30 seconds after I had hit the off switch. I admit to being a tad concerned about my re-wiring, but quick calls to two friends who have this lathe – and who haven't disconnected their controllers - assured me that this background sound is normal and derives from a phase converter. In addition to the e-control, there are 4 drive belt positions. Changing the belt on the step pulleys is a snap. A clever spring-loaded lever arrangement lifts and holds the motor while the belt is shifted to the desired position, while the headstock cover simply tilts up to enable the belt to be moved.
An indexing head with pin lock is fitted to the headstock as standard equipment, and the high quality accessories include a spur centre, a live tailstock centre, a heavy knock-out bar, a spindle wrench, and 3" and 6" faceplates.
How does the lathe perform? Perhaps the best measure is that it's certainly improved the quality and quantity of my output, and I am now spending far too much time turning rather than cabinet-making. It's heavy, rock solid, beautifully balanced, and infinitely controllable. I did manage to stall the motor once to the point that the electronics cut out. (I was hogging remarkable amounts of wood off a very large and heavy turning blank.) I phoned the dealer with a "What do I do now?" question and he said he didn't know because it hadn't happened to any of his other customers, but he'd would phone General. On Monday. Since it was Saturday morning and I was in the mood, I grabbed the manual which has all the codes and decided, once again, to see if I could "beat the dealer". When I turned the lathe on again, however, it had re-set itself, and I haven't experienced another occurrence.
My friends are both excellent turners who sell their work, and they are completely satisfied with theirs. The only lathes I know that would be considered superior are an order of magnitude more expensive.
Comments (0)
No comments yet. Be the first!
Leave a Comment