Delta 380 15-inch Planer Review
by Garrett Lambert
The machine is made in Taiwan in a modern factory under Delta supervision.
Taiwan Photos by Ellis Walentine


The planer is delivered in two large boxes. The lighter one (92 pounds) contains the base unit components and the two extension roller tables, all nicely package in molded foam. The packaging is remarkable.

I carried the smaller box to my downstairs shop, and following the simple instructions, spent about 20 minutes assembling the base, leaving the 16 carriage bolt nuts only finger tight – very important as you will see below. The heavy duty roller tables are to be mounted last, so I set them aside.
The larger box (380 pounds) is strapped onto a welded tube steel skid. When the straps are cut, the heavy cardboard top slides up and off revealing a molded foam inner case surrounded by still more steel tubes. These make the package bullet-proof, and are held in place by the foam, so the tubes just lift out. The top foam piece has pockets holding the manual, the hand-wheel – quite heavy - and its speed-handle, a couple of poor quality open-end and hex wrenches, and the cutter-head cover. Removing this top layer reveals the massive, fully-assembled planer.
I could now lift one side of the box, but there was no way I was going to be able to move the whole unit, let alone do it with any control. In fact the instructions state that a minimum of 4 men are required to lift it manually using two 2x4’s locked between the cutterhead and the table as handles. However, the dealer had said two strong men could do it. Problem is I do these things alone, so I must use brains instead of brawn. First step, remove major weight, and the most obvious chunk - which would also usefully lower the high center of gravity - was the very large 3 HP motor.
Not a big deal. Four hex-head machine screws and the belt cover came off. As per the manual, a 2x4 under the motor mount ensured nothing dropped suddenly, and also enabled removal of a little welded tube assembly that provided drop protection during shipping. Loosening three bolts that enable belt tension to be adjusted lowered the motor enough to permit me to pull off the three matched, toothed, drive belts. With the motor resting on the 2x4 I removed the three loosened adjustment bolts entirely and lifted the motor, pulley, and switch out and away from the machine. Total time about 15 minutes. Good move. The motor probably weighs 80 pounds or more, and I lugged it to the basement.
With that done, I stopped for the day to plan my assault on the planer and to screw up enough courage to actually tackle it. Even without the motor, the remaining package weighed about 300 pounds. It was still in the bottom half of the foam which was in the bottom of the cardboard box, and resting inside the steel skid. The skid was sitting dead centre on the axle of my utility trailer, so I rolled it as close to the back door as possible and bridged the gap with a couple of 2x4’s to avoid 3 steps up. Using a steel bar as a lever, I inched it into the foyer, and to make a long story short, slid it down the 10 carpeted steps on a 2x10. Control was via a ½” Dacron braided rope wrapped around the package vertically – important!! (DAMHIKT) - that, in turn, was attached to a 3/8” nylon block & tackle - same one seen in a photo below. Once at the bottom, I used some short clamp pipes rolled it into the shop, cleaned off the protective grease with kerosene, and then took another long break.

I had also purchased a 600 lb Shop Fox mobile base for this machine, so I assembled it – very clever, simple design, but still takes about an hour – and put the base unit in/on it. I then hooked my B&T onto the overhead floor joists and pushed the planer under it. I looped the ½” rope under either side of the cutter head assembly and, after installing the hand wheel, cranked it down tight so the rope wouldn’t move. (I made sure the knives weren’t touching.) The B&T lifted the assembly so that I could position the stand under it and then lower it with control.
Four bolts attach the planer to the stand. They are inserted from under the base unit and are very awkwardly located. Moreover, the 8 holes have to be lined up almost perfectly. Mine weren’t, of course, and I was able to get only one bolt in. After a bit of futzing around a dim light glimmered and I remembered the instruction to leave the base unit’s bolts loose. Using the B&T to take up some of the weight produced more than enough play to get those holes lined up, and the remaining bolts in and tight. Next step was to tighten the base unit fasteners.
The roller tables are an outstanding feature, enough to sway a decision to this planer all by themselves. However, mounting them is awkward. Using a height-adjustable stand to support the outboard end of each table made things a lot easier, but aligning them in exactly the same plane as the planer bed is a matter of frustrating trial and error. I used a long straight-edge and did one side of each at a time. This little challenge took close to an hour, but it’s obviously got to be done right. The good news is that I’ve never had to re-adjust them since, and I’ve raised and lowered them a lot.
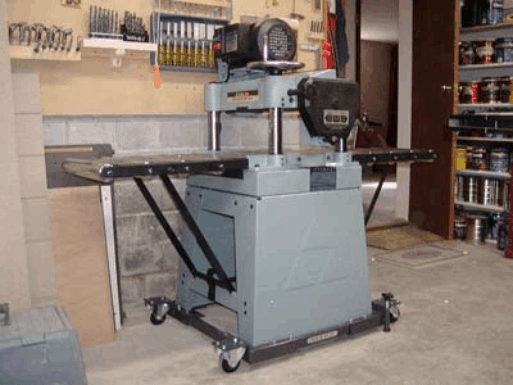
The second-last step was to re-mount the motor, and the procedure was exactly the reverse of the removal except that I again used the B&T to take up the weight as I inserted bolts and adjusted belt tension. The final small job was to attach the belt cover, the shavings chute, and the extra-cost accessory dust hood. Not only is the price a rip-off for this essential piece of plastic, but the diameter is an odd 5”. (Got to have something to complain about.) One of the chute’s screws does double-duty to clamp the motor cord.
Since I had already wired the 220V circuit for the jointer with a duplex receptacle, it was simply a matter of taking a deep breath, plugging in, and punching the Start button. I was surprised at how quiet it is. I grabbed the nearest board, adjusted the height to take off 1/8” and sent it through. Bliss. I’ve now been using it for 6 months, and it’s taken everything I’ve fed it without complaint. This is a machine that is simply a pleasure to use.
Comments (0)
No comments yet. Be the first!
Leave a Comment