WoodCentral
❌

Normal view

When Curves Are Easier Than Straight Lines

18 October 2025 at 20:32

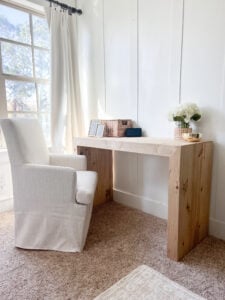
I recently needed to make some wall-shelves. I needed three, they needed to fit on a specific wall, and they had to be made of a light-coloured wood. I didn’t have any other criteria or requirements.

The piece of wood I chose to use was a yellow birch cant about 4 x 6 x 36 inches. My first thought was to run it through the bandsaw to resaw it into three shelves roughly 1.3 x 6 x 6 inches, then joint and plane them flat and parallel. It would have been a straightforward process, but I realized that there was a more efficient, and interesting way to make the shelves. It became obvious when I thought about how shelves are used:

Shelves are mostly decorative, with only one surface (the top) functional. Therefore, only that one surface needed to be flat and smooth to hold items and facilitate cleaning, as dust doesn’t tend to accumulate on the bottom of shelves. The other surfaces could be rough, so I could skip the step of planing that side. The bandsawn texture would be interesting and tactile. However, a bandsawn texture can only be created with a bandsaw, and any subsequent processing of the surface changes it. Attempting to adjust or correct the shape in any way would result in an irregular pattern of texture (e.g. a smooth spot). Therefore, the cut made by the bandsaw must be perfect.

Take the following for example. (A) is the desired outcome, where all sides are straight and parallel – a rectangle. However, if the bandsaw’s fence isn’t aligned properly, the blade wanders, or the line is not followed, a taper (B) is the result. Likewise, deviating from the line can result in a convex (C) or concave (D) surface. All of these conditions can be corrected, but would require additional work with the thickness planer (or similar tool) which, as mentioned before, would also remove the tactile surface left from the bandsaw.

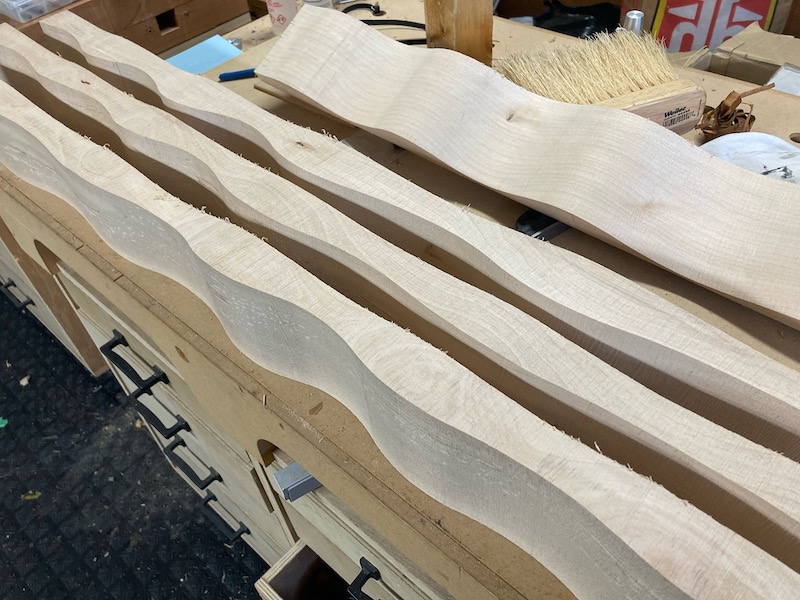
With only a little more work, I could make the shelves more interesting by adding some curves. Plus, any irregularity in the cut would be imperceptible.

So, that’s what I did.

After sawing the curves, I used a foam sanding block to gently smooth the texture, ease the sharp corners, and remove the fuzzies. Then I used my best crosscut blade to cut them to length, applied three coats of semi-gloss polyurethane, and installed them on the wall with steel tapered connectors.

If you don’t incorporate curves into your work, I encourage you to try. Here are some of my favourite tools to work with curves:

  • Bandsaw, jigsaw, and coping saw
  • Coarse, hand-cut rasps, rotary and belt sanders with coarse sandpaper
  • Chisels, carving gouges, and drawknives
  • Arbortech power carving attachments for angle grinders

I don’t often lay out curves before shaping them, but when I do, these are the tools I may use:

  • Flexible battens (strips of wood)
  • French curve templates
  • Adjustable compass with pencil, and a trammel for large arcs
  • Pencil, used freehand

These are my top tips for working with curves:

  • When using saws to cut curves, making all your movements smooth will generally lead to smoother curves
  • Trust your eye and hands – when it looks good and feels good, it’s good
  • Cut joinery before adding curves, or at least make sure you save reference surfaces when shaping
  • Be aware where your joinery and fasteners are so you don’t expose them or hit your tools on them

Let me know if you have questions about adding curves to woodwork.

  •  

A Simple But Practical Storage Project

17 November 2024 at 23:55

Things have been busy for me over the last few years and I’ve been very active in the shop with regular things like organization, maintenance, and tweaks to the shop layout. The focus has also shifted towards product development, although I’m approaching the testing phase (if you’re interested in being a tester, subscribe to my blog for updates).

Recently, I realized a simple and quick storage project that would provide some much-needed extra space and organization in the room that often suffers the most from clutter – the bathroom. All that was required was a few scraps of melamine, some edge banding, a handful of screws, and an hour or two.

The inspiration was a cluttered counter, and realization that there was a lot of wasted space in the cabinet below the sink since it had 21 inches of height, but the items inside were much shorter. Adding a shelf was the obvious solution, but a good solution wasn’t that simple. Here’s what I considered:

  • Adding a full shelf would restrict sight lines and physical access to the back of the lower level, not to mention the sink drain and water supply lines that were in the way. A large U-shaped notch in the back of the shelf could get around the plumbing. It would need to be removable to allow access for plumbing repairs;
  • A shallow shelf at the front, say, 8 inches deep, would allow improved sight lines. However, that still restricted physical access, and a ledge would be required at the back to keep things from falling off the back;
  • A removable tray instead of a shelf would allow convenient access to all the contents of the cabinet, but since the European hinges used for the doors don’t swing the doors clear of the cabinet, the tray would need to be either tilted to get the necessary clearance, or made narrower and a support would be required for the narrower tray;
  • A shelf mounted to drawer slides would improve visual access to the bottom and physical access to the top, but the shelf would still be in the way. Also, drawer slides are expensive;
  • A shelf in addition to a pull-out tray for the bottom shelf would be a good solution except for loss of usable height equal to the tray thickness plus clearance, loss of usable width due to the drawer slides (or height for under-mount slides), and cost; and
  • Narrow shelves on the left and right sides of the cabinet, away from the plumbing, would provide limited storage, but allow good line of site and physical access to all items.

I decided that the last option made the most sense for my situation, so set about to make the shelves.

Once I established the size, I cut the melamine shelves to size. Then I created a template to round over the protruding corner from a piece of 1/4 inch MDF. I drew the curve with a compass, cut close to the line with a jigsaw, then finished it with a sander.

I positioned the template on each shelf, aligning it with my fingertips before clamping the template and shelf to my bench. If I were making many, I would have taken the extra time to incorporate stops in the template to automatically align it with the shelves.

Then I installed a large diameter template bit in my router and machined the corners. (Larger diameter bits tend to produce smoother cuts, and allowed to waste away the entire corner saving me the step of removing most of the waste first). To keep from cutting into the bench, I used a pair of stand-offs.

Then I used an iron and roller to apply pre-glued iron-on melamine edgebanding. I found it helpful to start in the middle and work outwards, so a slight misalignment was less likely to result in the edge not being covered at the end. I could have also taped it loosely in place to ensure alignment and worked from end to end.

To trim the edgebanding, I used my flushing plane which has been such a useful addition to the shop. The skewed blade helped ensure I didn’t push the edgebanding off the substrate as I worked.

Finally, I used a foam abrasive block to ease the edgebanded edges.

With that, the shelves were ready for installation.

I used four pocket hole screws to install the shelves – three in the side, and one in the back. Then I loaded them up. The two shelves provided room for dozens of bottles and small containers, freeing up the bottom of the cabinet for larger items. It was very rewarding and satisfying to see the level of organization afforded by this small and simple upgrade.

A final note about tolerances: most saws produce a better quality cut on one side than the other. Since these shelves would be seen from the top only (with the possible exception of the plumber), I didn’t take any precautions to reduce or eliminate chipout and instead made the cuts on my table saw with my flat top ripping blade set about 2 inches above the material. This helped ensure a chip-free top surface at the cost of more chips on the bottom.

On the other hand, a router tends to produce clean edges top and bottom. The straight flutes of the router bit I used produced flawless results on the corners, but a spiral compression bit would be even more reliable.

Compare these two pictures showing the top and bottom of the same shelf. The straight sections were cut with the table saw, and rounded corners with the router.

  •  

DIY Waterfall Writing Desk

27 November 2023 at 21:06

How to build a simple DIY Waterfall Writing Desk with free plans and YouTube video tutorial. This is a simple writing deskΒ that can be built with a few tools and the cost of lumber is under $100. My oldest daughter is in college and spends lots of time on her laptop. She asked, well begged...

The post DIY Waterfall Writing Desk appeared first on Shanty 2 Chic.

  •  

Make a Table Top Donut Wall

12 July 2020 at 01:07
I was asked to make a Donut Wall for a special birthday party.Β  I Googled it and learned that a Donut Wall is a fun, creative way to serve donuts at any party or event.Β  It's easy to make with standard lumber from the home center and basic woodworking tools.Β  Check out the video below.


If you would like to make one, click here to download my free Donut Wall plans.Β  Β Here are basic instructions.
  1. Cut all of the boards to size according to the plans.
  2. Drill evenly spaced 3/8" holes about 1/2" deep for the pegs.
  3. Start from the bottom and attach the thin slat, followed by the 6 wide slats.Β  Leave a 1" gap between each slat except for the top 2 slats.
  4. Glue in the pegs so they are straight and perpendicular to the boards.
  5. Attach the two legs.
  6. Apply finish or paint as desired.
  7. Customize the Donut Wall with a sign or banner for your particular event.


This donut wall has 20 long pegs that are long enough to hold two donuts each for a total of 40 donuts.


The legs are cut at a 15 degree angle so the donut wall leans back.Β  The size of this wall is perfect for a table top.


The sign at the top can be customized to fit the event.


This Donut Wall was a big hit at the birthday party and the happy new owners will be using it for more future events.

  •  

DIY Board and Batten Wall

9 January 2023 at 19:57

I wanted to give my dining room a pop of color without breaking the budget! This DIY board and batten wall treatment is SO easy and super inexpensive! I did the entire thing for under $80! Check out my tutorial below! You can also see the reel I created on this project below! Materials I...

The post DIY Board and Batten Wall appeared first on Shanty 2 Chic.

  •  

Better Than IKEA for $200 Less

By: ILTMS
9 September 2023 at 15:00

This week Bob takes on a project to recreate and improve the popular Billy cabinet from IKEA. He’s determined to make it bigger, better, and cheaper. In this blog post, we’ll follow Bob’s journey as he transforms a basic IKEA design into a custom masterpiece.

  1. Better, Bigger, Cheaper
  2. A Cost-Conscious Approach
  3. Building the Cabinet
  4. Crafting the Doors
  5. The Final Product

Better, Bigger, Cheaper

Bob’s project begins with a clear vision: to enhance the IKEA Billy cabinet. He starts by using black melamine, opting for a thicker 3/4-inch material instead of the standard 1/2-inch for added durability. To improve the cabinet’s sturdiness and quality, he replaces the original cardboard back panel with hardboard. Bob meticulously plans his project using Fusion 360 and even aims to improve the cabinet’s doors for a more elegant look. (You can learn to do this too! Check out our online course.)

A Cost-Conscious Approach

One of Bob’s primary objectives is to make this project more budget-friendly than purchasing the IKEA version. He sets a goal of beating the $558 price tag of the original by at least $100. Bob emphasizes that the tools he uses for this project serve multiple purposes and aren’t exclusive to this build. He then breaks down the materials he uses, including black melamine, hardboard, and various hardware components.

Building the Cabinet

Bob takes us through the construction process step by step, highlighting essential details. He explains how he uses a shelf pin jig to drill holes for adjustable shelves, ensuring functionality and ease of assembly. He offers valuable tips, such as the importance of using a mask while cutting particle board due to the dust it generates.

Crafting the Doors

Bob decides to change up the cabinet doors from the original IKEA product. He creates a single, large door instead of the original four smaller ones, providing a cleaner, uninterrupted view of the cabinet’s contents (in this case…toys!). To achieve this, he cuts and assembles pieces of trim with half-lap joints. He also shares his decision to use plexiglass instead of tempered or plate glass, striking a balance between cost and durability.

The Final Product

After meticulous work and attention to detail, Bob’s custom Billy cabinet is complete. It’s bigger, better, and more cost-effective than the IKEA original, costing him around $350 in materials and saving $200. Bob reflects on the project’s worthiness, suggesting that DIY enthusiasts will find it fulfilling, while those seeking a quick cabinet solution may prefer buying from IKEA.

Success! Bob’s DIY adventure showcases the satisfaction of creating something unique and customized. His journey serves as inspiration for those looking to embark on their own DIY projects, reminding us that with dedication and creativity, we can transform everyday items into extraordinary pieces of craftsmanship.

Get the Build Plans!

Tools List:

(purchasing via these affiliate links supports ILTMS)

View tools for this project

Woodworking:

Finishes & adhesives I like:

3d Printing/CNC/Laser:

Other Stuff:

The post Better Than IKEA for $200 Less appeared first on I Like To Make Stuff.

  •  

You’d Never Guess How It Opens | Secret Nightstand

By: ILTMS
4 September 2023 at 18:55

In his latest video, Bob undertook an intriguing project: designing and crafting a stylish nightstand with a hidden compartment. The motivation behind this project? Storing some of this most prize possessions where others can’t find them.

  1. Upgrading with Style and Functionality
  2. Crafting the Perfect Nightstand
  3. Unveiling the Hidden Compartment

Β 

Upgrading with Style and Functionality

Bob’s desire to replace his existing bedside table set a high bar for the new creation. He outlined his specific requirements: a more appealing design, adequate storage for his book collection, and the piΓ¨ce de rΓ©sistance – a secret compartment. Bob’s candid account of his initial design struggles showcased his commitment to achieving perfection. Emphasizing the need for a better approach, he narrated how he overcame design challenges to create a visually appealing piece of furniture that not only met his needs but also embraced an added layer of intrigue.

Crafting the Perfect Nightstand

Bob took viewers through his meticulous process of transforming his vision into a tangible piece of furniture. He detailed the material selection, emphasizing the significance of milling lumber and skillfully combining pieces to craft panels for the shelves. Bob also demonstrated his woodworking techniques, including using a biscuit joiner for alignment. With insightful commentary and engaging visuals, he shared each step of his journey, from refining the legs with tapers to constructing the innovative sliding top mechanism. His candid reflections on the process lent a relatable touch to his expertise.

Unveiling the Hidden Compartment

In the final stretch of his project, Bob unveiled the secret compartment’s purpose – a home for his cherished knife collection. He shared the sentimental value attached to some of the knives and highlighted the importance of carrying a blade as a tool, rather than a weapon. Bob demonstrated how the top smoothly slid to reveal the compartment, underscoring his successful integration of functionality and style. The video concluded with Bob’s genuine satisfaction, having transformed an idea into reality. With a touch of humor and practical insights, Bob’s project not only showcased his craftsmanship but also inspired viewers to embrace creativity in their own endeavors.

Get The Digital Plans!

The post You’d Never Guess How It Opens | Secret Nightstand appeared first on I Like To Make Stuff.

  •  

Stop Wasting Money on Cheap Plastic Sheds!

By: ILTMS
5 August 2023 at 14:55

Big box stores want to charge a ridiculous amount for an outdoor storage shed. Bob wanted to make one that’s more functional and will costs less. And of course, we’ll have plans so you can make one too!

  1. Overrun By Everyone’s Stuff!
  2. Build vs. Buy?
  3. Let Us Figure Out the Hard Parts
  4. Was It Worth It?

Overrun by Everyone’s Stuff!

So, have you ever had one of those days where everything seems to go slightly haywire? Well, Bob from β€œI Like to Make Stuff” can definitely relate. In his latest video, he takes us on a rollercoaster ride of DIY ups and downs as he transforms his messy backyard into a nifty outdoor storage shed that’s both functional and easy on the wallet.

Bob kicks things off with a dash of frustration – turns out, even seasoned DIY pros have their β€œoops” moments. But he quickly shifts gears and dives into his master plan: creating a storage solution that fits his space like a glove. And guess what? He’s got the tech to back it up. With Fusion 360 and a bit of augmented reality magic, he shows us how he mapped out the whole thing digitally. Plus, he’s kind enough to share a QR code so we can all get a taste of the virtual action.

Build vs. Buy?

Now, Bob’s all about being savvy with his spending. Instead of splurging on pricey pre-made options, he’s out to prove that a little creativity can go a long way. Armed with 2Γ—3 lumber and some trusty plywood, he’s on a mission to build a shed that won’t break the bank but will definitely up his backyard game.

As the project takes shape, Bob takes us along for the ride, showing off some cool techniques. There’s miter saw magic for those tricky angled cuts, and a rather ingenious circular saw blade flip for tackling metal roofing. And let’s not forget those delightful moments where things don’t quite go as planned – talk about relatable!

Let Us Figure Out the Hard Parts

But here’s where the real magic happens. Bob’s not just building a shed; he’s building a narrative. He’s weaving a story of trial and error, of learning from mistakes, and of not being afraid to improvise when things don’t go according to plan. And you know what? It’s strangely reassuring. It’s a reminder that in the world of DIY, it’s not about being perfect; it’s about having the guts to give it a shot.

Fast forward, and we’re looking at a finished outdoor storage shed that’s looking spiffy. Bob’s meticulous attention to detail – the sealing, the painting – it all comes together to create a shed that’s as rugged as it is charming. And guess what? Bob’s not just keeping all the fun to himself. He’s sharing the building plans with everyone, so you can roll up your sleeves and give it a shot too.

Was It Worth It?

And just when you thought it was all business, Bob wraps things up with a side of giggles. Bloopers! Because, let’s face it, DIY adventures aren’t always smooth sailing. The blooper reel is a delightful reminder that even the most experienced DIY-ers have those β€œoh-no” moments.

So, there you have it – Bob’s backyard escapade, from tangled measurements to triumphant roofing triumphs. He’s not just building a shed; he’s building a community of DIY enthusiasts who know that a little persistence and a lot of creativity can turn even the most challenging backyard into a functional oasis.

Get The Digital Plans!

The post Stop Wasting Money on Cheap Plastic Sheds! appeared first on I Like To Make Stuff.

  •  

This Bench Almost Broke Me

By: ILTMS
1 July 2023 at 15:00

For the past few years I’ve wanted to build bench seating for the fire pit area out back. I knew this project wouldn’t be the easiest one since I had a pretty good idea of what I wanted to do – but I didn’t think it would be THIS hard.

  1. Metal Tube Bending for Bench Seating
  2. Problem SolvingΒ 
  3. Cutting Down the Tube
  4. Bench Seat Planks
  5. Finishing it Off

1. Metal Tube Bending for Bench Seating

A while back I picked up a huge metal tube bender and I haven’t had the opportunity to use it yet – until now. This tool is super heavy and bulky making using it tricky. If you’re using this tool, extra hands is definitely helpful. Don’t grow extra hands, borrow a friend’s hands. Just make sure to return them.Β 

Using Fusion 360, I can use the model to see what the measurement of the curve needs to be. This will allow me to know how much I have to bend the tubing through this insane process. Once I hit that measurement, I would be done bending. Just call me Superman.

2. Problem Solving

The instructions that came with this tool weren’t helpful so it certainly took some trial and error as the day went on using it. The first piece we tried to bend was one for the books. We started out with the tool attached to the workbench in the shop. When we realized it was going to get bent too tall for the ceiling height, we moved it outside and attached it to a step stool. After Anthony broke the step stool trying to bend the tubing, I realized we could use (SEVERAL) clamps to attach it to the front bumper of the green Cruiser.Β 

Clamping the bender to the cruiser allowed for more strength but the process still seemed….wrong. I tried another piece of tubing using the same process – metal tube bender, WD-40, attached to the front bumper and somehow – by magic or the grace of God – I could bend it with one hand. Just when I was nearing the possibility of having enough of a curve, I took the tube to the fire pit area of our backyard to check in on the sizing.

Note – that as you curve metal tubing, it will get harder as the bend starts compounding on itself. It causes more friction as it’s rolling making it a bit more difficult. But it’s still not as hard as the first one.Β  That one was a doozy.

3. Cutting Down the Tube

Using a portable band saw, I cut the tubing to the correct length and cut the pieces for the legs before heading back in the shop to weld. I tacked the cross beams and legs in place across the curve.Β 

4. Bench Seat Planks

I knew I was going to use cedar planks but I needed to do quite a bit of math to find the right ways to curve them perfectly along the bend metal tubing. I found the center of the curve to mark where I need to cut the planks into wedge forms. Using a taper cutting jig for the table saw made the cuts perfect wedges.Β 

Once I got all the planks into place, I used perforated angle, made cuts in it to be able to bend it to the curve of the tubing and used that to attach the planks to the bent tubing. I used short screws and washers. Next, I flipped the bench over and sanded down the edges to smooth out the curve and not be so sharp on the back of legs.Β 

5. Finishing it Off

To wrap it up, I added some 3D printed caps for the end of the tubing to keep out any dirt, rain and bugs. I really don’t want a tiny bee hive starting in that tubing. Last, I added some solar powered LED fairy lights underneath of the bench just to cast some light onto the ground while it’s super dark out.Β 

Very very last I topped it with a Totalboat finish so that the wood would last outside against the elements. We’ve already spent a few evenings out by the fire enjoying some s’mores and just getting to talk through life. I put off this project for a while because I knew there were parts that would be hard and I just wasn’t looking forward to the math. There’s lots of hard things in life whether it’s hard conversations to have or just hard projects to build. Take a deep breath and take the next step forward and make it happen. I believe in you.Β 

Tools List:

(purchasing via these affiliate links supports ILTMS)

Woodworking:

3d Printing/CNC/Laser:

Welding:

Other Stuff:

The post This Bench Almost Broke Me appeared first on I Like To Make Stuff.

  •  

Quick. Cozy. WAY Cheaper Than You Think.

By: ILTMS
10 June 2023 at 15:00

Meighan wanted a space in her house that looked Pinterest worthy but kept the cost way under budget. Can we create a built in bench breakfast nook?

  1. Functional to Fancy
  2. Designing the Bench in Fusion 360
  3. Supplies for the Bench
  4. Acquiring Tools
  5. Building the Frame
  6. Bench top

1. Functional to Fancy

Meighan recently moved into a new house and we wanted to help her make a corner space in her kitchen more custom and functional. She had a vision for something that looked….expensive. She wanted a built in bench with storage but it also had to allow for airflow for the air return ventΒ  – on top of that, her kitchen table is antique so it didn’t follow traditional sizing for seating. We got to work problem solving and making this breakfast nook Pinterest worthy.

2. Designing the Bench in Fusion 360

First we designed the space in Fusion 360 – if you don’t know about Fusion learn here – we added in all the measurements so we could design the bench to fit in just right. The framework for the bench had to be very specific to the air return on the wall to make sure it had enough surface space on the front of the bench to allow for air flow. Also in Fusion, we were able to design the right size kick plate to allow for foot and leg space under the table along the bench. From there, we were able to see the sizing of all the supplies we needed.

3. Supplies for the Bench

At the hardware store, we were able to cut down some of the plywood based off our cut sheets so we wouldn’t have too much to cut back in Meighan’s shop. To save money for the bench frame, we went through the stack of less desirable 2Γ—4’s at the hardware store to find the best looking boards. It took some extra time to find the right ones, but we saved $6 a board. While at the store, we found laminated solid wood that were the right measurements of the seat for the bench. Β 

4. Acquiring Tools for the Build

One of the biggest differences from the last time we made stuff with Meighan is that she has a garage shop filled with tools now. One of the best ways to save money is buy buying tools second hand or – if the opportunity presents itself – accepting hand me downs from friends or family. Meighan got all of her large tools from someone who had upgraded their shop and needed to get rid of older tools quickly. For the bench we needed to use a Table Saw, Miter Saw, Jigsaw, Drill and Driver, and Kreg Pocket Hole Jig.

5. Building the Frame

Back at the shop we cut down the boards to length and added pocket holes to all the boards. Bob cut down the plywood for the front of the bench including jigsawing the kick plate. Tying the bench frame together with the plywood was quick and simple using a Kreg pocket hole jig, pocket hole screws and a driver.Β 

6. Bench Top

Once we got the frame in place, we were able to see where we needed to make any adjustments and where the back of the frame would line up with the wall. After taking down some of the feature wall trim, the bench fit in smoothly.Β 

For the bench top, we added full overlay hinges and gas struts to help soften the lid as it closes to keep little fingers safe from being squished. Together, those pieces are still cheaper than buying torsion hinges – in turn, saving us some money. To add some comfort, Meighan used some leftover fabric and a twin size mattress pad to make seat cushions.Β 

Our goal here was to make something that looked awesome but didn’t break the bank. We spent a total of $160 and made it look incredible. What do you think? Pinterest worthy on a budget?

The post Quick. Cozy. WAY Cheaper Than You Think. appeared first on I Like To Make Stuff.

  •  

Can this $13,000 tool PAY FOR ITSELF?!

By: ILTMS
27 May 2023 at 15:00

A laser belongs in your shop AND can make you money – here’s how.

There’s a ton of different ways to use your wood shop to make money. Years ago I started out with a GlowForge laser, then I upgraded a few years later to a 90 watt Full Spectrum laser – it has become time to upgrade again to a 130 watt Nova 51 Thunder Laser. Adding a laser – no matter what it is – can allow you to make extra money from your shop.

  1. Save time with a LaserΒ 
  2. Make Money
  3. Laser Adds Capability
  4. Laser Machine Cost

1. Save time with a Laser

Using a laser can allow you to quickly taken an idea and put together a prototype to easily see a product in the real world. Over the last year, Josh has been working on designing and prototyping desktop arcades. The tab and slot tolerances in the design really only work well because they were cut on a laser. The laser can make prototyping super fast and effecient – I can model it in Fusion 360 and then send it to the laser for the prototype. After that, I can use the laser to batch out several arcades at a time. By using a laser to make the cuts, they become even more precise than if I were using traditional shop tools.Β 

2.Make Money with a Laser

Using a laser to make unique objects and use different materials to make objects. One of the more popular items I’ve seen made with a laser is jewelry. You can make super intricate designs out of wood, leather, or other mediums. Not only can you make the unique and intricate design, you’re able to batch out those designs to sell.Β 

You can make even more money by customizing whether by customizing a unique item you’ve made or by customizing items off the shelf. You can always pick up a cutting board locally and customize those with a logo, name, or even a design using your laser. Adding customization to any project is a way to make instant extra money – a specific example would be a simple walnut box sold on Etsy and it was an additional $25 just for a lasered customization. That’s a pretty significant amount of profit for no work.Β 

How do you figure out what to make and where to sell it? Look for gaps in a market. Look at your own personal hobbies and see if there’s something that can be added. If you’re into collecting Hot Wheels, maybe there’s a market for selling display units for storing the cars. With a step further, you can even customize those items that are filling the gaps in the market.Β 

Once you have your products to sell, where do you even sell them? You can start out at local craft shows for people in your community to see in person and walk away with it in hand in that moment. You can also check out Etsy – it’s a website created specifically as a marketplace for handmade goods. By loading your products on Etsy, you’re able to make ond ship out a ton more product across the world. Another local option is to check in with local shops and boutiques – whether they buy your items wholesale in bulk from you or sell at the items as consignment.

3. Laser Adds Capability

Several of my kids are on soccer teams and the parents will often use lasers to create merch for the other parents to purchase in support of their kids. The laser allows you to work on a bunch of different mediums with a ton of different capabilities.

Not only can you engrave wood but you can work in a ton of different materials. For the desktop arcade, Josh designed and cut cardboard packaging on the laser. He designed it in Fusion 360 and it was completely custom to the arcade and even added integrated zippers for opening.Β 

There’s also engravable plastics that look like wood or metal. Not only can it cut some heavy duty materials, but I can also laser in super delicate materials like paper. You can engrave beautiful wedding invitations right on the laser by dialing down the intensity. If you remember last year, we introduced shop mats for your shops that we lasered in house!

Just like there are certain materials that wouldn’t be cut with woodworking tools, there’s certain materials that shouldn’t be cut with a laser. Make sure to do your research to make sure that it’s safe to cut them.Β 

Though some traditional woodshop tools can be precise, nothing is as exact as laser cutting for curves like name signs.

One of our favorite capabilities is the safety aspect. My son was able to design a school project and cut it out on the laser with minimal supervision and minimal risk – something that I would not do in a traditional woodworking shop.Β 

4.Laser Machine Cost

We definitely are aware of the price tag that goes along with one of these machines. Josh’s 70 watt laser ran him almost $700. My 45 watt Glowforge runs about $7,000. The 90 watt Full Spectrum laser at the office ran us about $13,000. To the newest super laser upgrade: the 130 watt Thunder Laser – cost $13,400. This big machine can cut through 3/4 inch ply wood. The capabilities is has far surpasses all the other lasers we have combined.Β 

By creating and selling different projects made on this laser, you could easily pay it off.Β  My biggest advice is to have a plan prior to purchasing – know what your projects are and what your profit would be to pay off the laser. Josh came up with a book nook that cost him almost $3 in material to make. Most book nooks on Etsy profit at least $40. To make up the cost of the laser in just book nooks, Josh would have to sell 325 to pay off the machine. It would be super easy to come up with several products to make your money back quickly and start making a real profit.Β 

I think having a laser in your shop can add capability AND can pay for itself. What projects would you make on your laser?

Β 

Tools List:

(purchasing via these affiliate links supports ILTMS)

3d Printing/CNC/Laser:

Other Stuff:

The post Can this $13,000 tool PAY FOR ITSELF?! appeared first on I Like To Make Stuff.

  •  

You Can Make This Loft Bed in a Weekend // With Build Plans

By: ILTMS
6 April 2023 at 15:30

Beds are EXPENSIVE and we have made so many different types – check out this custom designed loft bed Bob and Josh made. You can make it (and others like it) with the build plans!

Josh spent a ton of time researching the best loft bed for his son and couldn’t find what he really wanted. Not to mention everywhere had quality loft beds for $1,000 and up. Instead of putting a car down payment on a bed, he hopped into Fusion 360 and designed a custom loft bed with a built in desk, shelving, and closet.Β 

  1. Loft Bed Checklist
  2. Loft Bed Build Plans
  3. Loft Bed Desk
  4. Put it Together

1.Loft Bed Checklist

When designing the bed, Josh had to keep in mind several things. First, maximizing the vertical space. He wanted both boys to have their own individual, custom spaces so that meant having to use the vertical space which lead to a loft bed style. Second, customizable. Not only did he want it custom for his son and bedroom, but he wanted to offer customizable options for build plans, too. Third, minimal tools. Working in a small bedroom or even in an apartment, there’s not a lot of space for large tools. Fourth, Easy to build. Beds are pretty simple construction!

2.Loft Bed Build Plans

After the design was completed, Josh used the build plans and took the cut list to the hardware store for them to cut. They were able to cut the plywood down to the exact dimensions needed – for free. Basically, if you don’t have a table saw or a circular saw, you can have huge sheets of plywood cut down for you at the hardware store.Β 

Using the plans, Josh knew which pieces needed pocket holes – spoiler: it was a billion pocket holes. We used two different type of pocket hole jigs for the bed – both of which can be purchased at local hardware stores. The plans also showed where edge banding was needed. Since most pieces were cut at the store, it didn’t take long to get the pocket holes and edge banding completed. To cut the closet door handle and the ladder to get to the loft bed, Josh used a jigsaw. At this point, we have used minimal tools to get this bed prepped to be put together.Β 

3.Loft Bed Desk

For this version of the loft bed, Josh used a huge slab of wood he got off Facebook Marketplace. For the desk, you can easily use pre-made butcher block counter tops and you can have those cut down to the size needed for the desk. Josh used the CNC to carve out the desk pieces and milled it down to size. There were a few places that needed to be filled with epoxy. Using a bright blue hue, he mixed some Total Boat expose and filled the gaps.Β 

4.Put it Together

Once the bed was painted and the epoxy dried, it was time to put the bed together. The plans Josh and Forby created allowed us to know step by step what to do to get the bed put together in the small space. To finish up the closet door, Josh used a Kreg hinge jig to make the perfect size for the hinges. Tons of pocket hole screws later, we had a completed bed. Finally, Bob added remote controlled puck lights to the undersize of the bed over the desk for additional light.Β 

Above all, this loft bed looks amazing and Josh’s son loves it. This was also just one of the 3 loft bed designs that are included in the build plans. The best part of the build plans is the included QR code to see the bed as an AR model in your space. You can do this before you even buy the plans to see how it will fit in your room. Β 

In conclusion, if you make this bed or others included in the plans, be sure to tag us!

The post You Can Make This Loft Bed in a Weekend // With Build Plans appeared first on I Like To Make Stuff.

  •  

I Made a Fart Detector

By: ILTMS
16 March 2023 at 15:30

Nothing stinks more than a fart chair that tells on you.

We have officially released our Arduino for Makers course and what better way to share that with you all than making an Arduino based project. For the last several years I’ve had β€œfart sensor” on my project to do list and it’s finally time to make it happen.Β 

  1. The Actual Fart Sensor
  2. Coding the Fart Sensor
  3. Testing the Sensor
  4. Adding the Fart Sensor to the Chair
  5. Next Level Fartiness
  6. Adding the Light and Buzzer
  7. Who Had the Best Fart?

1. The actual fart sensor

The fart sensor not only detects methane from stinky farts but it can also detect carbon monoxide, hydrogen, natural gas, and even propane. There several other sensors like this, too. Certainly, this project can be more than just sensing methane from farts, but it can be useful in your home as well.Β 

2. Coding the fart sensor

To start, I used the sensor, an Arduino Uno (which is the same we use in the Arduino for Makers course) and then a tiny screen. Next, the coding for this was very simple and it took me less than 10 minutes to set up. This sensor works by checking the combination of all the gasses at once and then the tiny screen will give you a concentration number. Finally, I set the sensor to a numeric threshold so when it crosses a 500 threshold, the screen will light up with any words I code it to say.

3. Testing the sensor

Therefore, since this sensor also detects propane, we used a small propane torch (without lighting the flame, obviously) to test out the sensor. Unfortunately, not everyone can fart on command to test this out as many times as we did. Finally, with a completed set up, I added it to the chair to make this really come to life.

4. Adding the fart sensor to the chair

We found a rattan chair at our local Goodwill – we chose this type of chair specifically so that gas would pass through the holes of the weaved chair seat. First, on the underside of the chair I cut a hole in the elastic strapping to mount the sensor. Next, I tested using the propane to make sure that my hypothesis was correct – the sensor works perfect with the weaving of the rattan chair. Last, with the sensor mounted, it was time to take it to the next level.Β 

5. Next Level Fartiness

At this point, we’ve proven that the sensor works and will function within the chair. Next, we need to make this chair into a fart prank. First, we need to add a relay to the Arduino setup. We talk about this in the Arduino for Makers course – the point of the relay is to take the input from the Arduino, and you can use it to control the higher voltage output – like plugging in a lightbulb and a siren. A relay is a great tool to use to connect the Arduino to something bigger to take that project that requires more power to the next level.Β 

6. Adding the light and buzzer

Next, using the relay, I added a bright red light that we mounted hidden under the chair along with a buzzer. Using jumpers, I jumped the relay over to the Arduino – and by adding 6 additional lines of code, the light and buzzer worked! This is the perfect example of taking your base line Arduino and add things onto it a piece at a time – all of which are covered in the new Arduino for Makers course.Β 

7. Who had the best fart?

Since everyone on the team knew about the chair, we really couldn’t prank each other. Instead, we took the display from the practice seat progress chair we made a while back and hooked that up to the chair making the fart chair a game for the team. The highest fartiness score will win – trust me, it’s not who you think will win. Spoiler: it’s Meighan.

This project was ridiculous but it really shows you that basic electronics can make your project really cool – or really silly. Be sure to check out our new course Arduino for Makers!

The post I Made a Fart Detector appeared first on I Like To Make Stuff.

  •  

Floating Shelves You Can Stand On

By: ILTMS
22 December 2022 at 16:31

I literally STOOD on a floating shelf that was hanging on my wall. I also had to learn some lessons along the way.

Recently I installed a super fun backsplash in my kitchen and now it’s time to wrap this project up. I wanted to install floating shelves to make the space feel complete – how strong should they be? I decided to make them where I could stand on them.Β 

  1. The Floating Shelf
  2. Building the Floating Shelf Bracket
  3. Hanging the Floating Shelf Bracket
  4. Something. Is. Wrong.
  5. Problem Solving
  6. Let’s Fix This

1. The Floating Shelf

I chose some pieces of cherry, milled them and glued them together for a nice and solid shelf. Once they were glued, I needed to take them through the planer to help make them nice and smooth and level. Unfortunately, the belt melted mid planing. Does this cause a problem – kind of, but I kept going.

2. Building the Floating Shelf Bracket

The most important part of this project is how the shelf is going to be attached to the wall and hold the weight of a grown adult man – AKA me. I took steel bars and welded them through a long steel plate. By doing this method it allowed the bars to go through both the shelf AND studs in the wall.Β 

First, I needed to measure out where the studs are on the wall to know where to put the steel bars through the plate. Once those were measured and marked, I cut the steel bars down to the length each needed to be to hold both the shelf and adhere in the wall. To put holes in the metal plate you start with a small hole and once you have that pilot hole, you use a step bit to make the hole the right size for the steel bar.Β 

Before welding the bracketI needed to make sure the bars were perfectly squared in the holes otherwise they won’t be going into the wall level – which proved to be a huge problem later. I used some magnets to square up the bars to the plate while I welded them in place.

3. Hanging the Floating Shelf Bracket

Moving on to the wall, I had to figure out exactly where the center of each stud was to hang the shelf. From there I had to drill a 5/8 hole to match the steel bars. Using a shorter bit, I decided to *try* and keep a steady hand to keep it level through the stud. I was able to get the steel in the wall and then I was able to mark on the cherry where the steel rods would go into the shelf to hold it.

To drill holes in the sides of the milled shelf I used a super long 5/8 bit. Was it loud? Yes. Did it get smoky? Also yes. Ear protection is a must. Back in the kitchen I worked on getting the shelf onto the steel bars on the wall. This is where it all got crazy.

4. Something. Is. Wrong.

Something was very very wrong. At this point I realized I had over-designed things just to make sure it was strong enough to hold me. I took a step back, evaluated where I was, and began again.

Sometimes with projects, or honestly even in life, we need to take a step back and breathe. Take note of what we know we did wrong and figure out how to move forward. Sometimes we have to begin all over again even if we don’t want to.

5. Problem Solving

When the belt on the planer melted, I should have stopped and waiting for the new belt to be delivered before proceeding. Even though the shelf LOOKED flat, it wasn’t. With a replaced belt, I was able to mill the shelf down exactly how it should be.

The next problem to be solved was the steel beams going into the studs. This time around the beams had to be completely coplaner – no wobble at all. Not only did I make sure the holes were very level this time, I also removed one beam – instead of having 3, I made just 2.Β 

6. Let’s Fix This

To do all of this the right way I used a Rockler drill guide to make sure the holes in the shelf were perfect. It’s kind of like having a drill press you can put a hand drill in and it was exactly what I needed to use the whole time.

The second time around was incredibly easy and honesty just how easy it could have been the whole time. The beams and the shelf fit together and went into the wall so much easier. AND I COULD STAND ON IT AND IT HELD ME! Goal accomplished. Using the same technique I was able to knock out the second shelf much quicker than the first.

Is there a reason to havea shelf that you can sit on? I definitely learned a lot from this project and I’m very happy to have another kitchen project complete!

The post Floating Shelves You Can Stand On appeared first on I Like To Make Stuff.

  •  

Gallery Walls: Easier Than You Think

27 October 2022 at 15:30

We’ve made a lot of cool stuff here – let’s build a huge gallery wall and hang it all up!

  1. Measure the Space
  2. Gallery Wall Layout
  3. Let’s Build Some Boxes
  4. French Cleats
  5. Hanging the Boxes

Over the years I’ve made a lot of cool stuff and often it just ends up hanging out around my shop. With our office space now, I want to have them nearby and looking really cool. This week I built a huge gallery wall out of floating box shelves to hold all of the cool stuff I enjoy.

1. Measure the Wall

Since being in our new office space we have built our gaming table that we use for meetings, we made the Star Wars inspired sliding wall, and the giant secret arcade. I started off by measuring the huge wall in our conference room – I also needed to find the center of the wall along with the general eye level point I wanted to have. Then I measured all the items that I want displayed on the gallery wall. Not only did I need to measure the width and height but also the depth to know how deep the boxes needed to be.Β 

2. Gallery Wall Layout

After measuring, I needed to layout the design of the gallery wall. There are several different ways you can do this. You can use graph paper – like I did from here – and draw out each box then cut them out to lay out on your workbench. You can also go into Fusion 360 – learn how here – and build out the 3D model of each box. This time, I’m going to go into Illustrator and make boxes that reflect the measured sizes to print off and create the design layout. I worked in inches and put them in Illustrator as millimeters.

Now that we have designed a layout, we cut out craft paper and taped them on the wall.Β  You see this method used a lot for designing gallery walls to get a good feel for how it your paper layout will be reflected on the wall.Β 

3. Let’s Build Some Boxes

I ripped 3/4 inch plywood on my table saw and cut them down to size on the miter saw – you can also use a circular saw for these, too. Once I had them cut, I had to decide how I was going to make these boxes. Ultimately, I landed on using a butt joint since I will be adding edge banding and I want to make sure they’re as sturdy as possible for holding stuff. Each edge had wood glue on and then drove in some brad nails to lock the sides in place. Amazon had some corner clamps that helped to force the corners into 90 degrees while the glue dried.

Later, I added a back to the boxes that made the boxes even stronger. The back panels were cut out of 1/2 inch plywood so that it would be a little lighter than the 3/4 inch on the outside. I drove pocket holes into the sides to hold that panel in place. Meighan painted the back panels Carbon Copy by Behr so that the items in the boxes would pop with the gallery wall.

4. French Cleats

To hang the boxes on the gallery wall, we used French cleats made from off cuts from the plywood used to build the boxes. First, you’ll want to set your table saw at a 45 degree angle to rip the off cut down. Then I used the miter saw to cut them down to the right length for each box.

Please note – it’s not safe to do this with a circular saw so you can buy metal French cleats, off Amazon. You could also drive screws straight through the back panel into studs, or add key hole hangers to the back.Β 

To put the back panels on the boxes, I used some scrap wood as spacers to keep the panel from falling into the box while I attached it with the pocket holes. I wanted to make sure it was actually in place 3/4 of an inch because the cleat needs to fit in that space. I used wood glue and brad nails to keep it in place.Β 

5. Hanging the Boxes

Before we can put cleats on the wall, we have to do some prep work. The cleats on the back of the boxes and the cleats on the wall have to be the same height. MATH – It’s important to add together the 3/4 inch from the side of the box, the cleat that will be on the wall is 2 1/4 inches, then the cleat on the back of the box is another 2 1/4 inches.

First, we need to find and mark the studs using a stud finder. When we can’t drive into a stud, we’ll use metal drywall anchors. Once finding the studs, I held up the cleat that would be on the wall and marked where those studs are. Then I pre-drilled 16 on center to drill into the wall. I used a 2 inch spacer around the boxes to make sure they were all spaced out correctly.Β 

When the boxes were hung, I was able to finally add all the fun stuff we’ve made into the boxes. This gallery wall turned out exactly how I had envisioned. I left extra space on the wall to add more boxes later on as I make more stuff. If you make something like this, let me know!Β 

Β 

The post Gallery Walls: Easier Than You Think appeared first on I Like To Make Stuff.

  •  

Secret 4-Player Arcade

11 August 2022 at 15:50

For those of you who may not want an arcade cabinet in your living room, we’ve got you. We made a nice piece of furniture that hides a 4-player arcade in plain sight! You can make this amazing Secret 4-Player Arcade using the digital plans linked below!

  1. Use the Cut List To Break Down Materials
  2. Assemble the Cabinet
  3. Install Arcade Playing Surface
  4. Load RetroPi and Start Playing!

1. Use the Cut List to Break Down Materials

We’ve made some step-by-step digital plans so you can build this Secret 4-Player Arcade for yourself. In the plans we list out a bill of materials, a cut list for each panel, and easy to follow assembly instructions. The plans list each piece of the Secret Arcade and label them for easy assembly. We chose to build the majority of this cabinet out of white melamine. At the time of building, a sheet of melamine was half the price of a sheet of plywood, and we didn’t have to paint it.

If you wanted to use plywood for the Secret Arcade, that’s totally fine. You can use pocket holes more often than we did. Because we were working with melamine, I chose to use dowels and screws for a majority of the constructions. Wood glue doesn’t stick well to the plastic veneer that melamine has. Once you have all of the pieces cut and organized, we can assemble the cabinet.

2. Assemble the Cabinet

Again, because we made our Secret Arcade out of melamine, we are using dowel joinery a lot. A dowel jig is a really handy tool to have along with a pocket hole jig. In the video, as well as the build plans, we mention our assembly method. First, we build out the cabinet structure and add the four actual drawers. Drill adjustable shelf pin with a jig can allow for shelf adjustability later on. Once the base cabinet is completed and edge banded, you can add the wooden outer shell.

Once the wooden outer shell is in place, it is time to add the invisible hinges and the false drawer fronts. This panel lifts out of the way revealing the arcade control board underneath. We have included a printable template with the digital plans so you can match the spacing of the arcade controls easily. Next, attach the locking (and non-locking) drawer slides to the control board and slide it into place.

3. Install Arcade Playing Surface

Once the sliding control panel is in place, you can install the arcade buttons, joysticks, and interface boards. We purchased a 4-player arcade button package from Amazon (linked in the tools area) that had 4 joysticks, 4 interface boards, 10 arcade buttons of each color, and the wiring to connect them and power the buttons’ LEDs. Once we connected each button and joystick, the interface board has a USB cable that transmits the inputs to the Raspberry Pi micro-computer.

4. Load RetroPi and Start Playing!

To play games on any of our arcades, we use a fully functioning micro-computer called a Raspberry Pi. There are many models that Raspberry Pi offers, the newest of which is the Pi4. For this project, we are using a Raspberry Pi 400, which is cool because the computer is built into a keyboard. It has the same functionality as a regular Pi but has the onboard keyboard. To load the RetroPi operating system, you simply download the Raspberry Pi Imager and select RetroPi. It will load the OS onto an SD card that you then load into the Pi.

Once you have RetroPi loaded, you can do some Google searching for your favorite games’ ROMs and load them onto the card. We won’t go into specifics on this step, because it is a grey area on owning the game versus owning the ROM, so download games at your own risk. But once you get games onto the SD card, you can scroll through the interface and start playing!

Hiding A Secret Arcade in Plain Sight!

I am really happy with how this Secret 4-Player Arcade turned out. We added some simple LED pucks to the tops of each shelf to cast some cool light on the retro consoles we placed on them. We now have video games consoles from past decades that we can play along with a 4-player arcade all in one unit! It is an amazing addition to a game room, a basement, or to your living room. Again, check out the build plans linked below so you can make one for yourself.

Get the Digital Plans Here!

Tools List:

(purchasing via these affiliate links supports ILTMS)

Woodworking:

Finishes & adhesives I like:

3d Printing/CNC/Laser:

Electronics:

Other Stuff:

The post Secret 4-Player Arcade appeared first on I Like To Make Stuff.

  •  

Sliding Room Divider (Inspired by Star Wars)

12 May 2022 at 15:30

We wanted a cool looking room divider that could block out bright light. Using our CNC and some rollers, we made a sliding room divider straight out of Star Wars!

  1. Model with Fusion 360 for FREE!
  2. Cut Out Panels
  3. Add Frames & Rollers

1. Model with Fusion 360 for FREE!

When we got the new building, Josh measured each room and made a simple floor plan in our favorite, free 3d modeling program, Fusion 360. We teach an online course on how to get started modeling digitally. Go to www.fusion360formakers.com and use the offer code MAKECOOLSTUFF10 to get started! Using his model, we were able to measure the huge window wall in the front room and plan out the room divider.

Once we settled on a Death Star design, Josh figured out the sliding panel mechanism and we were ready to get cutting. Because he used Fusion 360 to design the wall digitally, he could then send that design straight to our CNC machine. It made cutting all of those pill shapes really easy. It is so handy doing all of the prep and planning work in Fusion 360 so we didn’t waste time or material.

2. Cut Out Panels

This Sliding Room Divider is made of a stationary front panel and a matching sliding panel captured inside a frame. The stationary panel will be cut from full size 3/4β€³ MDF sheets. To save weight, the sliding panels are cut from 1/2β€³ plywood sheets. The sliding panels are slightly more narrow than the stationary ones to allow them to slide. The CNC made quick work of the panels and we biscuit joined the larger sections together. Meighan then painted the huge pieces and we were ready to assemble.

3. Add Frames & Rollers

Now that the huge panels are assembled into a larger and smaller section, we can assemble the two walls. We cut header and footer pieces and attached them to the stationary panels. Next, we lined up the holes in both panels and attached the rollers. Lastly, we enclosed the whole assembly with another set of header and footer pieces as well as some side supports to stop the sliding panels. Josh and I lifted the two walls in place and secured them to the window frames on the front wall.

The smaller wall was set back away from the front door so we didn’t block the exit. Using some 1Γ—4 pieces and some angled brackets, we secured this wall in place so it doesn’t move. The plywood panels slide on the rollers so easily we didn’t think it was necessary to add a bulky handle or motorized carriages. After a quick round of touch-up paint, the sliding room divider was all finished.

Sliding Room Divider

This project is amazing! We wanted a cool-looking feature wall that could control the light in the room. I think we achieved that perfectly. It adds to our overall nerdy aesthetic while being very functional. This project would have taken a lot longer and would have been less clean if we did it all by hand, but it’s possible. I love how we are able to integrate digital design into our workflow. Measuring, designing, testing, and manufacturing our ideas is sooo much easier using Fusion 360. Again, check out www.fusion360formakers.com and use the code MAKECOOLSTUFF10 this month, to get a discount on the online course.

The post Sliding Room Divider (Inspired by Star Wars) appeared first on I Like To Make Stuff.

  •  
❌