WoodCentral

Normal view

Building a Rolling PVC Kayak Rack

By: ILTMS
16 May 2026 at 15:00

My kayak is one of my favorite ways to spend an afternoon, but my storage situation for it had become embarrassing. It was just leaning against the wall of my garage, waiting for me to do something about it. Add to that two paddle boards that were buried somewhere behind a pile of garage clutter, and the whole setup was past the point of being workable. It was the kind of project that nags at you every time you walk by it, and I finally carved out a weekend to actually fix it.

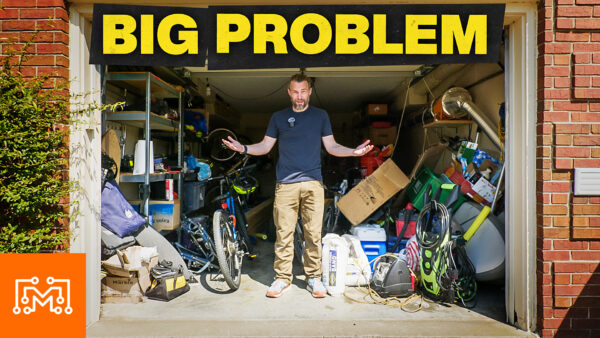
The garage itself had been in rough shape for a long time. It wasn’t that fixing it would take forever. Honestly, it wouldn’t. The hard part was justifying the time when there were always more “important” projects waiting in line. The kayak and paddle boards were the main issue, but the whole space had gotten away from me. Tools, sports gear, car parts, and random stuff had piled up in ways that didn’t make sense anymore. If I was going to make room for a new rack, the rest of the garage needed attention too.

What I actually wanted was a single spot that could hold the kayak and both paddle boards together, with easy in-and-out access. The catch is that all of those things get wet. They need to dry off before going back into the garage, which meant the rack also needed to live outside sometimes. So I sketched out a three-tier rolling cart on the whiteboard. Top tier for the kayak, two lower tiers for the paddle boards. Roll it out to dry, roll it back in when everything was ready to be put away.

Wood was out. Anything that’s going to be wet on a regular basis is just asking for trouble if you build it from lumber. PVC made way more sense for this kind of thing, but PVC always has the same problem, and that problem is joinery. Walk down the plumbing aisle at any home center and you’ll see plenty of connectors, but they’re all designed for plumbing, which means they don’t really help if you want to join five pieces of pipe at one corner. That’s where this project was going to live or die.

While poking around online I found a company that makes connectors specifically for furniture and structures built from PVC. Five-way fittings, four-way fittings, three-ways, and corners covered basically every joint configuration I’d need. They even had inserts designed to hold caster posts, which meant I could turn the entire rack into a rolling cart without any sketchy workarounds. I ordered a big box of connectors and grabbed all the pipe I needed locally. Plain white pipe, since the connectors come in colors and I was going for function over fashion anyway.

Over the years I’ve cut plenty of PVC with a hacksaw (slow) or a miter saw (loud, dusty, and full of staticky plastic shavings that get everywhere). This time I used a ratcheting PVC cutter, which made the whole job almost embarrassingly fast and clean. I had a lot of 1-1/4″ pipe to get through, plus some 2″ pipe for what I had planned next. With everything cut to length, I laid the entire rack out on the garage floor before assembly. With this many identical-looking pieces in white, getting it right on the floor first saves a ton of confusion later.

Assembly was straightforward once the pieces were sorted out. The connectors fit tight, which is exactly what you want, and no glue is needed for something like this. One detail I worked in: instead of just having the kayak slide directly across PVC, I made rollers from the larger 2″ pipe by sliding it over the smaller frame pipe.

Four rollers across the top tier for the kayak, since it’s heavier, and a single roller in the middle of the paddle board tiers since those are lighter. Casters got mounted to the bottom corners, and the whole thing actually turned out a lot sturdier than I expected.

Before I could test the rack with the actual paddle boards, I had to dig them out from the disaster behind them. So the garage cleanup happened. A lot of stuff got tossed, a lot got reorganized onto shelves, and I separated everything out by category, including automotive, sports gear, camping, and so on. I also set up a dedicated automotive cart that I can roll out to the driveway when I’m working on a car, which solves a real problem I’ve had for years. The whole thing took the better part of a weekend, but the difference was night and day.

With the garage actually walkable again, I rolled the rack into place and loaded it up. The paddle boards slid onto their tiers without a fight, and the rollers definitely helped there. The kayak was the bigger question, since it’s heavier and sits on the top tier. Lifting it up there was less of a problem than I worried it would be, and the whole loaded rack rolled around with no drama. It also fit into the spot I’d planned for it without crowding out the mower, which was a small but satisfying win. The cart does exactly what I wanted it to do.

The bigger lesson from this build wasn’t really about the rack. It was about the value of a weekend spent improving a space you use every day. Garage projects always feel hard to justify when there are bigger builds in line, but the payoff lasts way longer than you’d think. The space works better for me now, my family can actually find what they’re looking for, and the gear we actually use is ready to go instead of buried. Thanks for hanging out for this one. Now, go make something awesome!

TOOLS

(purchasing via these affiliate links supports ILTMS)

Woodworking

Finishes & Adhesives

3d Printing/CNC/Laser

Welding

Electronics

Other Stuff

The post Building a Rolling PVC Kayak Rack appeared first on I Like To Make Stuff.

  •  

Making a Modular Desk Organizer

By: ILTMS
13 September 2025 at 15:00

I’d been fighting a losing battle with my desk ever since I built it. Every morning I’d clear it off, trying to keep things minimal and clean, but by lunch it looked like a tornado hit. The same stuff kept piling up in the same spot – pens, measuring tape, SD cards, random notes. It wasn’t just clutter from old projects either. These were things I actually used every single day, so putting them in a drawer didn’t make sense. They’d just end up back on the desk within an hour anyway.

The obvious solution was some kind of organizer, but I didn’t want just another plastic tray where everything gets dumped together. That’s not organizing – that’s just containing the chaos. I wanted something that actually had a specific spot for each item, looked good on the desk, and could work for other people too. So I grabbed a notebook and started listing everything that kept showing up on my desk. Pens and pencils were obvious. My measuring tape was always there. SD cards seemed to multiply on their own. And my phone charger, which I’d been hanging off the back of my monitor, needed a better home since the monitor arm made everything bounce around when I bumped the desk.

I gave myself one main constraint for this project – the organizer had to be exactly as wide as my keyboard. That way it would look intentional, like it belonged there, not just another random thing on the desk. That meant the thing was going to be pretty wide, about 12.8 inches. Most 3D printers can’t handle something that big in one piece, but Bambu Lab had just sent me their new H2S printer to test out. This thing has a massive build area compared to my other printer, about 120% bigger than their X1C model. Perfect timing.

The design came together pretty quickly once I started modeling it in Autodesk Fusion. Instead of making one giant organizer, I decided to create a frame with separate inserts that drop into it. This way, people could arrange things however they wanted or even swap out inserts for different tasks. Being left-handed, I needed my writing surface on the left side where my hand naturally goes. But right-handed people would want it on the opposite side. The modular design solved that problem. Each insert could go anywhere in the frame.

The 3D printing part went smooth as expected. The H2S handled the large frame piece without any issues, and the quality was fantastic right out of the gate. I printed most of the inserts in black PETG – a material I trust that looks clean on the desk. The printer’s hot end goes up to 350°C, so it can handle pretty much any material you throw at it. The AMS2 Pro attachment made it easy to do multi-color prints too. Just click on the face you want to change color in Bambu Studio, pick your color, and that’s it. Way easier than I expected.

But here’s where things got interesting. The H2S isn’t just a 3D printer – it has a laser attachment that slides right onto the tool head. You plug in one cable, attach an air hose, and suddenly you’ve got a 10-watt laser cutter. I used this to cut custom walnut dividers for the SD card holder. The wood adds a nice touch that breaks up all the black plastic, and it was way faster than trying to cut those thin pieces by hand. I also cut a piece of acrylic to use as a small dry-erase board that fits perfectly in one of the slots.

The coolest part about this whole system is how flexible it turned out to be. Since everything is held in place with magnets, you can rearrange the layout whenever you want. Need more writing space today? Swap in another notepad holder. Working on a project with lots of small parts? Replace the pen holder with a parts tray. You could even keep a drawer full of different inserts and change them out based on what you’re working on that day. The phone charger section can move to either end depending on whether you’re left or right-handed, so your wrist doesn’t hit it while writing.

After using this thing for a while now, my desk actually stays organized. Everything has a specific home, and since those homes make sense, stuff actually goes back where it belongs. The SD cards stay in their walnut slots. The pens stand upright where I can grab them. My measuring tape has its own spot. Even my sticky notes have a dedicated holder. It’s not magic – it just works because it was designed around how I actually use these things every day. Plus it looks way better than a pile of random stuff next to my keyboard. Thanks for following along with the build. Now, go make something awesome!

TOOLS

(purchasing via these affiliate links supports ILTMS)

Woodworking

Finishes & Adhesives

3d Printing/CNC/Laser

Welding

Electronics

Other Stuff

The post Making a Modular Desk Organizer appeared first on I Like To Make Stuff.

  •  

Making a Camera Gear Organizer From a Mystery Flight Case

By: ILTMS
30 August 2025 at 15:00

I picked up this weird aluminum flight case at a yard sale a while back, and honestly had no clue what the thing inside was supposed to be. The original equipment looked pretty high-tech, but I wasn’t planning to use it anyway. What caught my attention was the case itself – lightweight aluminum construction, built tough for travel, with some interesting mounting hardware already installed along the top edges. The whole thing just screamed “repurpose me into something useful.” Sometimes the best projects start with a mystery box and a vague idea of what could be possible.

The problem I was trying to solve had been bugging me for months. As someone who makes videos, I keep accumulating camera gear – action cameras, drones, batteries, chargers, microphones, and all the little accessories that come with each device. Most of the time this wasn’t an issue since I shoot in my shop and have a dedicated gear cabinet to keep everything organized and dust-free. But recently I needed to take a bunch of cameras out to the farm for a project, and throwing everything into a backpack felt pretty sketchy. I needed a proper transportation solution that would protect expensive gear while keeping everything organized and accessible.

The inside of this case had serious potential. It was one big open volume with mounting brackets already in place, plus it was designed to travel and take abuse. But I couldn’t just throw foam in there and call it done – this had to be a real system.

My main camera is pretty substantial, so I knew I’d need to dedicate serious space for that. The smaller action cameras and accessories needed their own organized storage that wouldn’t turn into a jumbled mess every time I opened the case. The solution started to take shape as a two-section design that would maximize the available space while keeping everything accessible.

I decided to split the case into two distinct areas. The larger section would house my main camera in a custom-fitted cradle, with enough room for it to sit securely without getting cramped. The other section would work more like a library system – foam panels that could slide in and out of tracks, each one holding specific cameras and gear in perfectly cut foam recesses. This way I could pull out exactly what I needed for a particular shot without disturbing everything else. The concept was solid, but figuring out the mechanical details would take some work.

The foam panels were the trickiest part to get right. I ordered some layered tool foam that lets you trace around objects and peel out layers to get the exact depth you need. The challenge was making these panels work vertically instead of horizontally like they’re designed for. Each panel needed to slide smoothly in tracks while holding cameras securely, which meant getting the spacing just right. Too loose and things would rattle around, too tight and the panels wouldn’t slide properly. I also had to account for the fact that most of my gear wasn’t as thick as the foam, so the panels could sit pretty close together without interference.

The mechanical system required some 3D printed components to make it all work. I designed simple clips that would grip around the outside of each foam panel while having a fin on the back that could slide down into wooden tracks. Getting these printed parts to fit properly took a few iterations, but the concept was sound. I also had to add some taper to the top of the track openings so the panels would guide themselves into position instead of requiring perfect alignment every time. Sometimes the little details like that make the difference between a system that works smoothly and one that’s frustrating to use.

For the main camera section, I went all-in on custom protection. Instead of just stuffing foam around it, I took a photo of the camera’s bottom and modeled a precise cradle in Autodesk Fusion. This let me create something that would hold the camera exactly right while providing maximum protection. The cradle got 3D printed, and I also designed a flexible strap system that could hook over the camera to lock it down securely. If you’re interested in learning this kind of 3D modeling and design work, you should check out our “Fusion for Makers” course – it covers exactly this type of practical problem-solving with Fusion.

The finished case turned out better than I expected. Everything has its place, from the smallest memory card to the main camera, all surrounded by foam and protected by that aluminum shell. The sliding panel system works smoothly, and I can grab exactly what I need without unpacking the whole case. Plus I can lock it up and toss it in the truck without worrying about expensive gear getting damaged. Sometimes the best projects come from combining something you found cheap with a problem you actually need to solve.

Thanks for following along with this build. Now, go make something awesome!

TOOLS

(purchasing via these affiliate links supports ILTMS)

Woodworking

Finishes & Adhesives

3d Printing/CNC/Laser

Welding

Electronics

Other Stuff

The post Making a Camera Gear Organizer From a Mystery Flight Case appeared first on I Like To Make Stuff.

  •  

Organizing a Lifetime of LEGO Sets

By: ILTMS
24 May 2025 at 15:00

My LEGO collection has been a lifelong obsession. I’ve kept just about every set since childhood, and they were creating a storage nightmare in my office. Those boxes stacked against the wall weren’t just taking up space—they represented a disorganized system that was driving me crazy. While I built a great storage table for my kids’ LEGO a few years back, my personal collection needed its own solution. The containers I had were mismatched, unlabeled, and most were completely full, giving me zero room to dismantle more sets and sort the pieces properly. It was time to tackle this problem head-on and create a system that would actually work.

I started with my biggest pain point—storage. I needed larger, uniform containers that would let me see what was inside without opening them. Rather than the IKEA solutions many builders recommend, I found some clear plastic shoe boxes at Walmart that were pretty inexpensive. These would work perfectly for most of my bricks, and they also had some divided containers that would be useful for smaller components. With my containers selected, I measured the space under my rolling workbench and headed to Fusion to design a storage system that would maximize the available area.

My first thought was to build a custom shelving unit with dados cut into plywood, but then I remembered I had slat wall panels I could use instead. These chipboard panels have grooves every few inches that would let me create adjustable shelving without the hassle of cutting all those dados. The downside was that the slots were slightly less than half an inch wide, which created some issues with my shelf thickness plans. I had to pivot to quarter-inch shelving material, which meant I needed to design custom supports to hold everything in place. After experimenting with 3D printed shelf supports, I decided to switch to simpler wooden strips screwed directly to the frame – not as fancy, but much more practical.

Assembly went smoothly once I had all the pieces cut. I used CA glue to temporarily hold the melamine panels together, then added screws for proper support. Since the chipboard had voids right where the screws went in, I added a back panel to provide extra structural support. A coat of paint made everything look more finished, and I added some spacers at the back of the shelves to make sure all the different-sized containers would line up perfectly at the front. The completed unit fit perfectly under a desk in my office and provided exactly the organized storage I needed for my brick collection.

Another problem I wanted to solve was what to do with all those extra pieces that come with every Lego set. I designed a custom 3D printed sorting tool with a center bowl and smaller compartments around the edge. The idea was to dump the loose pieces in the middle, then distribute them into the appropriate bins by size before transferring them to their permanent storage containers. My first prototype had some issues – the top spun around too easily and didn’t keep the pieces contained, plus the fit between components wasn’t consistent. After some redesign work, I created a version that locks in place and has a concave center to keep parts from bouncing out.

For the finishing touch, I created custom label holders that snap together and have a slot at the top for sliding in paper labels. This simple addition makes finding specific parts much easier and helps maintain the organization system long-term. Looking at my space now compared to the chaotic mess I started with, it’s amazing what a difference some basic storage containers, thoughtful organization, and proper labeling can make. The area will continue to evolve as I use it, but I’m finally looking forward to working in this section of my office.

My next challenge will be taking apart more LEGO sets to sort into this new system, but that’s a project for another day. The main thing is that I’ve created a solution that works for my needs and makes my Lego collection accessible again. If you’re struggling with organizing your own building materials, whether it’s LEGO or anything else, sometimes the simplest solutions are the most effective – clear containers, adjustable shelving, and good labels can transform your workspace. Thanks for following along with this project. Now, go make something awesome!

TOOLS

(purchasing via these affiliate links supports ILTMS)

Woodworking

Finishes & Adhesives

3d Printing/CNC/Laser

Welding

Electronics

Other Stuff

The post Organizing a Lifetime of LEGO Sets appeared first on I Like To Make Stuff.

  •  

Organizing Tool Parts with 3D Printing and Laser Cutting

By: ILTMS
10 May 2025 at 15:00

I noticed something the other day that’s probably bugged you too. Almost every tool we buy comes with accessories, bits, and pieces that are essential to using it. But the manufacturers rarely give us a good way to store these items.

I recently picked up the new MetalFab from xTool, which is an awesome piece of equipment. It functions as a laser welder, laser cutter, laser cleaner, and CNC machine all in one. The problem was that it came with a bunch of different tips, nozzles, and attachments that I needed to keep track of. There are specific nozzles for the laser cutter, different tips for the cleaning function that attach to an extension piece, and another tip for welding. Plus, there’s this dust cap thing and safety goggles that are absolutely critical since we’re talking about a powerful laser that operates in open space. Losing any of these parts would be a major headache.

The tool itself is well designed and built solid, but it doesn’t have any storage compartments or drawers for all these parts. What it does have is a stand for the welding gun where it sits when not in use. Since every MetalFab owner has one of these stands, I figured instead of making a storage solution that just works for me, why not create something that could work for everyone with this tool? And even if you don’t have this specific tool, the process I’m going to walk through applies to organizing accessories for pretty much any tool in your shop.

My plan was to create something that would attach to the existing gun stand, with storage spots arranged around the outside perimeter so the gun could still sit in the middle without interference. I needed to think about how to store each piece properly. Four of the pieces had the same diameter tube on the bottom, so they could all use the same style holder where they drop in and stand up for easy visibility. The extension tube was longer and made more sense laying down. One of the caps needed its own custom slot. And the cutting attachment was oddly shaped with no flat sides, making it tricky to store without them rolling around or falling over.

The first step was measuring everything carefully with calipers and writing down the dimensions. Then I designed my first prototype, knowing it wouldn’t be perfect. Instead of wasting time and material on a full 3D print, I laser cut a thin profile of the design to test the layout. This quick prototype showed me that my measurements were pretty close, but I learned a lot about how the pieces would interact. Some parts were too close together and would interfere with each other when being removed.

After rearranging the layout in Autodesk Fusion and testing with another laser-cut prototype, I got the profile right. But the three-dimensional part required more thought. Each piece needed to be captured somehow, either sitting down in something or having walls around it to hold it in place. Since all the parts were different heights, I couldn’t just make one uniform solution. What I needed was a thin base with custom “islands” or walls for each specific piece. Testing showed that simple collars worked for some parts but not others. The cutter head, for example, didn’t have a flat bottom surface, so it needed a custom-shaped recess that matched its profile to prevent it from toppling over.

When designing something like this, you have to consider the manufacturing method you’ll use to make it. I noticed that the laser-cut prototype and 3D printed version had slight but important differences in fit. With laser cutting, you have to account for the kerf (the width of material removed by the laser), while 3D printing deals with plastic expansion where the material might squeeze into spaces a bit differently than planned. This got me thinking about making this design available for people with different tools – some might have 3D printers, others might have laser cutters.

For the 3D printed version, I split the design down the middle so it could be printed as two separate pieces for those with smaller printers. Double-sided tape would attach it to the stand. For the laser-cut version, I created offset shapes that could be cut out, stacked, and glued together to make walls of the right height around each opening. The best part is that one 3D model led to two different manufacturing methods for the same storage solution.

Now all my MetalFab accessories have a home where they’re visible, organized, and secured. No more digging through sawdust-filled boxes or cups trying to find that one specific nozzle I need. If you’ve got tools with accessories that need organizing, I hope this gives you some ideas for your own shop. Taking measurements, creating a quick prototype, and refining your design based on real-world testing is a reliable approach for any organizational project. Thanks for following along with this build. Now, go make something awesome!

TOOLS

(purchasing via these affiliate links supports ILTMS)

Woodworking

Finishes & Adhesives

3d Printing/CNC/Laser

Electronics

Other Stuff

The post Organizing Tool Parts with 3D Printing and Laser Cutting appeared first on I Like To Make Stuff.

  •  

Building a Better Desk for Making Music

By: ILTMS
13 December 2024 at 16:00

Over the past couple of years, I’ve been on a mission to improve the spaces in my life. I tackled the basement, revamped my workshop, and even created a dedicated Tron room for my 3D printers. But my office? It had become a disaster zone – a dumping ground for random stuff from all my other projects. I knew something had to change.

Music has always been a big part of my life, but I hadn’t been playing much lately. My goal was to remove all the barriers that kept me from making music and recording. The first step was redesigning my desk. My old desk was stuck in a corner which wasn’t the best use of space, especially if I wanted to integrate many of the instruments I’ve collected over the years.

I decided to get creative. I designed a new desk with a unique feature – a sliding tray that could hold my full-size 88-key keyboard. This wasn’t just any ordinary desk. I used a combination of black-stained plywood (actually India ink), cherry plywood, and a solid cherry top. The construction was a labor of love, involving lumber milling, biscuit joining, and some creative problem-solving with epoxy to fill in knots and imperfections.

The desk’s design was driven by one key constraint: accommodating my wide keyboard. I didn’t want massive support legs that would eat up more space. One side has a solid support that goes to the ground, with a small cabinet area for storage and a spot for my computer. The other side is more minimalist – just a leg with some storage for hanging instrument cables and headphones.

Finishing the desk was an adventure in itself. I experimented with India ink to get that deep black look I wanted, and took a friend’s advice on a clear coat finish that turned out amazing. The drawer, made from plywood with a maple edge, looks professional and clean. I even custom-notched a handle to give it a personal touch.

The sliding keyboard tray was perhaps the most intricate part of the build. I used special locking drawer slides that allow the keyboard to be tucked away completely when not in use, maximizing my knee room. When I want to play, I can pull it out fully in front of the desk. It was a bit of a gamble – the extended slides create a significant cantilever that I was initially worried about.

The result is something I’m genuinely proud of. The new desk is minimal, functional, and exactly what I needed. It solves multiple problems: it gives me easy access to my music, provides smart storage solutions, and looks great in the process. I’m committed to keeping the space clean and organized, seeing it as an opportunity to solve storage challenges creatively.

This project was more than just building a desk. It was about creating a space that reflects my passion for music and my approach to problem-solving. By taking the time to design something truly custom, I’ve transformed a cluttered corner into a workspace that inspires me. And honestly? I can’t wait to start playing music again. Thanks for hanging out with me. Now go make something awesome!

TOOLS

(purchasing via these affiliate links supports ILTMS)

Woodworking

Finishes & Adhesives

Electronics

Other Stuff

The post Building a Better Desk for Making Music appeared first on I Like To Make Stuff.

  •  

A Simple But Practical Storage Project

17 November 2024 at 23:55

Things have been busy for me over the last few years and I’ve been very active in the shop with regular things like organization, maintenance, and tweaks to the shop layout. The focus has also shifted towards product development, although I’m approaching the testing phase (if you’re interested in being a tester, subscribe to my blog for updates).

Recently, I realized a simple and quick storage project that would provide some much-needed extra space and organization in the room that often suffers the most from clutter – the bathroom. All that was required was a few scraps of melamine, some edge banding, a handful of screws, and an hour or two.

The inspiration was a cluttered counter, and realization that there was a lot of wasted space in the cabinet below the sink since it had 21 inches of height, but the items inside were much shorter. Adding a shelf was the obvious solution, but a good solution wasn’t that simple. Here’s what I considered:

  • Adding a full shelf would restrict sight lines and physical access to the back of the lower level, not to mention the sink drain and water supply lines that were in the way. A large U-shaped notch in the back of the shelf could get around the plumbing. It would need to be removable to allow access for plumbing repairs;
  • A shallow shelf at the front, say, 8 inches deep, would allow improved sight lines. However, that still restricted physical access, and a ledge would be required at the back to keep things from falling off the back;
  • A removable tray instead of a shelf would allow convenient access to all the contents of the cabinet, but since the European hinges used for the doors don’t swing the doors clear of the cabinet, the tray would need to be either tilted to get the necessary clearance, or made narrower and a support would be required for the narrower tray;
  • A shelf mounted to drawer slides would improve visual access to the bottom and physical access to the top, but the shelf would still be in the way. Also, drawer slides are expensive;
  • A shelf in addition to a pull-out tray for the bottom shelf would be a good solution except for loss of usable height equal to the tray thickness plus clearance, loss of usable width due to the drawer slides (or height for under-mount slides), and cost; and
  • Narrow shelves on the left and right sides of the cabinet, away from the plumbing, would provide limited storage, but allow good line of site and physical access to all items.

I decided that the last option made the most sense for my situation, so set about to make the shelves.

Once I established the size, I cut the melamine shelves to size. Then I created a template to round over the protruding corner from a piece of 1/4 inch MDF. I drew the curve with a compass, cut close to the line with a jigsaw, then finished it with a sander.

I positioned the template on each shelf, aligning it with my fingertips before clamping the template and shelf to my bench. If I were making many, I would have taken the extra time to incorporate stops in the template to automatically align it with the shelves.

Then I installed a large diameter template bit in my router and machined the corners. (Larger diameter bits tend to produce smoother cuts, and allowed to waste away the entire corner saving me the step of removing most of the waste first). To keep from cutting into the bench, I used a pair of stand-offs.

Then I used an iron and roller to apply pre-glued iron-on melamine edgebanding. I found it helpful to start in the middle and work outwards, so a slight misalignment was less likely to result in the edge not being covered at the end. I could have also taped it loosely in place to ensure alignment and worked from end to end.

To trim the edgebanding, I used my flushing plane which has been such a useful addition to the shop. The skewed blade helped ensure I didn’t push the edgebanding off the substrate as I worked.

Finally, I used a foam abrasive block to ease the edgebanded edges.

With that, the shelves were ready for installation.

I used four pocket hole screws to install the shelves – three in the side, and one in the back. Then I loaded them up. The two shelves provided room for dozens of bottles and small containers, freeing up the bottom of the cabinet for larger items. It was very rewarding and satisfying to see the level of organization afforded by this small and simple upgrade.

A final note about tolerances: most saws produce a better quality cut on one side than the other. Since these shelves would be seen from the top only (with the possible exception of the plumber), I didn’t take any precautions to reduce or eliminate chipout and instead made the cuts on my table saw with my flat top ripping blade set about 2 inches above the material. This helped ensure a chip-free top surface at the cost of more chips on the bottom.

On the other hand, a router tends to produce clean edges top and bottom. The straight flutes of the router bit I used produced flawless results on the corners, but a spiral compression bit would be even more reliable.

Compare these two pictures showing the top and bottom of the same shelf. The straight sections were cut with the table saw, and rounded corners with the router.

  •  

Turning Boring Storage Into an Interesting Spray Can Solution

By: ILTMS
21 September 2024 at 15:00

Have you ever faced a boring home organization task and wished you could make it more exciting? That’s exactly what happened to me when I realized I needed to tackle my chaotic spray paint collection. Instead of settling for a standard storage cabinet, I decided to challenge myself to create something unique, functional, and fun. In this post, I’ll walk you through how I took a simple storage project idea and turned it into a fun solution that might inspire your next project idea.

Before diving into the project, I took stock of my situation. I had about 75 spray paint cans scattered around my workshop, making them difficult to organize and access efficiently. I didn’t want to take up any additional floor space, and I needed to be able to easily search through and grab individual cans. With this in mind, I started brainstorming creative solutions that would go beyond a basic boring cabinet.

At first I thought about using unused space next to my bandsaw, creating a drop-down storage system in the exposed ceiling joists. It’s a lot of unused space and would do a great job of hiding the cans out of sight when not needed. But I also noticed the basement support beams that are scattered throughout my workshop that can not be moved.

What about making better use of unusable space that can’t be changed? Plus it would always be at hand. After considering these options, I settled on the idea of creating a circular storage system around one of the basement support poles. This approach would maximize space efficiency and add an interesting visual element to my workshop.

To bring my idea to life, I used 3D modeling software (Use my Fusion course to learn now!) to design the components, a 3D printer to create custom parts, and a laser cutter for precise wooden discs. The design process involved several key elements: creating a base that could be easily assembled around the pole, designing spinning shelves to hold the spray cans, and developing a modular system that could be expanded as needed. One challenge I faced was figuring out how to make the shelves removable while still being stable. I solved this by creating interlocking pieces that could be secured with screws.

With my prototypes ready, it was time to put everything together. I started by attaching the base to the pole using hose clamps. Next, I assembled the rotating shelves, gluing the 3D printed pieces to the wooden discs. Finally, I stacked the shelves onto the base, making sure each level could spin freely. During assembly, I realized I had underestimated the number of cans I needed to store. It’s not a huge deal, I can make more storage, but take it from me—count your cans before you start a project like this!

The finished product is a unique, cylindrical spray paint organizer that makes efficient use of previously wasted space around a support pole. Not only does it store my spray cans more effectively than a traditional cabinet, but it also adds an interesting visual element to my workshop. I was able to think outside the box and turn a boring task into a challenging adventure, leading to a pretty fun solution. By setting constraints and embracing creativity, I was able to create a custom solution that perfectly fits my needs.

While this specific project might not be for everyone, the principle of making mundane tasks more interesting can be applied to many aspects of home improvement. Whether you’re organizing tools, planning a garden, or tackling a cleaning project, think about how you can add a creative twist to make the process more enjoyable and the result more satisfying. Remember, the goal of DIY isn’t just to save money or time – it’s also about learning new skills, solving problems creatively, and taking pride in your living space. So the next time you face a boring home task, ask yourself: How can I make this more interesting? Now go make awesome stuff!

TOOLS

(purchasing via these affiliate links supports ILTMS)

Woodworking

Finishes & Adhesives

3d Printing/CNC/Laser

Other Stuff

The post Turning Boring Storage Into an Interesting Spray Can Solution appeared first on I Like To Make Stuff.

  •  

Starting to Build My Electronics Room

By: ILTMS
1 June 2024 at 15:00

In my last video, I completely reorganized my workshop to create space for a new project—a clean room. I shifted all my woodworking tools to one side to make room for a tech-oriented workspace. The idea was to have a dedicated area for 3D printers, vinyl cutters, and other electronics that didn’t quite fit in my office or the wood shop. This new clean room was roughly the size of a one-car garage, about 20 feet long and 11 feet wide. Inspired by the aesthetic of Tron, I wanted this space to look futuristic, with lots of LEDs and sleek designs.

To get started, I had to build some walls. I used a framing nailer, despite its roofing coil, because it’s perfectly suited for framing too. I began by constructing a short wall section. This section needed to be removable because my large 3D printer couldn’t fit through a regular door. Instead of installing double doors, which seemed unnecessary, I opted for a detachable section of the wall. This way, I could easily open up a large space if needed. I framed the wall using two by threes instead of two by fours to save money and space, and I didn’t worry about standard stud spacing since I planned to cover the walls with plywood.

Once the basic framing was done, I needed to secure the walls to the floor and ceiling. Though tempted by the idea of using a ram set—a tool that drives anchors into concrete using shotgun-like charges—I chose to use screws instead for easy removal if needed. With the initial wall in place, it was time to think about the unique Tron-inspired window. This window would be a focal point, incorporating shapes and lighting reminiscent of the Tron movies. My plan involved cutting the window shape into the wall, tracing it onto plexiglass, and etching it to create glowing edges with LEDs.

Next, I had to address the ceiling, which involved working around existing utilities like AC ducts and plumbing. I decided to install a drop ceiling, similar to what I had in my home office, to hide these utilities while keeping them accessible. This meant building plywood boxes around the utilities to create flat edges for the ceiling grid. I bought a drop ceiling kit with black tiles and track, aiming for a seamless, disappearing ceiling look. However, I ran into some issues with the installation, which required redoing parts of the grid to get it right.

As the project progressed, I realized the scope was bigger than I initially planned. I often start projects with a rough 70% plan and fill in the details as I go, but this room’s intricate design elements required more attention. Instead of rushing to finish everything in one video, I decided to split the project into two parts. This way, I could ensure the final details—like the window lighting and room programming—received the focus they deserved. For this first part, my goal was to get the room ready: walls covered, painted black, and all utilities in place.

Finally, it was time to install the door. I chose a pre-hung door but faced challenges due to the custom wall thickness. I had to modify the door frame to fit, which involved some tricky adjustments.

Despite these hurdles, I got the door installed, which marked the final step before painting the entire room black. The black paint transformed the room into a blank slate, setting the stage for the next phase of adding all the Tron-inspired details. Be sure to come back for the next video when I finally finish this room and add all the lights and details to the room!

TOOLS

(purchasing via these affiliate links supports ILTMS)

Woodworking

Finishes & Adhesives

3d Printing/CNC/Laser

Welding

Electronics

Other Stuff

The post Starting to Build My Electronics Room appeared first on I Like To Make Stuff.

  •  

How To Organize Any Space

By: ILTMS
18 May 2024 at 17:57

It’s about time time. After 7 years of accumulating tools, projects, and general clutter from making stuff, my workshop had become an unorganized mess. I could no longer easily access the things I needed or find motivation in the chaotic environment. But I had a plan to rethink the entire 1,100 square foot space.

My top priorities were creating a friction-free area to immediately start building ideas, while also optimizing for well-lit video presentations. I began by ruthlessly purging anything I hadn’t used in over a year – finally recycling metal scraps, donating unused tools, and tossing sentimental project remnants. This opened up vital space.

Next, I divided the shop into distinct zones: a wood workshop, storage area, and dust-free “clean room” for electronics and 3D printers. For each area, I listed priorities, physical constraints like walls and utilities, which objects belonged there, and how I needed to interact with the objects. Mapping this out, whether digitally or on paper, provides a flexible plan to reference.

Actually, this entire process of reorganizing my shop again led me down the path of distilling my thoughts into a repeatable worksheet that can help anyone to organize any space, whether it’s a workshop, a closet, or even a drawer. You can download the free worksheet here and use it to organize your own spaces.

With my woodshop area defined, I rearranged large tool stations like saws and workbenches based on workflow. Smaller tools found new homes through trial-and-error placement. Empty walls became welcome breaths of decompressed space. Organizational accessories helped declutter remaining items.

While not fully complete, the revised layout already inspires me with renewed making momentum. I’m excited to continue iterating and improvising storage solutions and the new clean room build. I have A LOT more space to organize—that clean room is next on the list—but I’m now confident that this system will help me keep everything in order as I make my way through the shop.

TOOLS

(purchasing via these affiliate links supports ILTMS)

Woodworking

Finishes & Adhesives

3d Printing/CNC/Laser

Welding

Electronics

Other Stuff

The post How To Organize Any Space appeared first on I Like To Make Stuff.

  •  

Making a Kitchen Utensil Organizer

1 September 2021 at 01:15

We have A LOT of kitchen utensils and our collection has outgrown the containers that hold them.  In this video, I make a HUGE wooden Kitchen Utensil Organizer with the Inventables X-Carve CNC Machine.   This project would be easy to make with other tools as well.


I used the Inventables EASEL PRO software to design this project.  This would make a great housewarming gift for a new homeowner or for anyone who loves to cook.  Click here to open my EASEL design and download the drawings.

Kitchen Utensil Organizer EASEL Design

This was a fun project to design and make.  It solves a problem in our kitchen and those are always the best kind of projects.  Thanks for checking out this project!  Steve...

Kitchen Utensil Organizer

Clicking a referral/affiliate link in this article and making a purchase will help to support my channel via a small referral fee from the merchant.  Thank you for your support!

  •  

Upgraded Lumber Storage (with build plans!)

21 July 2022 at 15:46

My shop needed more robust material storage for sheet goods, boards, and tools. Using some 2x4s, you can make this Lumber Storage Rack to better organize your shop. There are plans linked at the bottom of this article so you can make one too!

  1. Size Up Your Needs
  2. Build The Frame
  3. Wrap It In Sheets

1. Size Up Your Needs

Like most of your workshops, I struggle with an excess of lumber offcuts and awkward sheet goods. In the past, I built a Rolling Lumber Cart to help solve this problem. While the Rolling Cart works really well for most shops, I have overloaded it to the point that it no longer rolls. The sheet storage is also stacked in one place, not segregated for easy access. So the biggest design point I want to address is separating materials based on their sizes so I can retrieve them more easily.

2. Build The Frame

This updated Lumber Storage Rack will be made entirely from 2×4 lumber. Right now, material prices are high so I wanted to minimize the amount and cost of the materials. The cut pieces will be joined together with pocket hole screws and glue and assembled in pieces. To help with the functionality, I decided to add some melamine bottom panels to the sheet good storage areas. Melamine is a particle board sheet with a plastic veneer outer layer. This material is really inexpensive and the slick surface helps slide large sheets out of the rack.

The build plans will explain the construction arrangement, but the lower rack will hold four different sizes of sheet goods, while the upper rack will hold 4 different size board lengths. To make the whole unit more useful, you can skin the structure with plywood or more melamine so you can hang tools or other equipment on the outside faces.

3. Wrap It In Sheets

I, of course, wanted to maximize the usefulness of the new lumber storage rack, so I added some 1/2″ plywood to the outside faces. These large, flat surfaces are perfect for attaching more storage solutions. In another project, I will be making several organization ideas using this empty space. For now, The plywood sheeting covers the structure and the stacks of organized materials held within. Of course, this step is optional, but it looks better and is super functional.

Always Improve Your Space

This new Lumber Cart isn’t meant to replace the usefulness of the previous Rolling Tool Cart. The Updated Lumber Storage Rack is an evolution based on needs. Your shop may not have the quantity of offcuts that mine does, you may need more lumber storage than sheet goods, but either way, we have an option for you. I also encourage you to assess the needs of your space periodically. Just because something is a large presence doesn’t mean that it is as effective as it can be.

Get Digital Plans Here!

The post Upgraded Lumber Storage (with build plans!) appeared first on I Like To Make Stuff.

  •  
❌