Old Growth, Modern Treasure
29 May 2026 at 14:28
I’ve spent years making stuff. I renovated our entire house, built climbing walls, tree houses, and decks. But I had never designed and built a complete structure from the ground up until this project. Earlier this year when we put in a pool, I had them pour a big concrete pad in the backyard specifically for this. I spent months working on the design, and honestly, I wasn’t entirely sure what I was doing. But I knew I wanted to figure it out, and I had a plan to make it happen. This is the first part of what’s going to be a multi-part series, and I’m glad you’re here for it.
![]()
I went through about five different designs before landing on the final one. All of these designs were built in Autodesk Fusion, which turned out to be incredibly helpful for this project. Working in Fusion let me figure out exactly what the framing needed to look like, how the roof would come together, and how much material I’d actually need. If you’re interested in learning how to use Fusion for projects like this, we have an online course called Fusion for Makers that walks you through the whole process. The software really helped me understand just how many decisions go into designing even a simple building. I probably didn’t get all those decisions right, but at least Fusion forced me to think through everything before I started cutting wood.
![]()
Once I finalized the design, Fusion output the drawings I needed to start building. All the lumber showed up in one delivery, except for the rafters which had to be custom ordered because of their length. Between the framing lumber, sheathing, and those rafters, the total material cost to build the entire structure and get it weathered in came to about twenty five hundred dollars delivered. That’s everything you need to frame it, sheath it, and make it waterproof so you can work on the inside without worrying about rain. I wanted to be upfront about costs throughout this series because that’s something I always wonder about when I watch other people’s builds.
![]()
The back wall was my starting point, and I built it in two sections so I could lift them by myself. The larger section had a window in it, which meant I needed to frame in a header, king studs, trimmers, a sill, and cripple studs. If you’ve never framed a window before, it’s actually pretty straightforward once you know the terms. The header sits on top and transfers the load from above down to the floor, and everything else supports that structure. I used pressure treated lumber for the bottom plates since they sit on concrete, and I put foam sill tape between the wood and the concrete pad. Getting those first two wall sections up solo was nerve wracking, but I managed to get them standing and temporarily braced.
![]()
After the back wall was up, I used a powder actuated tool to anchor everything to the concrete. I’d been looking forward to trying one of these for years. You drop a twenty two shell into it, set it on a nail, and when you hit it with a hammer it shoots the nail through the wood and into the concrete. It’s loud and it’s awesome. The side wall was next, and this one was twelve feet tall with no windows or doors. That meant every piece was just big and heavy. I added blocking between the studs to stabilize everything, especially for lifting. Getting that wall up by myself was probably the sketchiest part of the entire build so far. At one point I was committed and couldn’t stop it from falling if I went too far. My heart was racing, but I managed to get it upright and braced.
![]()
The front wall had a big double door opening and a window, so I built it in two sections just like the back. I was really careful during the design phase to make sure the sheathing and drywall would land on studs at the right intervals. Fusion made that planning really easy, though I still ended up with one weird little section that I assume just happens when you don’t have a ton of experience. I also realized after the weekend that I’d made a mistake with one of the window headers. The side walls are load bearing, but I’d used the same header design from the non load bearing back wall. I caught it in time and swapped in a stronger header before moving forward.
![]()
The last framing pieces were the two big triangles that make up the peak of the roof line. My wife found a picture of a house with this split roof design where two sections lean in opposite directions at different heights, and we both really liked it. So I tried to recreate that look. After about three days of work, all the wall framing was done. But before I could move on to the roof framing, I needed to stabilize everything with sheathing. Without it, the walls are just a bunch of rectangles that want to rack side to side. The sheathing locks everything in place so the structure can support the weight of the roof. I went with the Zip system, which is an OSB panel with a waterproof membrane. I’d seen other people use it successfully, and it meant I could skip the house wrap step.
![]()
Getting the sheathing panels up by myself was another challenge, especially the ones that went up high on the walls. I set each panel on a half inch scrap on the ground to keep groundwater from wicking up into the material. Once all the panels were nailed on, I used flashing tape to cover all the joints. This tape bonds with the Zip system panels through a chemical reaction when you roll it on. There’s a technique to it, especially around windows and doors, so I watched some videos from Matt Risinger to make sure I was doing it right. I also went higher than necessary with the tape as a safeguard against future moisture problems. One other thing worth mentioning is the overall size. I designed this building to be exactly one hundred and ninety seven square feet. Where I live, anything under two hundred square feet doesn’t require a building permit, which saved me time and money. I did have an architect named Byron review my plans after he heard me talking about the project on our podcast. He gave me fantastic feedback and verified that everything would pass code if it needed to. That gave me a lot more confidence moving forward.
![]()
The framing and sheathing are done now, and the structure is stable and weatherproof. The next step is tackling the roof, which I already suspect might have a problem waiting for me. But that’s a challenge for the next video. Thanks for following along with the build. Now, go make something awesome!
(purchasing via these affiliate links supports ILTMS)
The post Building a Shed from Scratch: Framing and Sheathing appeared first on I Like To Make Stuff.
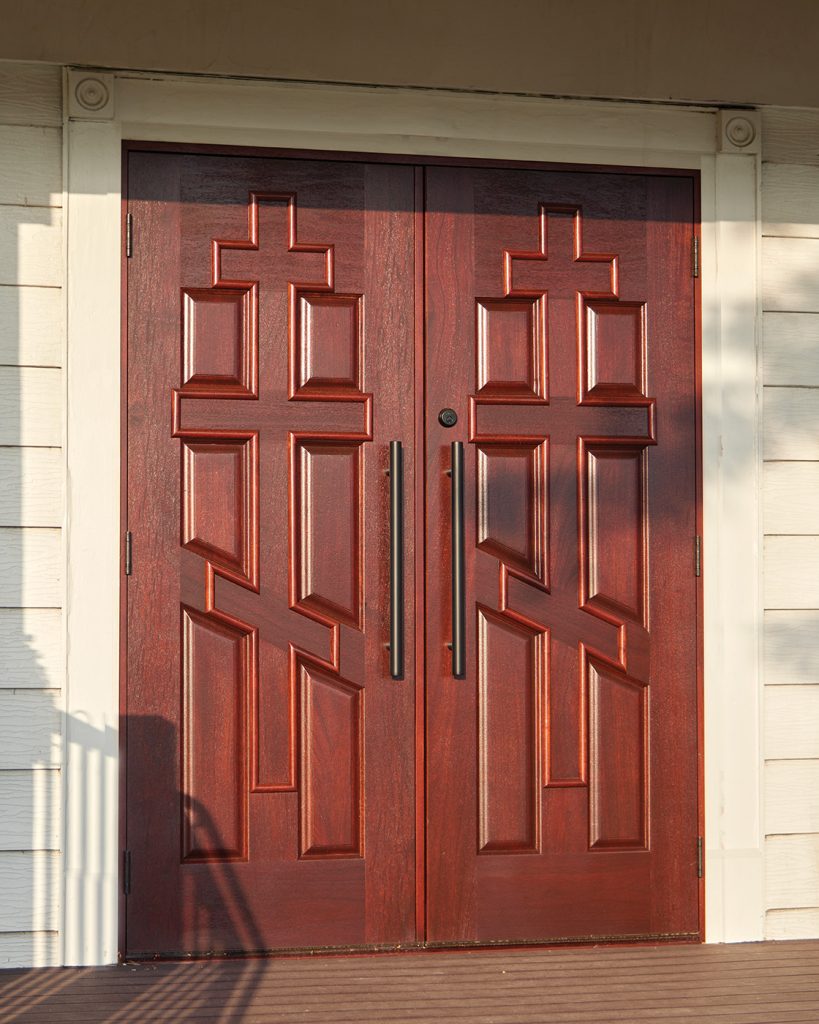
Synopsis: Robert Webb needed to house stereo and TV components, and so he decided to build a Craftsman-style cabinet. To allow sound and heat to escape—and remote-control signals to enter—he designed the doors with vertical spindles rather than solid panels. Instead of chopping lots of mortises into the rails, he cut grooves in the rails and inserted notched strips into them-creating mortises without mortising. In this article, he provides detailed instructions on the entire process, including adding decorative filler blocks.
I recently built a Craftsman-style console to house stereo and TV components, and I wanted the cabinet to be both beautiful and functional. To allow sound and heat to escape—and remote-control signals to enter—I traded solid door panels for vertical spindles common to the Craftsman style. To add visual interest, I inserted filler blocks between the spindles in a wavelike pattern.
This door design is especially helpful wherever ventilation makes sense—for a stereo cabinet like mine, or for kitchen cabinets, a bathroom vanity, a mudroom cabinet, a wine rack, or a closet. But it has a modern, minimalist style that will work in lots of places.
You can vary the size and spacing of the spindles, and there are a number of design possibilities for the filler blocks. While Craftsman-style furniture is traditionally made with quartersawn white oak, this contemporary take looks good in lots of woods. I went with cherry.
These doors are also fun to build, and they offer a number of valuable woodworking lessons.
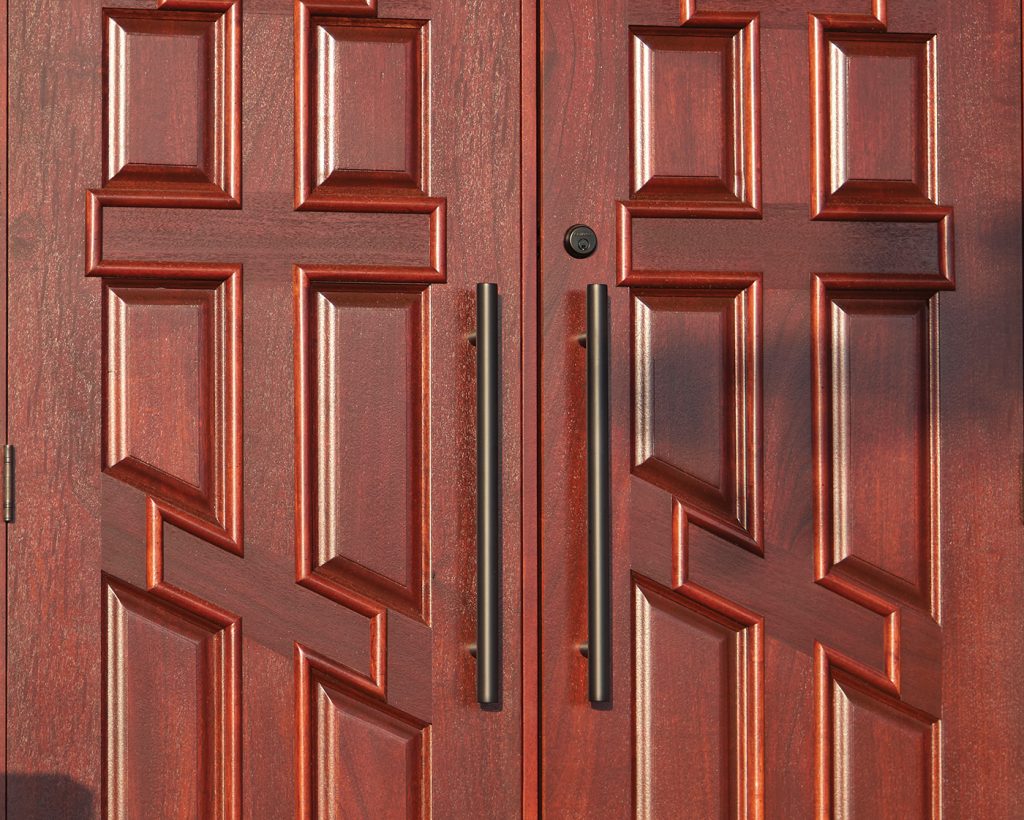
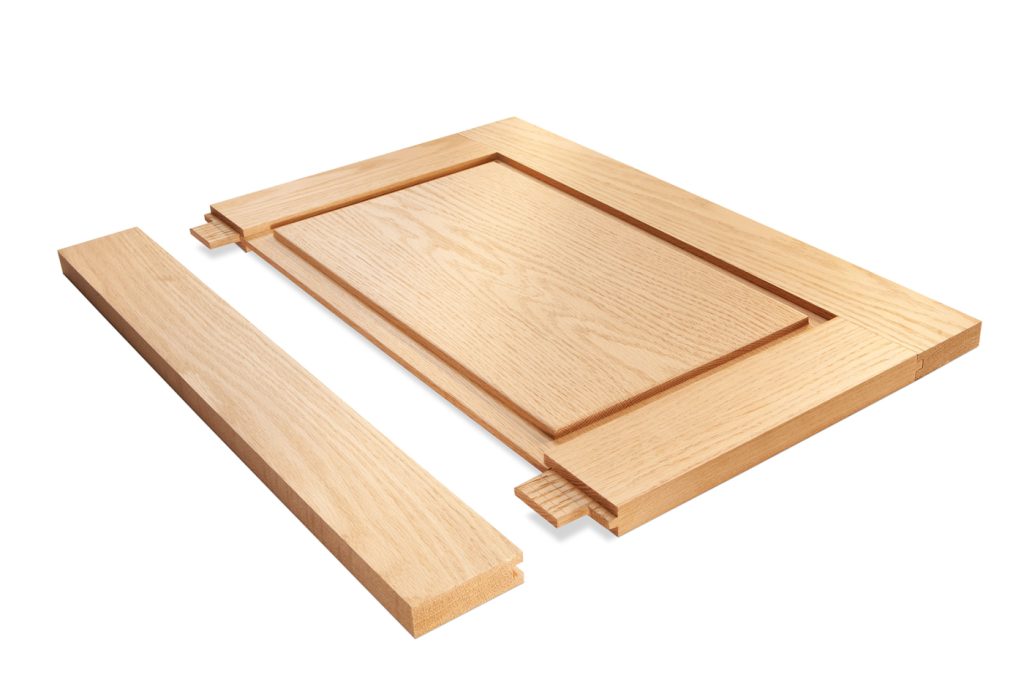
![]() The door frames are reinforced with deep mortise-and-tenon joinery, ensuring they will stay square and swing freely for decades to come.
The door frames are reinforced with deep mortise-and-tenon joinery, ensuring they will stay square and swing freely for decades to come.
You can cut the joints however you like. I cut the mortises using the simple router box described in Bob Van Dyke’s article in FWW #303 (“Quick and Accurate Mortises”), with the help of a plunge router and a spiral upcutting bit. I formed the tenons on the table saw using a stacked dado set.
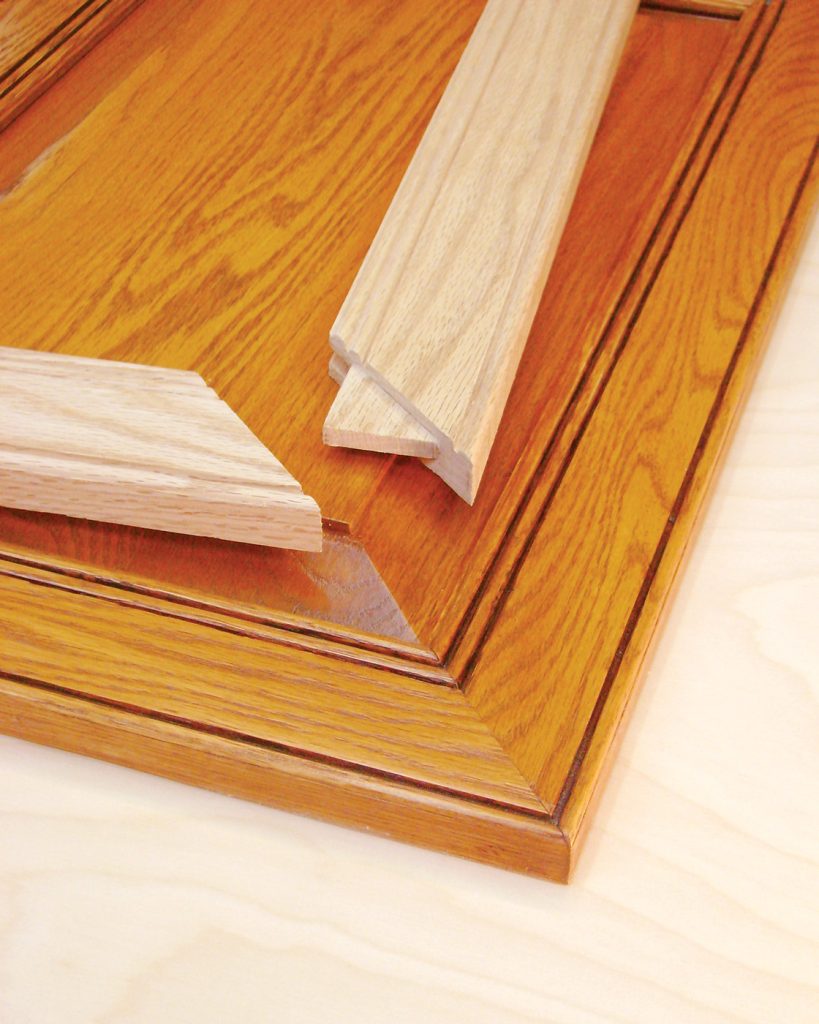
![]() The spindles are where things get interesting. I’ve learned in the past that you don’t want to mortise their full thickness into the rails. If you do, you’ll inevitably have small gaps, either right away or in the future, and viewers will be able to see down into those. The gaps will also trap dust. Instead, you want to cut short tenons slightly smaller than the spindles. The small tenon shoulders will hide the joints.
The spindles are where things get interesting. I’ve learned in the past that you don’t want to mortise their full thickness into the rails. If you do, you’ll inevitably have small gaps, either right away or in the future, and viewers will be able to see down into those. The gaps will also trap dust. Instead, you want to cut short tenons slightly smaller than the spindles. The small tenon shoulders will hide the joints.
Chopping dozens of equally spaced mortises in the rails would be tedious to say the least. My approach does away with mortising altogether. Instead, I cut grooves in the rails and insert notched strips into them—forming mortises without actually mortising. This approach is not only straightforward but also versatile, and it can be used for vertical or horizontal spindles of any size.
As for the decorative filler blocks, those are glued into place after the door frames and spindles are assembled.
| From Fine Woodworking #315
To view the entire article, please click the View PDF button below. |