Fireside Bench [Video]
6 September 2024 at 18:22
This is the second time I’ve used milk paint from Real Milk Paint Company to finish a frame. I’ve added a link to my blog about that frame. The design and construction of both frames is similar, the only difference is in the carving on the outer band and the color of the paint. You can see the first blog here where I went into more detail about making the frame. I’ve had a number of comments asking about the technique I used to finish it and this blog is about that.
After assembly, the first step was to apply the base coat of Cheesecake from RMP. It has a warmth that appealed to me. On the first frame I used their Black Iron which, as the name implies; is a deep black. For this frame I wanted to experiment with creating a custom color. The Real Milk Paint Co. has a color chart showing how blending their Soft White with any other color will customize that color. I used 1 part of the Soft White to 9 parts of the Black Iron. I discovered that using and mixing small quantities of the milk paint with their marble techniques left too much of the paint powder in the can. Lee Valley hardware has this small min whisk which I found to work well after bending the whisk section upwards which lets you get to the bottom of the can. I used the marble technique too. These pictures show the procedure:


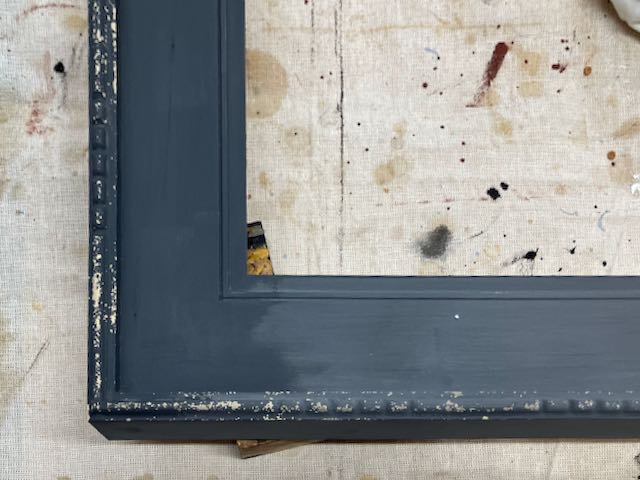
The painting this frame was created for is titled Shop Girl, it’s oil on stretched canvas, measures 24″ square, and was painted by my wife Diane Eugster. After the base coat was applied it was scuff sanded with 320 paper. No sanding between the top coats as that would probably remove some of the Chippy material. I did lightly scuff sand the final top coat with a white, nylon scrubby before rubbing on two coats of the OSMO Polyx 3043 satin. My goal was to expose enough of the top coat to replicate some aging but not so much that it’d look like a beat up old frame. The base coat compliments that light vertical detail near the center of the painting while the final coat mimics the shop girls skirt. That’s what makes a frame truly custom.
Since it’s difficult to show the entire frame in a photograph I made this short video “tour” of how the entire frame looks, it’s on my YouTube Channel.
![]()
Big box stores want to charge a ridiculous amount for an outdoor storage shed. Bob wanted to make one that’s more functional and will costs less. And of course, we’ll have plans so you can make one too!
So, have you ever had one of those days where everything seems to go slightly haywire? Well, Bob from “I Like to Make Stuff” can definitely relate. In his latest video, he takes us on a rollercoaster ride of DIY ups and downs as he transforms his messy backyard into a nifty outdoor storage shed that’s both functional and easy on the wallet.
Bob kicks things off with a dash of frustration – turns out, even seasoned DIY pros have their “oops” moments. But he quickly shifts gears and dives into his master plan: creating a storage solution that fits his space like a glove. And guess what? He’s got the tech to back it up. With Fusion 360 and a bit of augmented reality magic, he shows us how he mapped out the whole thing digitally. Plus, he’s kind enough to share a QR code so we can all get a taste of the virtual action.
Now, Bob’s all about being savvy with his spending. Instead of splurging on pricey pre-made options, he’s out to prove that a little creativity can go a long way. Armed with 2×3 lumber and some trusty plywood, he’s on a mission to build a shed that won’t break the bank but will definitely up his backyard game.
As the project takes shape, Bob takes us along for the ride, showing off some cool techniques. There’s miter saw magic for those tricky angled cuts, and a rather ingenious circular saw blade flip for tackling metal roofing. And let’s not forget those delightful moments where things don’t quite go as planned – talk about relatable!
But here’s where the real magic happens. Bob’s not just building a shed; he’s building a narrative. He’s weaving a story of trial and error, of learning from mistakes, and of not being afraid to improvise when things don’t go according to plan. And you know what? It’s strangely reassuring. It’s a reminder that in the world of DIY, it’s not about being perfect; it’s about having the guts to give it a shot.
Fast forward, and we’re looking at a finished outdoor storage shed that’s looking spiffy. Bob’s meticulous attention to detail – the sealing, the painting – it all comes together to create a shed that’s as rugged as it is charming. And guess what? Bob’s not just keeping all the fun to himself. He’s sharing the building plans with everyone, so you can roll up your sleeves and give it a shot too.
And just when you thought it was all business, Bob wraps things up with a side of giggles. Bloopers! Because, let’s face it, DIY adventures aren’t always smooth sailing. The blooper reel is a delightful reminder that even the most experienced DIY-ers have those “oh-no” moments.
So, there you have it – Bob’s backyard escapade, from tangled measurements to triumphant roofing triumphs. He’s not just building a shed; he’s building a community of DIY enthusiasts who know that a little persistence and a lot of creativity can turn even the most challenging backyard into a functional oasis.
![]()
(purchasing via these affiliate links supports ILTMS)
Woodworking:
Other Stuff:
The post Stop Wasting Money on Cheap Plastic Sheds! appeared first on I Like To Make Stuff.
My back porch a catastrophe – really, it’s a CAT-astrophe. And after some recent storms, it’s become a high priority to reclaim the space and get the disaster under control.
I want to make this screened in porch an oasis for my family to relax and enjoy the fresh air. But before I even get started, we have to get this space cleaned up and out. The potting bench is getting moved to the side of the house, all of the kids toys are getting shifted to a whole other area, and the cats litter box has to find a new home. I pressure washed the whole space so that it would be ready for a full refresh.
![]()
The main problem I have out in the porch is that the screens are from the 1980’s – they’re old and worn down and really need to be completely redone. I took down all the 40 year old rotten wood and ripped down the cat-shredded screens. Using a simple system from a general hardware store, I was able to completely redo all the screens. You use a piece of screen track that you screw directly onto the 2×4, then you overlay the screen, push it down into the slot with a spline and a screen rolling tool. Once that’s on, there’s a PVC cover that snaps right into place. This was much simpler than I expected it to be originally.
![]()
When creating the screens, I realized I needed to add something at the bottom for there to be a ledge to attach the last section of the track to. I added a pressure treated 1×2 and a 2×4 decking board to mount that track to. It will also come in handy to set things on in the porch.
![]()
There’s definitely a few tips when it comes to installing screens. 1: Use a screen rolling tool the RIGHT way. They usually come two sided; one side will be rounded and you use that to roll the screen down into the track. The second side has a scoop in the disc and that’s the side you’ll use to push the spine down over the screen and into the track. 2: The spline is a stretchy rubber and when rolling it down over the screen into the track, my best tip is to pull it tight as you roll it. It will help to get it down into that track much easier. 3: With the PVC cover snapping on over the track, the screen doesn’t have to be trimmed perfectly because that raw edge will be covered by that PVC.
![]()
With all the screens completed, I added a new screen door as well. The door I purchased was slightly shorter and wider than the original door. I needed to make the frame fit that door by lowering the 2×4 header and widening the opening both by an inch. The new door also has updated self closing hinges that are made of a heavier plastic that won’t rust over time.
![]()
Inside the porch I needed to build something that would serve a few purposes. I created a floor to (almost) ceiling shelf that doubles as a side table and triples as a cat tree and cat walk to keep the cats from climbing on the new screens. Using 8 ft 2×2’s as the 3 corners and a short 2×2 as a 4th leg, I added decking for a top to make it a small side table. I also added small shelves up the side for the cats to hop up on. Once the side table shelving unit was on the porch, I added a super long decking piece across the top of the wall as a literal cat walk for the cats. I added a 2×2 underneath of it to keep it from sagging over time and to add hanging plants across from it, too.
![]()
I hung outdoor cafe lights around the inner perimeter of the porch for some added ambiance. Locally, we found an outdoor table and chairs for an incredible sale, we added an outdoor rug under the table. We filled the porch swing with outdoor pillows and sprinkled a few plants outside for some fresh air. The space has become exactly the oasis we wanted.
![]()
(purchasing via these affiliate links supports ILTMS)
Woodworking:
Other Stuff:
The post I Can’t Ignore This Disaster Anymore appeared first on I Like To Make Stuff.
For the past few years I’ve wanted to build bench seating for the fire pit area out back. I knew this project wouldn’t be the easiest one since I had a pretty good idea of what I wanted to do – but I didn’t think it would be THIS hard.
1. Metal Tube Bending for Bench Seating
A while back I picked up a huge metal tube bender and I haven’t had the opportunity to use it yet – until now. This tool is super heavy and bulky making using it tricky. If you’re using this tool, extra hands is definitely helpful. Don’t grow extra hands, borrow a friend’s hands. Just make sure to return them.
Using Fusion 360, I can use the model to see what the measurement of the curve needs to be. This will allow me to know how much I have to bend the tubing through this insane process. Once I hit that measurement, I would be done bending. Just call me Superman.
![]()
The instructions that came with this tool weren’t helpful so it certainly took some trial and error as the day went on using it. The first piece we tried to bend was one for the books. We started out with the tool attached to the workbench in the shop. When we realized it was going to get bent too tall for the ceiling height, we moved it outside and attached it to a step stool. After Anthony broke the step stool trying to bend the tubing, I realized we could use (SEVERAL) clamps to attach it to the front bumper of the green Cruiser.
Clamping the bender to the cruiser allowed for more strength but the process still seemed….wrong. I tried another piece of tubing using the same process – metal tube bender, WD-40, attached to the front bumper and somehow – by magic or the grace of God – I could bend it with one hand. Just when I was nearing the possibility of having enough of a curve, I took the tube to the fire pit area of our backyard to check in on the sizing.
Note – that as you curve metal tubing, it will get harder as the bend starts compounding on itself. It causes more friction as it’s rolling making it a bit more difficult. But it’s still not as hard as the first one. That one was a doozy.
![]()
Using a portable band saw, I cut the tubing to the correct length and cut the pieces for the legs before heading back in the shop to weld. I tacked the cross beams and legs in place across the curve.
![]()
I knew I was going to use cedar planks but I needed to do quite a bit of math to find the right ways to curve them perfectly along the bend metal tubing. I found the center of the curve to mark where I need to cut the planks into wedge forms. Using a taper cutting jig for the table saw made the cuts perfect wedges.
Once I got all the planks into place, I used perforated angle, made cuts in it to be able to bend it to the curve of the tubing and used that to attach the planks to the bent tubing. I used short screws and washers. Next, I flipped the bench over and sanded down the edges to smooth out the curve and not be so sharp on the back of legs.
![]()
To wrap it up, I added some 3D printed caps for the end of the tubing to keep out any dirt, rain and bugs. I really don’t want a tiny bee hive starting in that tubing. Last, I added some solar powered LED fairy lights underneath of the bench just to cast some light onto the ground while it’s super dark out.
Very very last I topped it with a Totalboat finish so that the wood would last outside against the elements. We’ve already spent a few evenings out by the fire enjoying some s’mores and just getting to talk through life. I put off this project for a while because I knew there were parts that would be hard and I just wasn’t looking forward to the math. There’s lots of hard things in life whether it’s hard conversations to have or just hard projects to build. Take a deep breath and take the next step forward and make it happen. I believe in you.
![]()
(purchasing via these affiliate links supports ILTMS)
Woodworking:
3d Printing/CNC/Laser:
Welding:
Other Stuff:
The post This Bench Almost Broke Me appeared first on I Like To Make Stuff.
It’s been a long year – let’s get back in the garage with the Karmann Ghia.
The Karmann Ghia has been with us for the last few years but there’s been a pretty big road block (pun maybe intended) to get out to the farm to be able to work on it. My white Land Cruiser – my original daily driver dumped it’s oil and the engine seized up…a year ago. Since then I’ve been working to get my green Cruiser consistently running so that I can actually make it out to the Ghia.
Did I give up? Nope. Just had to get past those pesky roadblocks. The main goal is to get the whole body primed and to do that, we have to tackle some body issues first.
Back at the farm I was able to go around the Ghia and mark all the holes that needed to be filled.
There were a couple different techniques I needed to use to fix the spots around. I started with one that would prove to be one of the easier techniques for a tiny hole. I used a handheld copper sheet to use as a heat plate backing so that the weld wouldn’t stick to it but rather fill the hole. With that being successful, I moved to the next place. Using the same technique I filled a hole on the drivers side tire space. By using light behind where the hole had been I was able to see any missed places.
The next two spots weren’t too terribly difficult but the product was it’s own problem. I used two different two part epoxy filler and the first one ended up being too thin and had to be redone. But the second epoxy worked perfectly. Once dried I sanded the two spots down and they were right.
The third place began the tricky work. Because it was over the headlight, it had to become a curved repair. I cut a piece of sheet metal and had to replicate the curve of the headlight. Then I had to cut a hole in the body to fit the tiny piece of sheet metal in. With welding and grinding, it fit right in. Later I’ll be doing body filler so it will smooth it out even more.
The air compressor at the barn had been having some issues and needed a part repair. While I was waiting on that delivery, we had to move on to a few different spots before finishing the larger hole repairs.
To prep the interior for the primer, I used Rust Mort to brush on all the rust parts that had formed in the last year. Even though I had the Ghia sand blasted last year, it still had formed some small rust and luckily the Rust Mort was the fix.
With the air compressor being fixed I was able to complete the passenger side headlight hole repair and move on to the next larger piece on the drivers side.
This hole was in an opposite curve from the headlight. This hole has curves going in all directions so this was definitely going to need some problem solving. To fix this hole, I needed to cut out a larger hole in the body and fit in a piece of sheet metal to easily fill the hole. But because of the curve, it had to be met with a lot of patience.
Once the hole and the sheet metal piece were placed together, I welded a few spots, hammered down the extra places of the patch to meet the body work, and then fully welded it down. With grinding and sanding, it really turned out better than I had imagined.
With all of the major holes repaired, there was one last problem I wanted to solve before getting primer on this thing. There are two pieces in the interior that are fully rusted and I wanted to completely cut out and replace. The two pieces connect to the floor of the car so they really need to be in good shape.
I was able to remove the welding from the original rusted pieces and weld on the replacement parts. The replacement pieces actually came all the way from Germany from a guy who creates replacement parts for vintage VW’s – pretty cool!
THE TIME HAS COME!
I sanded down the body, used a tack cloth to get off anything left over, and got started on primer. I tried out a new 3M spray gun where the parts can be reusable BUT you can also throw them away and replace them. The primer was also a two part epoxy primer which was something new for me, too. We gave it a shot and I’ll let you be the judge. Did it turn out as great as we all imagined?
![]()
I’m excited to get on to the next part with the Ghia – until then.
(purchasing via these affiliate links supports ILTMS)
Welding:
Other Stuff:
The post Did I Give Up On My DREAM CAR?! appeared first on I Like To Make Stuff.
Meighan wanted a space in her house that looked Pinterest worthy but kept the cost way under budget. Can we create a built in bench breakfast nook?
Meighan recently moved into a new house and we wanted to help her make a corner space in her kitchen more custom and functional. She had a vision for something that looked….expensive. She wanted a built in bench with storage but it also had to allow for airflow for the air return vent – on top of that, her kitchen table is antique so it didn’t follow traditional sizing for seating. We got to work problem solving and making this breakfast nook Pinterest worthy.
![]()
First we designed the space in Fusion 360 – if you don’t know about Fusion learn here – we added in all the measurements so we could design the bench to fit in just right. The framework for the bench had to be very specific to the air return on the wall to make sure it had enough surface space on the front of the bench to allow for air flow. Also in Fusion, we were able to design the right size kick plate to allow for foot and leg space under the table along the bench. From there, we were able to see the sizing of all the supplies we needed.
![]()
At the hardware store, we were able to cut down some of the plywood based off our cut sheets so we wouldn’t have too much to cut back in Meighan’s shop. To save money for the bench frame, we went through the stack of less desirable 2×4’s at the hardware store to find the best looking boards. It took some extra time to find the right ones, but we saved $6 a board. While at the store, we found laminated solid wood that were the right measurements of the seat for the bench.
![]()
One of the biggest differences from the last time we made stuff with Meighan is that she has a garage shop filled with tools now. One of the best ways to save money is buy buying tools second hand or – if the opportunity presents itself – accepting hand me downs from friends or family. Meighan got all of her large tools from someone who had upgraded their shop and needed to get rid of older tools quickly. For the bench we needed to use a Table Saw, Miter Saw, Jigsaw, Drill and Driver, and Kreg Pocket Hole Jig.
![]()
Back at the shop we cut down the boards to length and added pocket holes to all the boards. Bob cut down the plywood for the front of the bench including jigsawing the kick plate. Tying the bench frame together with the plywood was quick and simple using a Kreg pocket hole jig, pocket hole screws and a driver.
![]()
Once we got the frame in place, we were able to see where we needed to make any adjustments and where the back of the frame would line up with the wall. After taking down some of the feature wall trim, the bench fit in smoothly.
For the bench top, we added full overlay hinges and gas struts to help soften the lid as it closes to keep little fingers safe from being squished. Together, those pieces are still cheaper than buying torsion hinges – in turn, saving us some money. To add some comfort, Meighan used some leftover fabric and a twin size mattress pad to make seat cushions.
![]()
Our goal here was to make something that looked awesome but didn’t break the bank. We spent a total of $160 and made it look incredible. What do you think? Pinterest worthy on a budget?
![]()
(purchasing via these affiliate links supports ILTMS)
Woodworking:
Other Stuff:
The post Quick. Cozy. WAY Cheaper Than You Think. appeared first on I Like To Make Stuff.
Beds are EXPENSIVE and we have made so many different types – check out this custom designed loft bed Bob and Josh made. You can make it (and others like it) with the build plans!
Josh spent a ton of time researching the best loft bed for his son and couldn’t find what he really wanted. Not to mention everywhere had quality loft beds for $1,000 and up. Instead of putting a car down payment on a bed, he hopped into Fusion 360 and designed a custom loft bed with a built in desk, shelving, and closet.
When designing the bed, Josh had to keep in mind several things. First, maximizing the vertical space. He wanted both boys to have their own individual, custom spaces so that meant having to use the vertical space which lead to a loft bed style. Second, customizable. Not only did he want it custom for his son and bedroom, but he wanted to offer customizable options for build plans, too. Third, minimal tools. Working in a small bedroom or even in an apartment, there’s not a lot of space for large tools. Fourth, Easy to build. Beds are pretty simple construction!
After the design was completed, Josh used the build plans and took the cut list to the hardware store for them to cut. They were able to cut the plywood down to the exact dimensions needed – for free. Basically, if you don’t have a table saw or a circular saw, you can have huge sheets of plywood cut down for you at the hardware store.
![]()
Using the plans, Josh knew which pieces needed pocket holes – spoiler: it was a billion pocket holes. We used two different type of pocket hole jigs for the bed – both of which can be purchased at local hardware stores. The plans also showed where edge banding was needed. Since most pieces were cut at the store, it didn’t take long to get the pocket holes and edge banding completed. To cut the closet door handle and the ladder to get to the loft bed, Josh used a jigsaw. At this point, we have used minimal tools to get this bed prepped to be put together.
For this version of the loft bed, Josh used a huge slab of wood he got off Facebook Marketplace. For the desk, you can easily use pre-made butcher block counter tops and you can have those cut down to the size needed for the desk. Josh used the CNC to carve out the desk pieces and milled it down to size. There were a few places that needed to be filled with epoxy. Using a bright blue hue, he mixed some Total Boat expose and filled the gaps.
Once the bed was painted and the epoxy dried, it was time to put the bed together. The plans Josh and Forby created allowed us to know step by step what to do to get the bed put together in the small space. To finish up the closet door, Josh used a Kreg hinge jig to make the perfect size for the hinges. Tons of pocket hole screws later, we had a completed bed. Finally, Bob added remote controlled puck lights to the undersize of the bed over the desk for additional light.
![]()
Above all, this loft bed looks amazing and Josh’s son loves it. This was also just one of the 3 loft bed designs that are included in the build plans. The best part of the build plans is the included QR code to see the bed as an AR model in your space. You can do this before you even buy the plans to see how it will fit in your room.
![]()
In conclusion, if you make this bed or others included in the plans, be sure to tag us!
(purchasing via these affiliate links supports ILTMS)
Woodworking:
Other Stuff:
The post You Can Make This Loft Bed in a Weekend // With Build Plans appeared first on I Like To Make Stuff.
Nothing stinks more than a fart chair that tells on you.
We have officially released our Arduino for Makers course and what better way to share that with you all than making an Arduino based project. For the last several years I’ve had “fart sensor” on my project to do list and it’s finally time to make it happen.
The fart sensor not only detects methane from stinky farts but it can also detect carbon monoxide, hydrogen, natural gas, and even propane. There several other sensors like this, too. Certainly, this project can be more than just sensing methane from farts, but it can be useful in your home as well.
![]()
To start, I used the sensor, an Arduino Uno (which is the same we use in the Arduino for Makers course) and then a tiny screen. Next, the coding for this was very simple and it took me less than 10 minutes to set up. This sensor works by checking the combination of all the gasses at once and then the tiny screen will give you a concentration number. Finally, I set the sensor to a numeric threshold so when it crosses a 500 threshold, the screen will light up with any words I code it to say.
![]()
Therefore, since this sensor also detects propane, we used a small propane torch (without lighting the flame, obviously) to test out the sensor. Unfortunately, not everyone can fart on command to test this out as many times as we did. Finally, with a completed set up, I added it to the chair to make this really come to life.
![]()
We found a rattan chair at our local Goodwill – we chose this type of chair specifically so that gas would pass through the holes of the weaved chair seat. First, on the underside of the chair I cut a hole in the elastic strapping to mount the sensor. Next, I tested using the propane to make sure that my hypothesis was correct – the sensor works perfect with the weaving of the rattan chair. Last, with the sensor mounted, it was time to take it to the next level.
![]()
At this point, we’ve proven that the sensor works and will function within the chair. Next, we need to make this chair into a fart prank. First, we need to add a relay to the Arduino setup. We talk about this in the Arduino for Makers course – the point of the relay is to take the input from the Arduino, and you can use it to control the higher voltage output – like plugging in a lightbulb and a siren. A relay is a great tool to use to connect the Arduino to something bigger to take that project that requires more power to the next level.
![]()
Next, using the relay, I added a bright red light that we mounted hidden under the chair along with a buzzer. Using jumpers, I jumped the relay over to the Arduino – and by adding 6 additional lines of code, the light and buzzer worked! This is the perfect example of taking your base line Arduino and add things onto it a piece at a time – all of which are covered in the new Arduino for Makers course.
![]()
Since everyone on the team knew about the chair, we really couldn’t prank each other. Instead, we took the display from the practice seat progress chair we made a while back and hooked that up to the chair making the fart chair a game for the team. The highest fartiness score will win – trust me, it’s not who you think will win. Spoiler: it’s Meighan.
![]()
This project was ridiculous but it really shows you that basic electronics can make your project really cool – or really silly. Be sure to check out our new course Arduino for Makers!
(purchasing via these affiliate links supports ILTMS)
Electronics:
Other Stuff:
The post I Made a Fart Detector appeared first on I Like To Make Stuff.
I got the new PSVR2 headset and it has one problem and I fixed it.
Normally for projects, I’ll have the plan in place and I’ll just carry out my build plans. Instead, I want to take you through more of my process to see how I come to a final product plan.
There’s several things I consider while going into my design: A. Who is the consumer? B. What functions does your object need to perform? C. How do you want it to look?
A.Who is the consumer? This isn’t necessarily the “customer” and in this case the consumer is me.
B.What Functions does your object need to perform? Storing the PlayStation VR chargers and the controller and the headset with the cord.
C.How do you want it to look? I want it to blend in with the headset – so I went with a matte white and black.
![]()
First, I started on graph paper so I could draw out what my idea was looking like. You can really work on weeding out issues on paper before even getting started. Next, I knew I needed a place to hold the controllers and also have a way to nestle the headset over the controllers. Last, after having my sketch, I was able to take exact measurements of the PSVR and then applied those measurements to the drawing to start iterating this.
![]()
3.PSVR2 Stand Prototype Materials
I don’t start out immediately thinking my first iteration is the final product so because of that, I’ll start my prototypes out of cardboard, coroplast, foam board, or a plastic sheet of styrene material. For this project specifically, I started the iteration out of cardboard.
First, I traced out the shapes of the PSVR onto the cardboard to get a rough idea of how big or small the holder needs to be. And with that, prototype number 1 came to be. Next, it had the base portion which would hold the controller and charger as well as the holders for the headset. Last, from this prototype, I learned that the surfaces that the headset sits on needs something to hold the headset a bit sturdier. I also noticed that the front holder could sit a bit higher.
![]()
From those notes, I was able to replace those elements with cut out pieces of cardboard in the new shapes. It was at that point that I realized I needed to distribute the weight of the front of the headset over more than just one piece of material. This change will allow the headset to nestle in a bit better to keep it from falling off. With that change I also had to update the base to accommodate the new front holder.
![]()
At this point I’m ready to take the iteration to some MDF to see the changes made in a harder surface. But before we do that, we need to make sure that this iteration is accomplishing the checklist of needs for this PSVR stand. By checking in with that list, I’m able to see that making it mountable and repeatable both needs attention.
![]()
5.Solving PSVR2 Stand Prototype Problems
I’m ready to cut this out of a harder material to see if we can solve the two problems that still need attention. By seeing this iteration in the MDF, I’m able to address some other issues that came up as well. We didn’t need the headset holder at the back of the stand to be mounted from the bottom, therefore I changed that to come from the back piece. Once that decision was made, I was able to do finger joints along the back to provide a strong support.
Seeing the front pieces that will hold the front of the headset, I was able to notice that they were entirely too thick. After taking those pieces down to a one inch material, I decided we could take this prototype to the next step.
![]()
From this prototype I learned that we can cut down the amount of material that the base is to lower the cost of materials. I also realized that we could make a different holder for the front of the headset since the place that needs the thickness attention is at the top, not the bottom.
6.Readjusting PSVR2 Stand Size
First things first: let’s cut down the material. First, I used very thin masking tape to mark the lines where I wanted to thin out the sides of the base. When it comes to the manufacturability of this product, what I would end up doing would be to take a picture of the base and take it into CAD so that it can be mirrored on the other side with duplicate lines.
![]()
With this prototype, it’s checking all the boxes. If I want to use a CNC, we’ll use 1/2 inch MDF for everything but the holders for the headset. Next, I went into Fusion 360 and modeled out the front and back shelf holders for the headset. The piece I modeled for the front has two pins that will fit right down into the base for support. The back piece also has two holes to dowel into the back wall.
![]()
For my final version, I used a router to cut out a bowl shape for the controller charger. First, I painted the base white to blend in with the PSVR. Next, I 3D printed the holders in black for the front and back headset holder. This stand fits the headset and checked off all the boxes of things I wanted to accomplish.
![]()
The best part of this is that it’s super minimal, and goes right in the wall just as I like. Be on the lookout for plans!
(purchasing via these affiliate links supports ILTMS)
Woodworking:
3d Printing/CNC/Laser:
Other Stuff:
The post I Fixed My Problem with the PSVR2 appeared first on I Like To Make Stuff.
I’m so excited to finally introduce you to my newest project vehicle: a 1976 FJ Land Cruiser. My first big project for this cruiser is to make a grill on the go that will be attached to the spare tire on the back and it’s sponsored by Goodyear!
This cruiser needs a lot of work, there’s holes, rust, missing weather stripping, but the tires are brand new from Goodyear – they’re the Wrangler Workhorse HT tires from Goodyear. For this project, I wanted to focus on something fun since the cruiser is already running pretty consistently. I used the existing mounting points for the spare tire but wanted to attach a grill that can fold up and down.
![]()
First things first, I had to start in Fusion 360 to get the table and grill modeled out. I took all the real world measurements and put them into the program to find our best solution. From that, I was able to add and remove different pieces to really see where I needed to start. The mounting piece needed to be accomplished first in order to make the foldable table.
![]()
Using a protractor I was able to measure out the right circle to fit in the grill mounting section of the spare tire on a piece of steel. The holes for the mounting piece are kind of in a weird spot so figuring out those locations took some problem solving. Next, I traced the backside of the bolts to a piece of cardboard to find the right locations to cut in the steel. It was important for me to find the center points between all 3 mounting holes – it allowed me to find the right orientation to the top as I transferred that to the steel for the grill.
![]()
Now to make the frame for the grill mount, I used some square steel tubing I already had on hand. After cutting that down to the sizes I needed, I welded them together in almost an upside down “T” shape. Last, I added gussets to keep that framing strong; I wanted to make sure the framing looked “finished” so I 3D printed some caps that will fit perfectly in the open tubing to seal it up.
![]()
To start, I used an 1/8 inch aluminum for the table. I don’t have a lot of experience with welding aluminum so this is where a ton of planning and patience came into play. First, I ripped the aluminum down to size and marked out the shape of the grill table top. Next, I wanted to fold a long piece of the aluminum into a “U” shape and honestly, I was procrastinating doing it – it was just going to be some tedious work. Last, I used a metal break that I put together a while ago and it worked exactly how I needed it to to bend the aluminum.
![]()
Once I began welding the aluminum, I realized it just wasn’t going to work. The problem was that the more heat I put made it deform and wouldn’t hold the pieces together and I couldn’t get it to work. Before I even spent a lot of time practicing to weld the aluminum – but I really just didn’t have the skillset yet to weld such a large piece of aluminum.
![]()
I took a step back, took a deep breath, and made a plan. First, I decided to call my local steel yard and recreated the same thing with steel instead of the aluminum. I welded everything together exactly as I had planned for the aluminum. It ended up being heavier that I had wanted but it worked out. Next, I had to weld on a piece for the front to hold the grill in place and then I could connect the table to the mount. Last, I connected the tabletop and the mount together with a set of hinges.
![]()
By adding a few brackets I could add a strap to hold the grill and table top in place. To finish it off, I painting it black which really made the red grill pop. After mounting it to the cruiser, I headed to to the farm to test it out. It’s exactly perfect and the grill test was absolutely delicious – Anthony and Meighan approved. Big thanks to Goodyear for sponsoring this build – be sure to check out their new Wrangler Workhorse HT tires!
![]()
(purchasing via these affiliate links supports ILTMS)
Woodworking:
Welding:
Other Stuff:
The post Grill on the Go for my Classic Land Cruiser appeared first on I Like To Make Stuff.