WoodCentral
❌

Normal view

WECREAT 45WATT VISION PRO LASER REVIEW

27 February 2026 at 14:35

πŸ’Ύ

This review might be a little different from most tech reviews. I am not a tech guy, so you are not going to get a deep dive into the minutia. I love what tech can do, but I like to keep it simple and focus on the project at hand rather than getting lost in the machine's details.
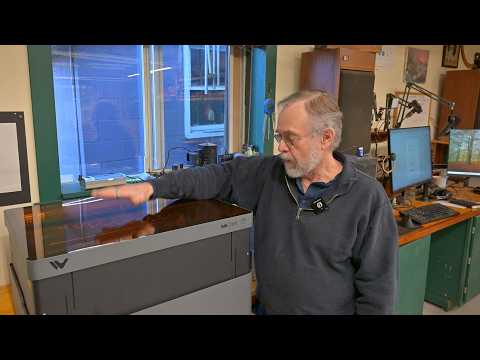
I have had the 45-watt Wecreat Vision Pro for several months now. For the most part, I did not go looking for projects to use it for – I waited until an opportunity to use it presented itself, and lots of opportunities presented themselves.
The Wecreat Laser Pro proved to be a compact yet powerful machine – and best of all, it is very simple to learn and use.

The Wecreat Vision Pro
https://wecreat.com/products/wecreat-vision-pro

For more on Vision Pro, see David Bedrosian’s Instagram posts.
https://www.instagram.com/bedrosianwoodworks/


Frayed Cable fix
https://youtu.be/IMBiKSoOBpo?si=Bea88pbpvCZsoH6i
  •  

Assimilating my New Wecreat Laser into my Workflow

3 December 2025 at 17:19

πŸ’Ύ

In this video, I show you how I have started to assimilate my new Wecreat 45-Watt Vision Proin into my workflow.
The project is a quirky/fanciful gate for our front yard. Partway through the project, it dawned on me that I have a new laser. So I went to work incorporating it.
When I get a new machine or tool for the shop, it takes a while for my thought processes to assimilate it into my design and engineering capabilities.
I have several tools and machines in the shop that can do the same thing. But there is often one particular machine that does a specific operation better than the others. When a machine is fully integrated into the shop, it is used to its full capabilities and at its best.

To learn more about Wecreat lasers follow this link:
https://wecreat.com/
  •  

Cutting veneers on my Laser

12 September 2025 at 16:22

πŸ’Ύ

I have one of my Cocktail Tables in process in the shop. In the past, I made segments for the top out of solid wood. This time around, I want to use veneers so I can get a repeating pattern.
The segments are an odd shape, and standard cutting methods don’t seem to apply. So I am putting my Wecreat Vision Pro 45-watt laser to work.
I was able to superimpose the pattern over the camera’s image of the veneer to tweak the positioning just how I wanted it.
  •  

A UNIVERSAL FIXTURE FOR A SLIDING TABLE SAW

1 August 2025 at 12:32

πŸ’Ύ

I often find myself needing to machine odd-shaped parts of a piece of furniture. With my latest project, I finally decided to make a fixture that registers and holds such pieces on my Felder sliding table saw.

Both the fixture and the parts being machined need to be cut out with precision for this to all work. CNC, Shaper Origin, or similar technology is required. (This might be your excuse to buy some new machines.)

The essential idea behind the fixture is a known gridwork of holes to which a plate with an identical gridwork is attached. The gridded plate has the shape of the part cut into it.
A sliding table saw is probably not necessary, but it is ideally suited for a slider. If I were making this for a cabinet saw, I would probably attach it to the rip fence in some manner.
If there is any interest in the .dxf drawings I used to make this fixture, let me know, and I will make them available.
  •  

Dining Table Extension Slides for the Gamble Table (Greene and Greene)

22 September 2024 at 22:17

πŸ’Ύ

Extension tables are done in a variety of ways. In this video I will give an overview of how I make the extensions for the Gamble Dining Table.
The Gamble Table is an original Greene and Greene design. My version is not an exact replica but is recognizable as such.
I am not certain how the Hall Brothers (builders of G&G houses and furniture) approached the slides for the original table. The workings of my slides are based on an old article from Fine Woodworking Magazine:
Extension Tables by Jeremiah de Rahm
issue #65 July/August 1987
If you are interested in extension tables I highly recommend the article.
  •  

Bessey K Body VS Pony Pipe Clamp Review

22 June 2024 at 14:30

πŸ’Ύ

For the longest time I used Pony Jorgenson 3/4" Pipe Clamps exclusively. I had had bad experiences with parallel clamps. I could not get the head to move in and out with any consistency - they drove me crazy! Plus, I felt they were addressing problems that did not exist - namely even clamping pressure and parallel clamping for flat panel glue-up. I had always been able to get even clamping pressure and maintain flat panels with the pipe clamps.
BUT - a few years back Bessey sent me 4 free K Body clamps. I started playing with them and soon found I loved them! It wasn't that they could do stuff the pipe clamps could not - but they could do many of the same things with much greater ease. They were time savers!
In business, time equals money. If I were still making a full time living in the shop (semi-retired now) - I would seriously consider filling my racks with K Body clamps. But they are very expensive, so I only buy a few at a time. (When I finish a paying job I might reward myself with a few of them)
This is not to say the Pony Pipe clamps do not have their place. If I had not been sent the freebie K bodies, I would have been happy to continue with them. If used correctly they can do everything the K Body clamps can do - just a bit slower.
If you are on a limited budget I would suggest starting with pipe clamps. They are much cheaper. Their expense can be further eased by buying fewer fixtures and more pipes of various lengths . The fixtures can then be changed out as needed.
If you do not have budget restraints, I would go with the K Body clamps.
  •  

Obsidian Ebony Review - A substitute for true ebony

10 June 2024 at 21:05

πŸ’Ύ

I use a lot of ebony in my Greene and Greene furniture. Many years ago I acquired a lifetime stash. But - if you are in need of ebony today - its very expensive and often hard to find. Not to mention the fact that ebony is a protected wood.
Years ago there was a product called "Ebonex". It was walnut infused through and through with black. It sort of /kind of worked - but not really. It was much softer than real ebony and didn't come close to producing the shine of polished ebony.
I was sent a sample of a Canadian product called "Osbidian Ebony" made by
Thermalwood. https://thermalwoodcanada.com/music-components/#obsidian-collection
This stuff really works! I have a very hard time telling the difference between real ebony and the Osbidian stuff when looking at polished end grain. The polished long grain shows brownish highlights - but they are within what I would consider the acceptable range.
I am told this product is primarily used for musical instruments. If you are building Greene and Greene furniture (or any doing any woodworking that requires ebony) I would recommend giving this stuff a try.

Osbidian Ebony can be purchased here:
https://rctonewoods.com/RCT_Store/obsidian-ebony-c-174/
  •  

Felder AD 941: Two Years On

13 December 2023 at 13:28

πŸ’Ύ

It's been a couple of years now since I received my Felder AD-941 Jointer/Planer. See my previous review of this machine for a more in-depth look.
The reason for this video is not only to share my thoughts after more experience on the machine but to go back and check the flatness of the tables for stability.
Some thoughts on the flatness. In the video I stated the accuracy of the Lee Valley straight edge to be .002 - I checked, and it is actually .003.
In my original video I found the flatness to be within .002. Last week I confirmed it to be the same. BUT - as you will see in the video this time around that number increased to .005. That's a difference of .003 - within the margin of error of the straight edge. I suspect hoverer, there is more variables at play here. My methods are not based on any training. If there are any machinist out there that would like to comment on this - I am all ears.
Given the tolerances and variables at play it is difficult to know if the tables have moved (warped) . If they have - it is very very little!

The machine has proven to be very reliable with only insignificant issues arising. One time there was need to adjust the heigh of the outfeed table (quite easy to do) and on another occasion there was a screw that came loose inside the cowling of the motor- another easy fix.

Incredible as it may seem the onboard DRO has not needed re-calibration since my last video. This is much different than the experience with the DRO attached to my old Powermatic planer - which required calibration so often as to make it unworkable.

I rotated the cutterhead inserts for the 1st time about a month ago. It was easy to do - just took a little time.

Felder likes to advertise that the cut from their spiral heads is so smooth as to require little or no sanding afterward. I don't buy the notion of no sanding - but my need to sand parts has been greatly reduced. Tear-out on figured woods is at a minimum - it still exists to a small degree but is much better when compared to other spiral heads I have owned.

I still get a thrill when I walk into the shop in the morning and see this machine - it's been all I hoped for!
  •  

PantoRouter Upgrades: The Pneumatic Clamps

5 November 2023 at 12:50

πŸ’Ύ

There PantoRouter has had some serious upgrades!

The most anticipated (at least the most anticipated for me) of these was the pneumatic clamps with a swivel base. The old clamps got the job done, but felt cumbersome to me.
The swivel base allows for clamping in any direction (the old ones did not). The pneumatics opens up the PantoRouter for production work and provides increased accuracy.

The new lever action clamps are also a substantial improvement over the old system. With the same swivel base, they also provide increased clamping versatility. While they offer an improvement in production capabilities, they don't rise to the level of the pneumatics in that regard though.

The improvements to the thickness gauge are welcome as well. I found that the increased surface area of the new thicknessing "block" improved the accuracy to the point that I did not have to use the fine adjustment. Having only run a couple of small projects though - I may find use for the use for the fine adjustment with more use.

Overall, the addition of the pneumatic clamps along with the swivel base comprise the most serious upgrade to the PantoRouter yet. They provide a massive increase of productivity, along with a leap froward in ease of use, and accuracy!
  •  

Fritz and Franz with DRO (digital read out)

15 October 2023 at 21:44

πŸ’Ύ

The outrigger fence on my sliding table saw has a DRO - but it is mostly useless for pieces less than 8" or so.
Since precision measurement is an integral part of my approach to woodworking - I have been wanting to build a Fritz and Franz jig with a DRO.
I scoured the web and YouTube for examples, but couldn't find anything.

So, I came up with my own. This video is not a how-to for making the jig - its more of an overview that hopefully will help those who are inclined to make one for themselves.
There's a couple of good YouTube videos on the Fritz & Franz that can recommend:
Steve at Extreme Woodworker https://youtu.be/OokHlPj4vqQ?feature=shared (I borrowed a couple of Steve's ideas)

David Bedrosian
https://youtu.be/w7a8EIzDGBU?feature=shared

I don't have enough experience with this particular DRO to recommend it, but this is the one I used in the video.
https://www.igagingstore.com/12-Absolute-Digital-Readout-DRO-Stainless-Steel-S-p/205480.htm

If you own a slider and have made a Fritz & Franz jig with a DRO - please comment below and tell me how it went.
  •  

K 700S Final Thoughts

23 August 2023 at 15:08

πŸ’Ύ

It’s been a year now since I took delivery of my Felder K 700S Sliding Table Saw. I’ve had time to form some solid opinions of it.
I had originally thought I would keep my SawStop (which is a very good saw) but it was a tight fit for both saws in my space. I eventually decided to sell the SawStop and rely upon my new slider alone. I have no regrets in doing so.
It’s a wonderful machine and joy to use! It oozes a feeling of precision and is incredibly well built. Sometimes as I walk by, I give the sliding mechanism a push – just to feel the smooth operation.
If you are contemplating placing an order for a Felder Slider, there is one important thing to keep in mind though . Felder has many configurations, and the components are not all compatible with the various accessories.
After my purchase, I wanted to add DRO’s to both the outrigger fence and the rip fence. Neither were compatible with the way my saw was configured. To be fair I was quite emphatic when ordering my saw that I would still be using my Sawstop for ripping - so the fence was not a priority. But I changed my mind.
Not a big problem though…
For the rip fence I simply used a Mighty Mag with a dial indicator to zero in quickly and accurately – just as I did with the SawStop.
For the outrigger DRO I found a 3rd party unit from Lamb Tool Works. It is incredibly accurate and easy to use. I love it! If there’s much interest, I will do a separate video on it.
https://lambtoolworks.com/dro-flipstop
I believe I made a good decision to buy this machine. Knowing what I know now I would not hesitate to purchase it again. I would, however, keep in mind future accessories and order accordingly.
  •  

SawStop Folding Outfeed Table

24 March 2023 at 18:06

πŸ’Ύ

The Folding Outfeed Table in this video was made for my SawStop table Saw - but it could apply to most other cabinet saws.

The folding hardware I used was " Wallmaster 24inch Folding Shelf Brackets " from Amazon. https://www.amazon.com/gp/product/B07VXWBHWF/ref=ppx_yo_dt_b_search_asin_title?ie=UTF8&psc=1

The idea to do this video came to me after I put the saw up for sale . Several people inquired as to the folding table. I shot this footage on the fly before the saw was picked up and left the shop.
  •  

Woodshop Tour

23 February 2023 at 12:23

πŸ’Ύ

Welcome to my woodshop! This is my personal space where creativity and experience come together to create furniture.
I have had many of my own shops and worked in several commercial shops over the last half century. Throughout that time, I have found the constant theme to be change. New knowledge and experience combined with creativity equals change. It’s a cycle that is always on repeat and what makes woodworking so exciting.
As we go through the shop, you will see a series of stations. Each is optimized for its purpose. There is not enough time to thoroughly cover any one station. In the short time we have not every detail of my shop is included. Some things have been discussed in detail in previous videos – so I went light here. If there is something you would like me to expand upon - let me know in the comments below.
Having worked in a variety of shop, I realized many years ago there are many ways to do the same thing. Sometimes there is a wrong way - but not always. Often it boils down to a matter of personal preference or resources at hand. I would never expect you to model your entire shop on mine. Whether you are a beginning woodworker or and experienced pro - I hope you find something of value in this video.
So come on in and join me for the tour!

0:00 Welcome to my Shop
2:23 Regulae Stultis Sunt ( Rules are for Fools)
3:00 Felder K700 S Sliding Table Saw
5:55 Felder AD 941 Jointer Planer Combo
6:00 Downdraft Sanding Station
7:31 Lumber Storage /General Storage
9:36 Terry's Quilt Studio
10:49 CNC machine
15:03 Sawstop Saw
17:30 MultiRouter- Spindle Sander- Shaper
18:23 Widebelt Sander - Edge Sander
18:49 Bandsaw - Vacuum Bag Fold Down
19:49 Dust Collector - Shaper Origin Station
20:12 PantoRouter Station
20:36 Shop Supplies Storage Room
21:19 Router Tables and Routers and more Routers
24:13 Bench Room
  •  

Multi-Router Auxiliary Plate part 2: Modifications

10 December 2022 at 18:38

πŸ’Ύ

This video covers some improvements to my Multi-Router Auxiliary Plate.

If you have not already watched my previous video on the auxiliary plate - you may want to do so. https://youtu.be/TwhAXFwAtFg
This video will only cover modifications and ideas for future modifications. The previous video will cover the basic operation.

Again – I will release for free the TurboCad file – dxf file and the svg file. Whether you have a CNC or Shaper Origin these files should allow you to cut the auxiliary plate out.
  •  

Multi-Router : Making an Auxiliary Table Plate

7 December 2022 at 22:25

πŸ’Ύ

I've long wanted to make an auxiliary plate for the Multi-Router table.
Many possibilities open up once the reference holes are mapped. With the aid of a CNC or Shaper Origin reference plates can be easily made.
You can download the ,dxf - .svg and TurboCad drawings from my website for free. This is an "on your own" offering. I am not able to offer support for any problems that might arise from working with the drawings.
https://furnituremaker.com/product/multirouter-auxiliary-plate/
  •  

Felder K700 S Zero Clearance Insert

24 September 2022 at 15:31

πŸ’Ύ

The zero clearance insert in this video is for the Felder K700 S Sliding Table Saw. BUT – it does not fit some older versions. Verify with the drawing before cutting out.
My saw is new as of 2022. I am not sure if this insert will fit any other models. If it fits yours and its not a K700 S - let me know in the comments so I can pass that info along.

You can download (for free!) the DXF file with details and notes. Also in the download is an SVG file for Shaper Origin users.

https://furnituremaker.com/product/felder-k700-s-zero-clearance-throat-plate/

If you have a Hammer K3 sliding table saw, Ramon Valdez has some very nice zero clearance inserts for sale.

https://ramonvaldezfinefurniture.com/product/zero-clearance-insert-for-felder-hammer-k-3-winner/


As of this video, I have only had my saw for a very short time and do not scoring blade yet (I thought the one from my old Hammer K3 would fit – it doesn’t). I am not sure if there is enough room below the stiffener for the scoring blade before the initial break-through. You may have to do the break-through in the same manner as for the riving knife.

The clearance on the beveled end is very close to the slider. If it rubs with the slider – use a small rebating block plane to create clearance.

The holes in the drawing at either end, appear to be just slightly off. However, they are within range.

This throat plate is relatively easy to make and hence easily disposable once the zero clearance is lost.
My plan is to make several. Each blade will likely have its own plate. Once a new plate is leveled, I will preserve its position with thread lock. The plate can then be removed and put back in place with minimal releveling.

I did not route on the underside clearance for tilting the blade – I will likely do those cuts with the stock Fleder plate. Although, if I find I am often tilting the blade to a specific angle, like 45Β°, I will go back and route the clearance and dedicate that insert to that specific angle.
  •  

Rafter Tail Tables Part 5 : Routing the Top and Thoughts on Finishing

2 September 2022 at 14:49

πŸ’Ύ

This series has been a step back in time. The videos were originally produced in the Popular Woodworking Studio in Cincinnati. The rights have recently reverted back to me .
In this segment I cover cutting out the top and a short discussion on finishing.
To follow along and/or build this piece start with Part 1 of this series. The Woodworking Plans are available at my website: https://furnituremaker.com/product/rafter-tail-table-plans/


This concludes the Rafter Tail Tables build.
  •  
❌